We’ve started carrying the OXI ONE at Takazudo Modular, so I decided to write a text-based guide for the OXI ONE. I’m also preparing video content, but here’s the text version in the meantime. I’ve received requests for Japanese-language resources, and since there’s a lot to cover, this will be a multi-part series.
The official manual is available below, in English only:
In this article, I’ve summarized the content in my own way, with the primary goal of giving first-time users a rough understanding of how to use the OXI ONE. As such, some detailed features are omitted. For complete feature documentation, please refer to the official manual.
Note that this article was written based on OXI ONE firmware version 3.9.3, and some content may be updated in the future. (I’ll update this article when I notice changes.)
Also, if you have any questions about the OXI ONE, feel free to join the Takazudo Modular Discord community linked below. I should be able to answer basic questions there.
- What the OXI ONE Is
- Prerequisites
- Track Selection / Playback and Stop
- The 4 Encoders and Track Settings
- Sync Modes
- Placing Notes in Mono Mode
- Track-Wide Settings
- Per-Note Settings
What the OXI ONE Is
So let’s get into the OXI ONE guide. …But first, a brief overview of what the OXI ONE actually is.
The OXI ONE is this electronic instrument! It’s a sequencer — a device specialized in continuously changing MIDI and gate/CV signals. In other words, it doesn’t produce any sound on its own.
The standard version has white pads, and the limited black version has black pads. We sell both on our Mercari Shops page:

I personally opened and used both for photography purposes, and I found the white version easier to see the pad colors on. However, the black version looks cooler (subjective opinion). The black version is apparently a limited edition, so I’m not sure how long it’ll be available. Choose based on your preference — the internals are exactly the same!
Takazudo’s Impressions of the OXI ONE
I wrote various details in the Mercari Shops product description, so please check that out too. But since listing this product, I’ve been extensively using the OXI ONE daily to create this guide. I’ve also received various questions from customers after launch, and answering those has deepened my own understanding of the OXI ONE.
With that experience in mind, let me share some brief thoughts. Compared to many modular synth modules, this is quite a complex device with many capabilities. One of the great things about modular synths is that you can just turn a knob or move a slider and the sound changes — that’s fun. There are complex, feature-rich modules too, of course.
Even with sequencers, there are simple ones with just 8 steps or so that still offer surprising possibilities. I find it really enjoyable to combine various simple modules in creative ways. Compared to those, the OXI ONE is definitely on the complex side.
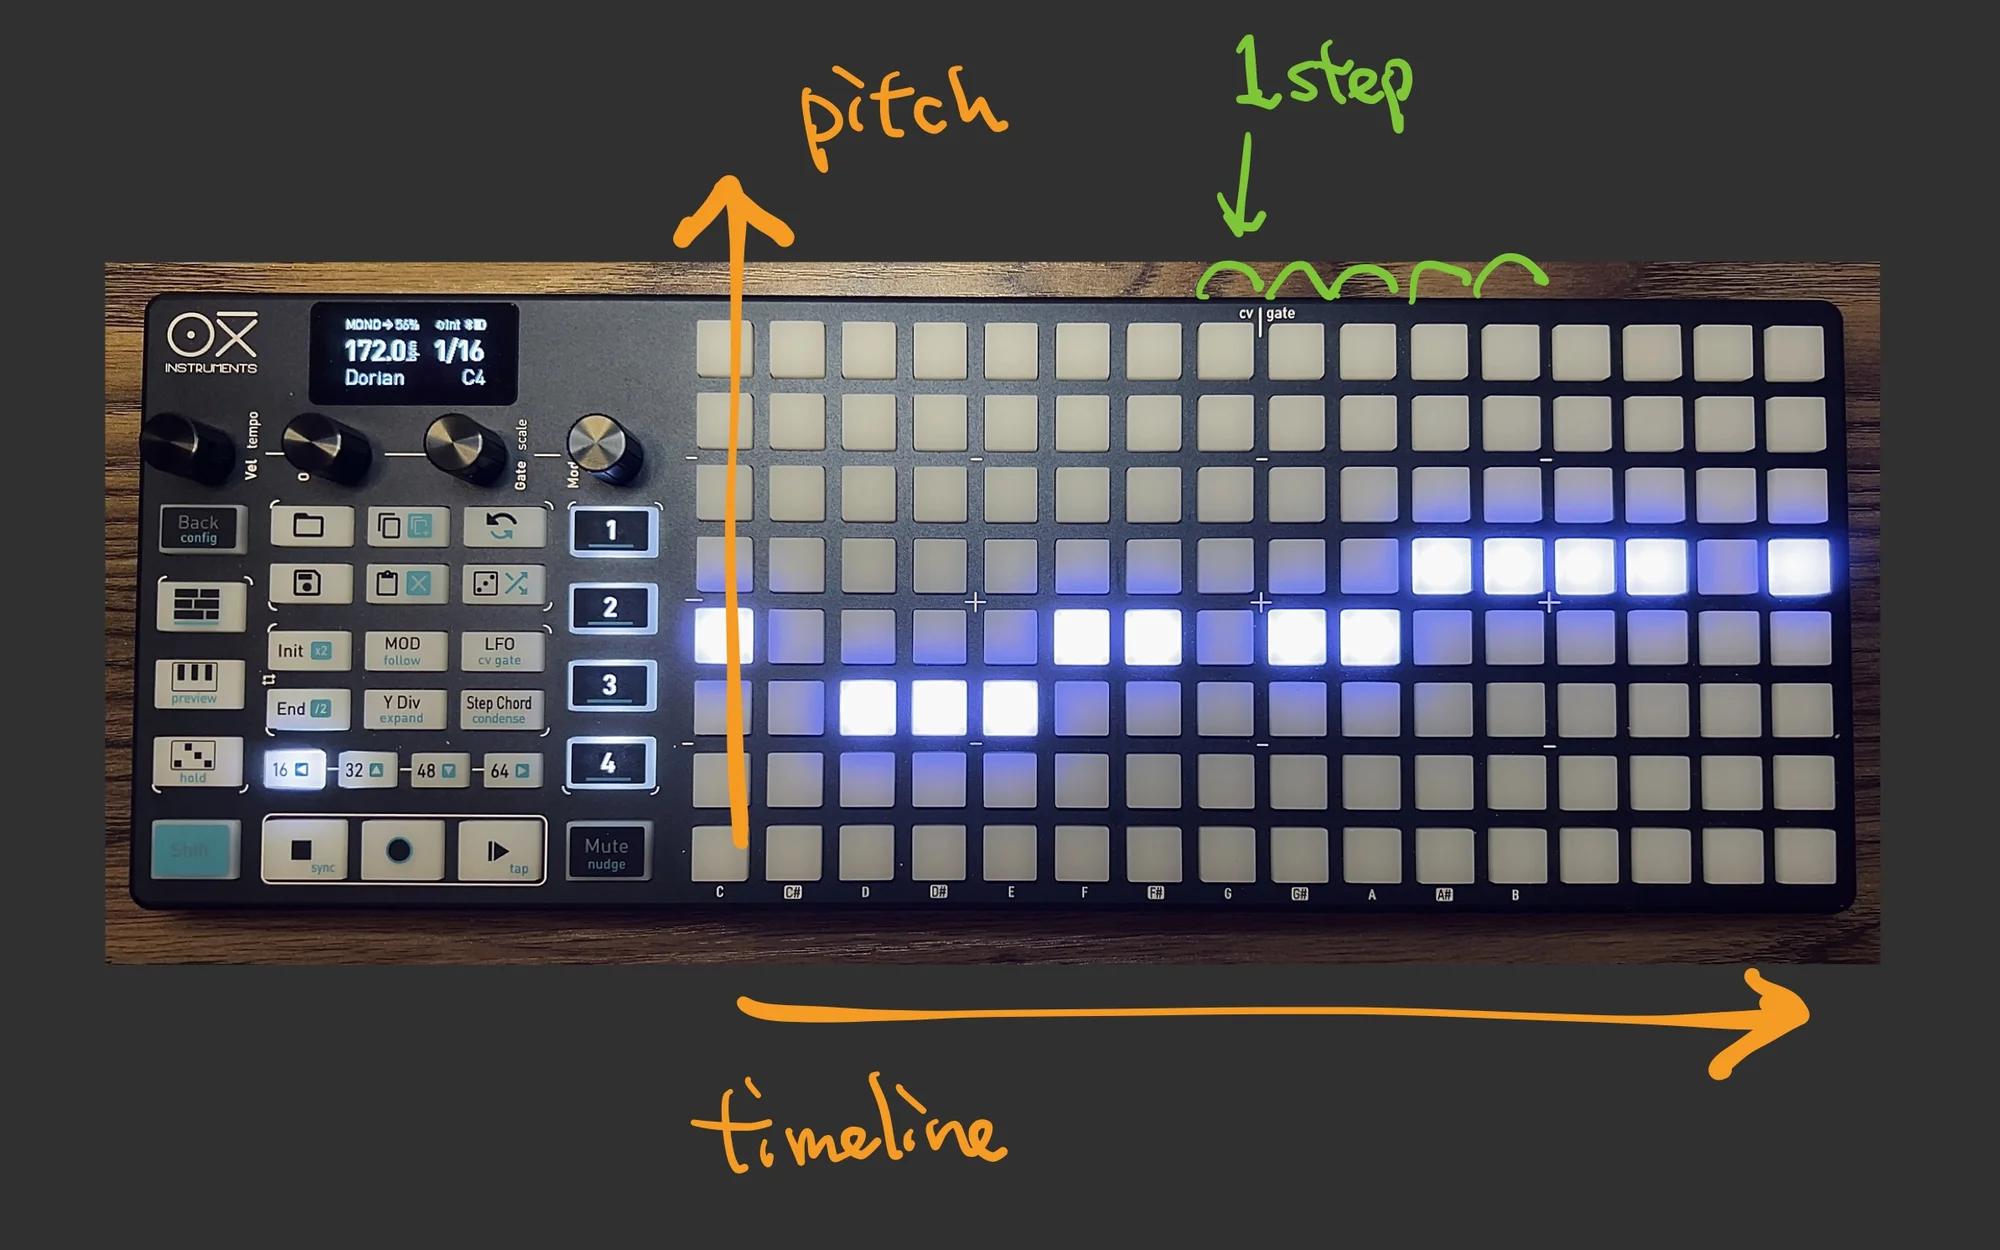
However, I personally feel the OXI ONE maintains a balance where it doesn’t cross the line into “too complicated, forget it.” The basic concept doesn’t change: an active timeline moves from left to right, and when it hits an illuminated pad, it outputs a gate or MIDI note.
Also, one reason modular users might initially feel they don’t need the OXI ONE is that the Y-axis represents pitch and the X-axis represents the timeline.
The reason Takazudo thinks modular users might feel this way is that one of the things I find great about modular synths is the ability to sequence pitch control (CV) and note timing (gate) separately. From that perspective, it’s natural to think, “Oh, it’s just another piano-roll-style sequencer. And it’s expensive for that.”
If that’s you, I’d like to point out that the OXI ONE’s (in my personal opinion) main features are Multitrack Mode and Modulation Lane.


From a modular perspective, it can output 8 gates and 8 CVs. But if you want to control CV patterns of any significant length, don’t you end up needing a modular setup with a lot of faders and knobs? That’s fun in its own way, but looking at the Modulation Lane photos above — the feature is exactly what it looks like: the height of the illuminated section corresponds to the CV voltage level. I really like this kind of clear, horizontal timeline-based CV control. You can make it as short as 8 steps or 4 steps.
Being able to use 8 of these Modulation Lanes simultaneously, plus 8 gate sequences at once — isn’t that remarkably capable?
So after spending all this time with the OXI ONE for the guide, I’ve started thinking this could be my main sequencer. That’s the level of enthusiasm I’m bringing to writing this guide.
Prerequisites
For now, I’ll be writing from a MIDI perspective. This is because MIDI has more parameters to work with, and the OXI ONE has settings for these throughout its interface. Also, while I’ve written quite a bit from a modular perspective so far, I want this to be useful for people coming from a DAW/DTM background as well.
Whether you’re into DTM or modular, I think you can get a performance-like feel out of this device. Using it even just to control software synths can offer fresh perspectives. I suspect the designers were at least somewhat conscious of its instrument-like qualities.
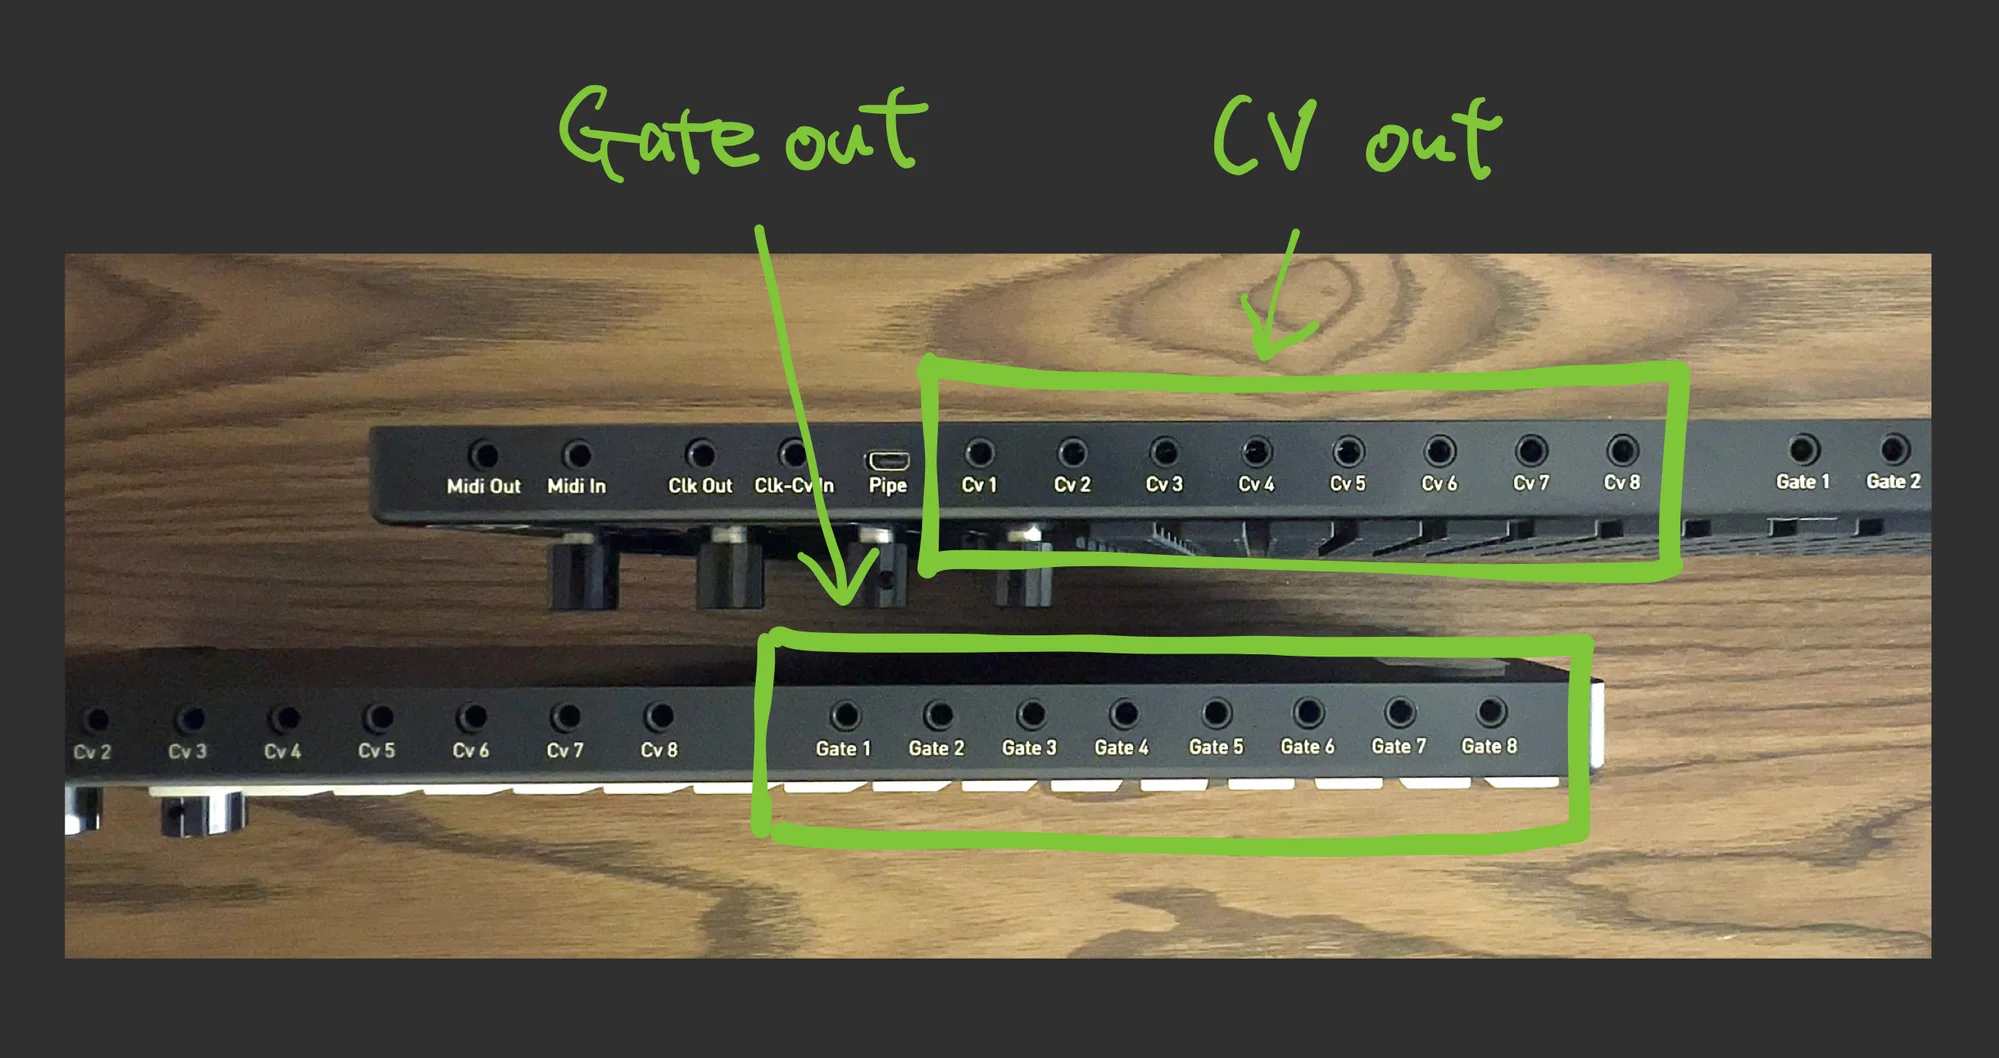
So I’ll be writing from a MIDI perspective, but for modular users — just think of all the various MIDI parameters (velocity, CC, etc.) as being available as CV and gate outputs. After covering everything, I’ll explain that part. The rear panel has CV/gate output jacks, and you can configure what goes where.
Track Selection / Playback and Stop
The first thing to understand is that the OXI ONE is a 4-track sequencer.
Each track has a selectable track type, which I’ll explain as we go, but for now, let’s use the simplest mode — Mono mode — on each track. This gives us 4 tracks of monophonic sequences.
Mono mode, as mentioned earlier, uses the X-axis as the timeline and Y-axis as pitch, allowing only one note per step.
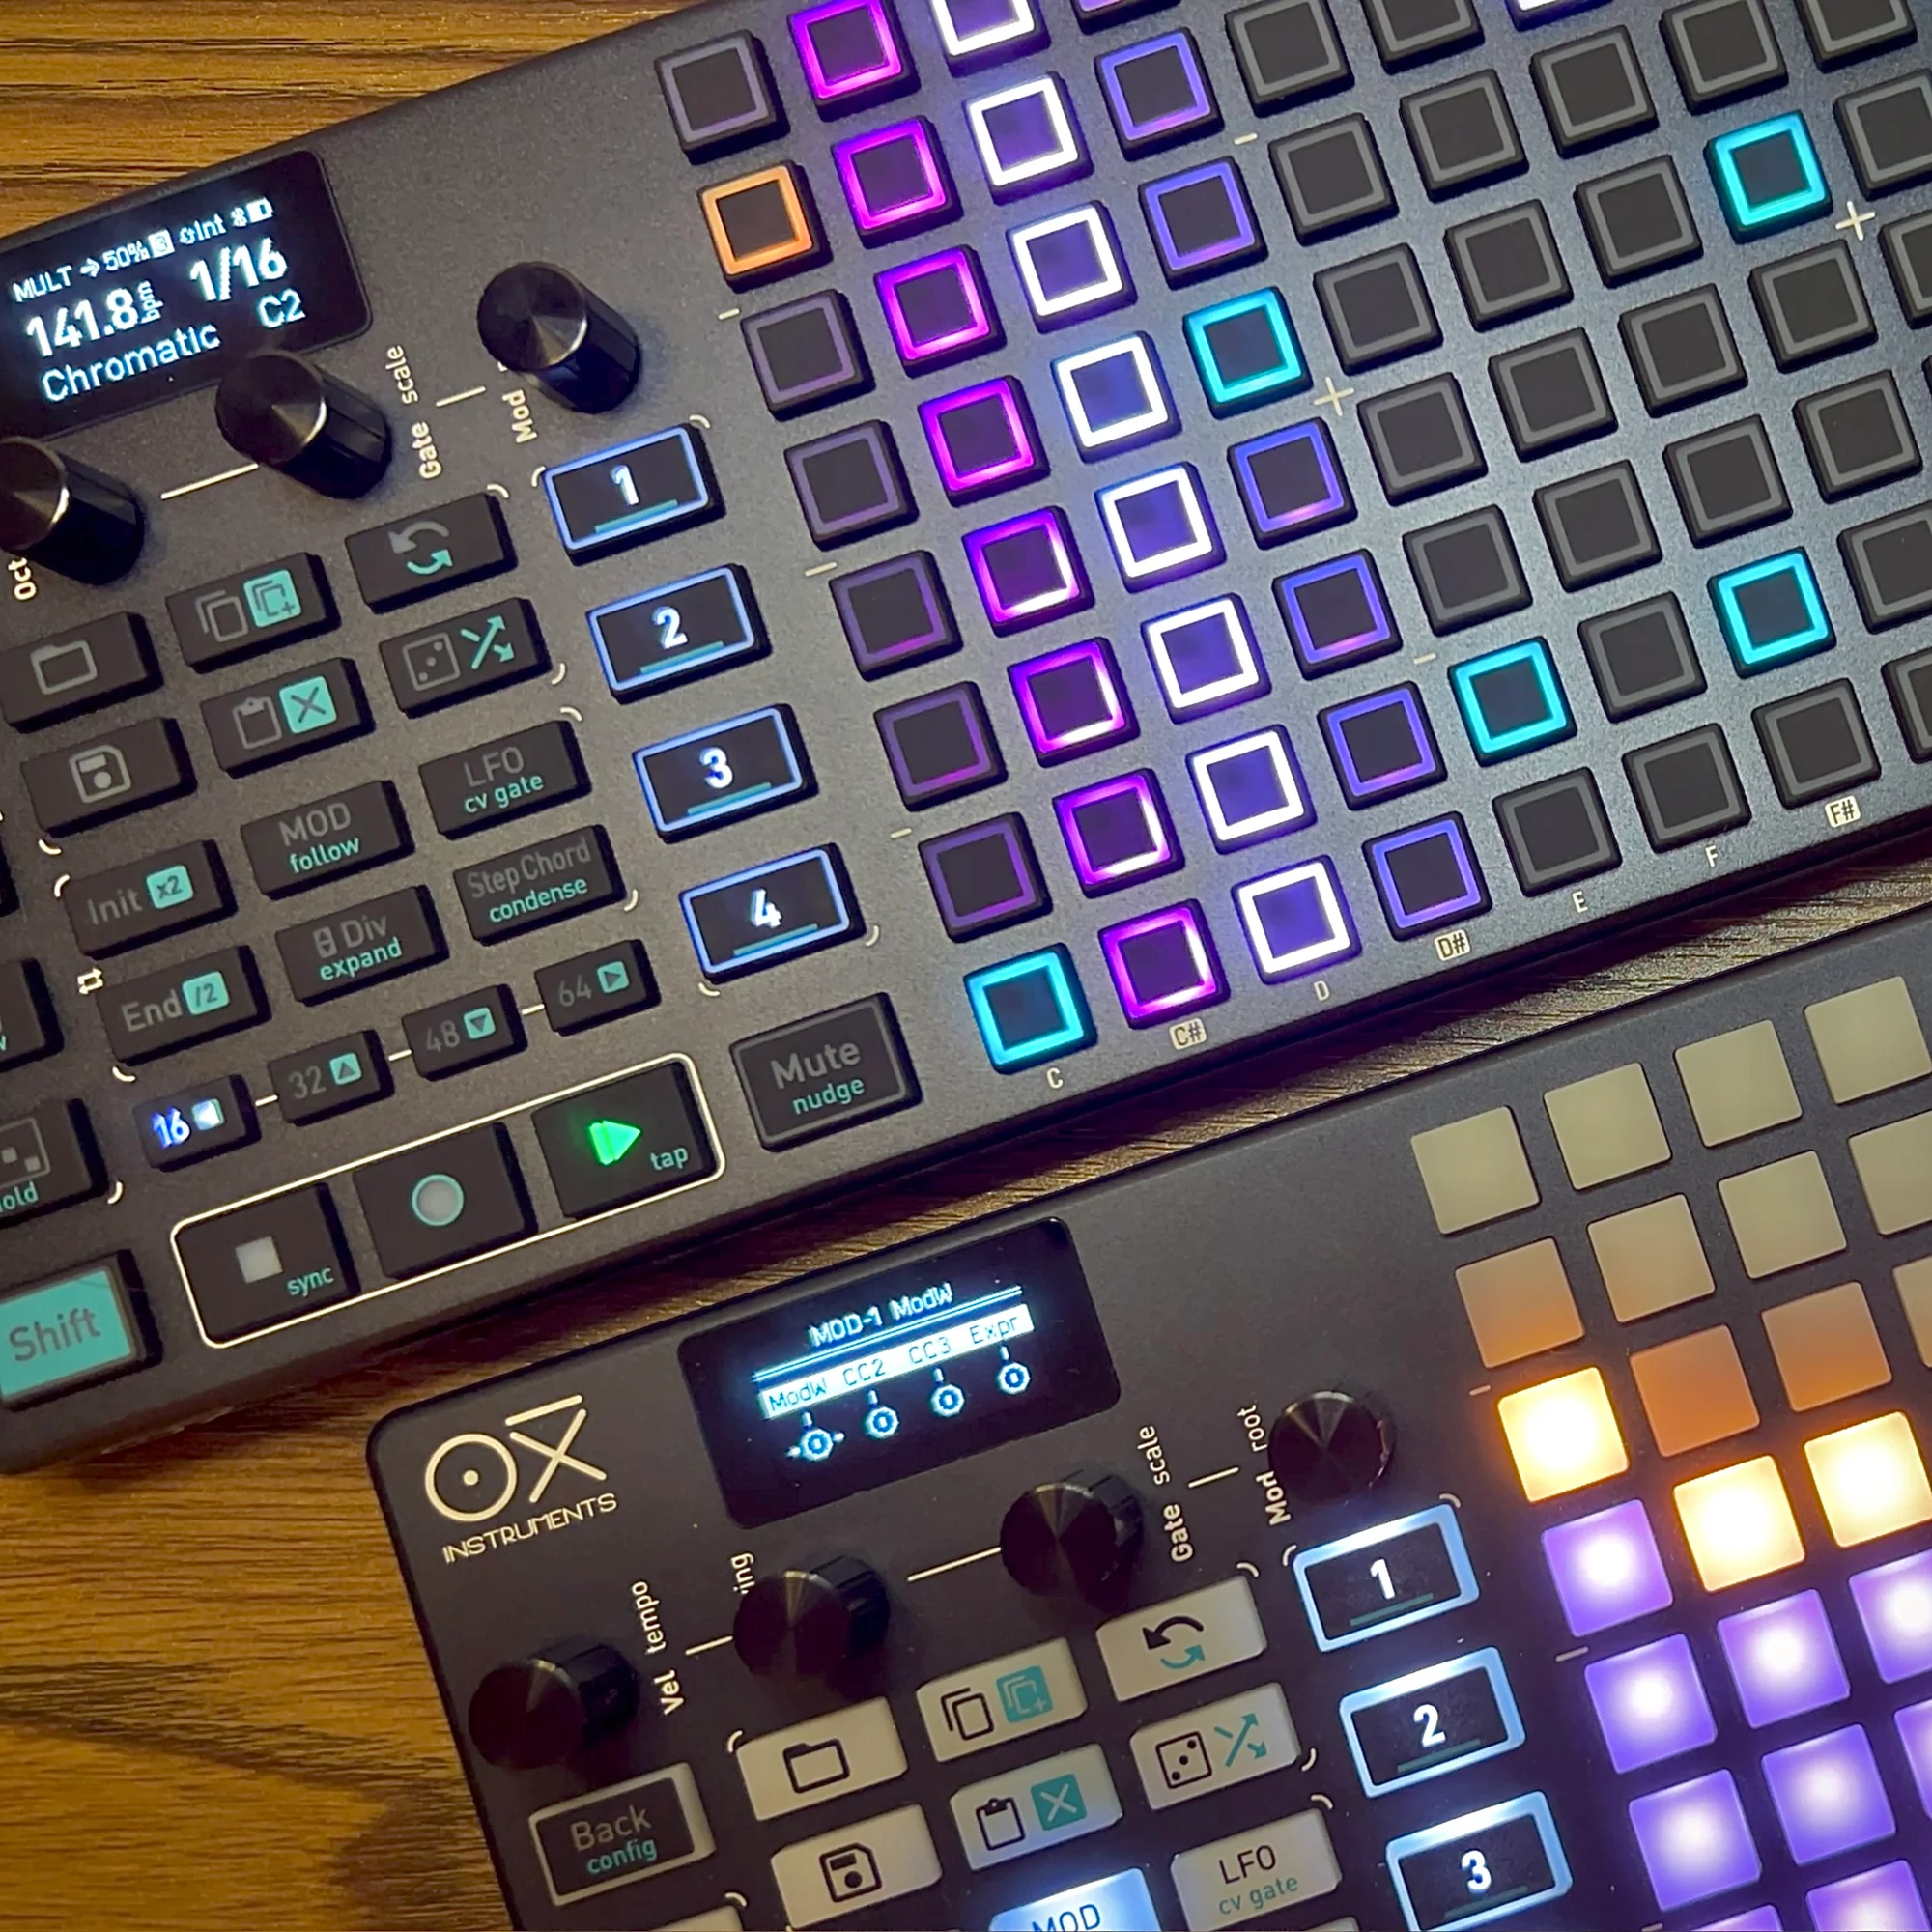
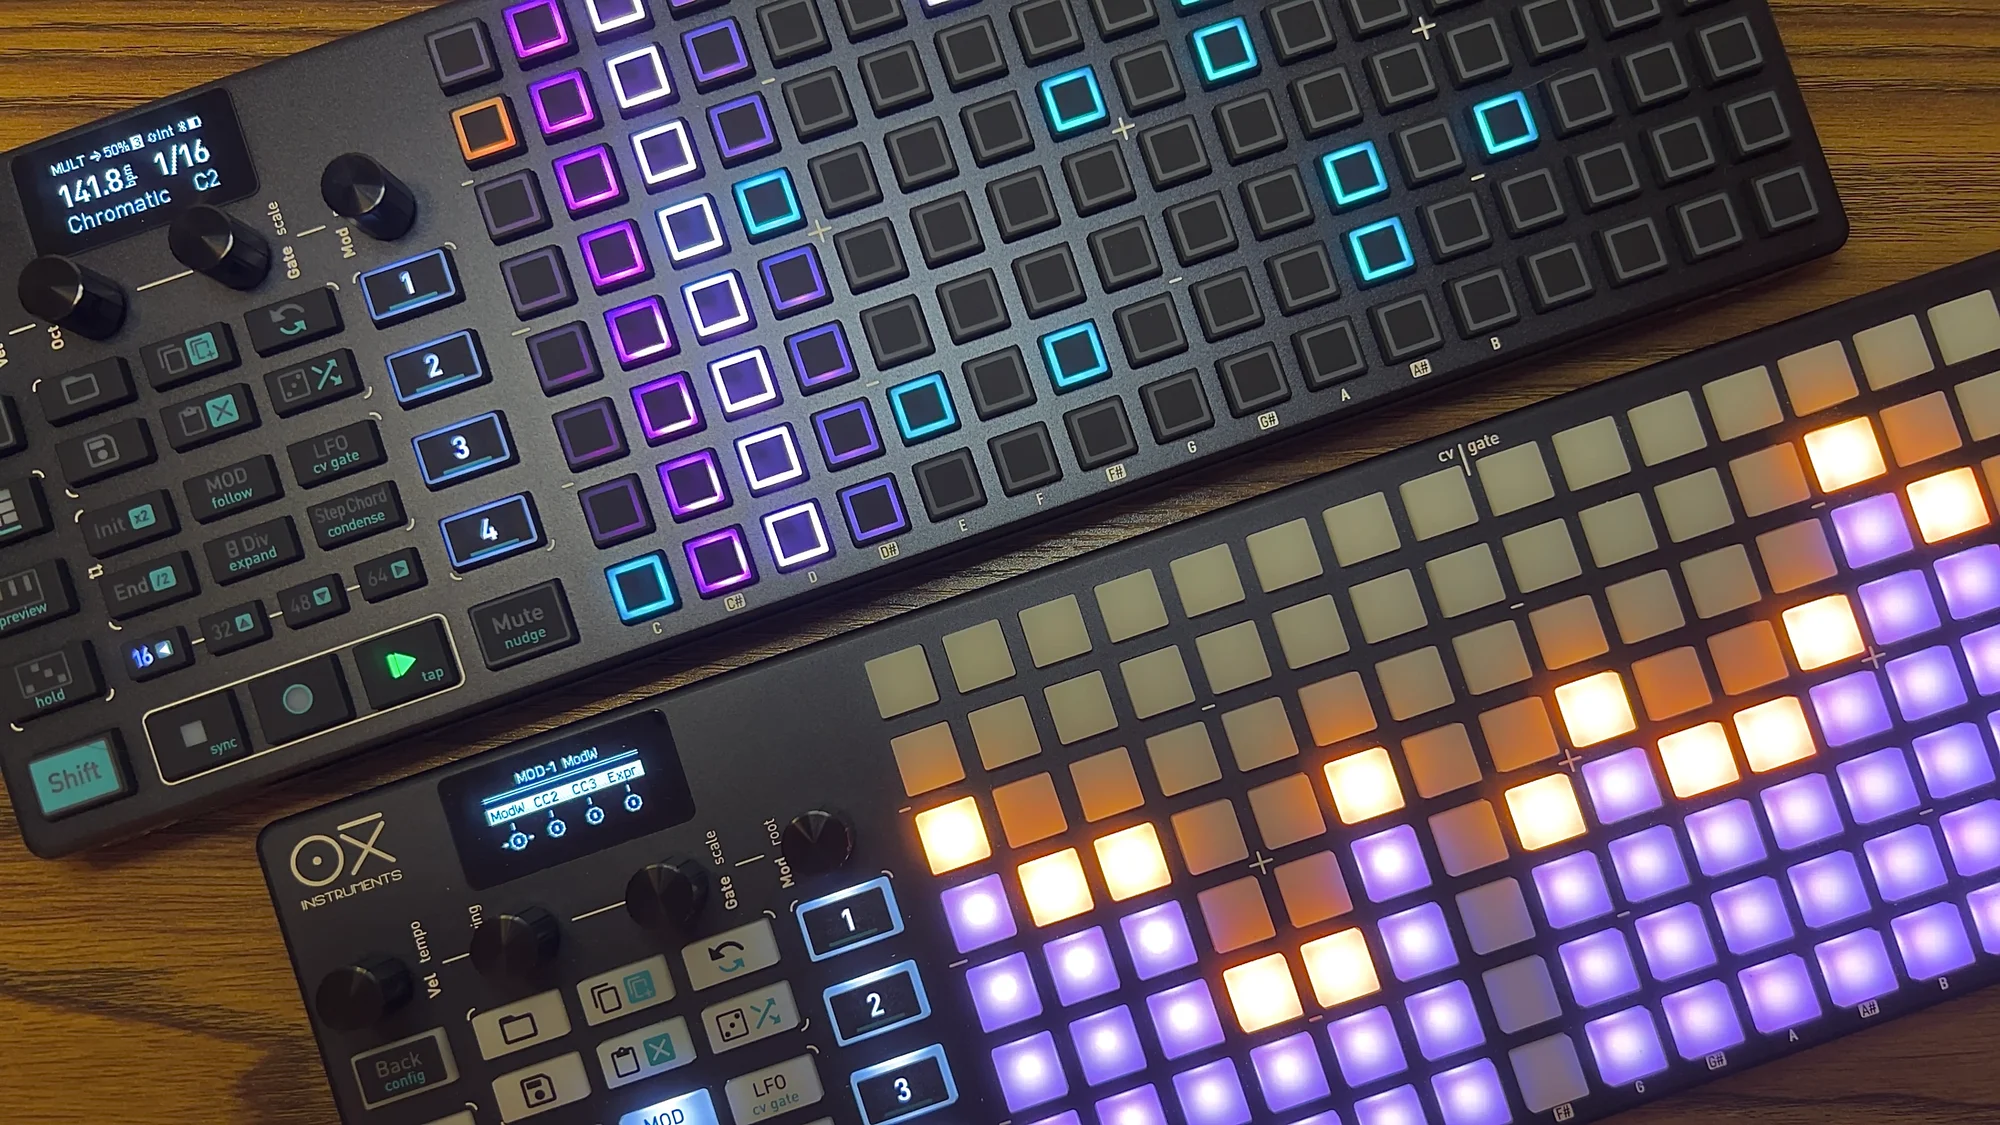
You can select these 4 tracks by pressing the numbered pads, and the right-side pad grid (which I’ll call the “grid” from here on) switches to show the selected track’s content.
Track 1…

Track 2…

Track 3…

Track 4…

…and so on.
Each track has various settings, but you can’t operate multiple tracks simultaneously. You press one of the 1/2/3/4 pads to select the track you want to edit, and then work with that track’s content.
Pressing a pad on the right-side grid toggles it ON/OFF. Press the Play button below, and the timeline starts moving from left to right.

Press the Stop button to stop.
The round Record button next to it will be explained later, but as you might expect, it records your real-time edits during playback.
Also, note the Shift button next to it — we’ll be using it shortly, so keep its location in mind.
The 4 Encoders and Track Settings
The four encoders are what you use to adjust various parameters on the OXI ONE.

Now, press Shift while pressing the Track 1 button, and the display will change to show “SEQ Setup” as shown below:
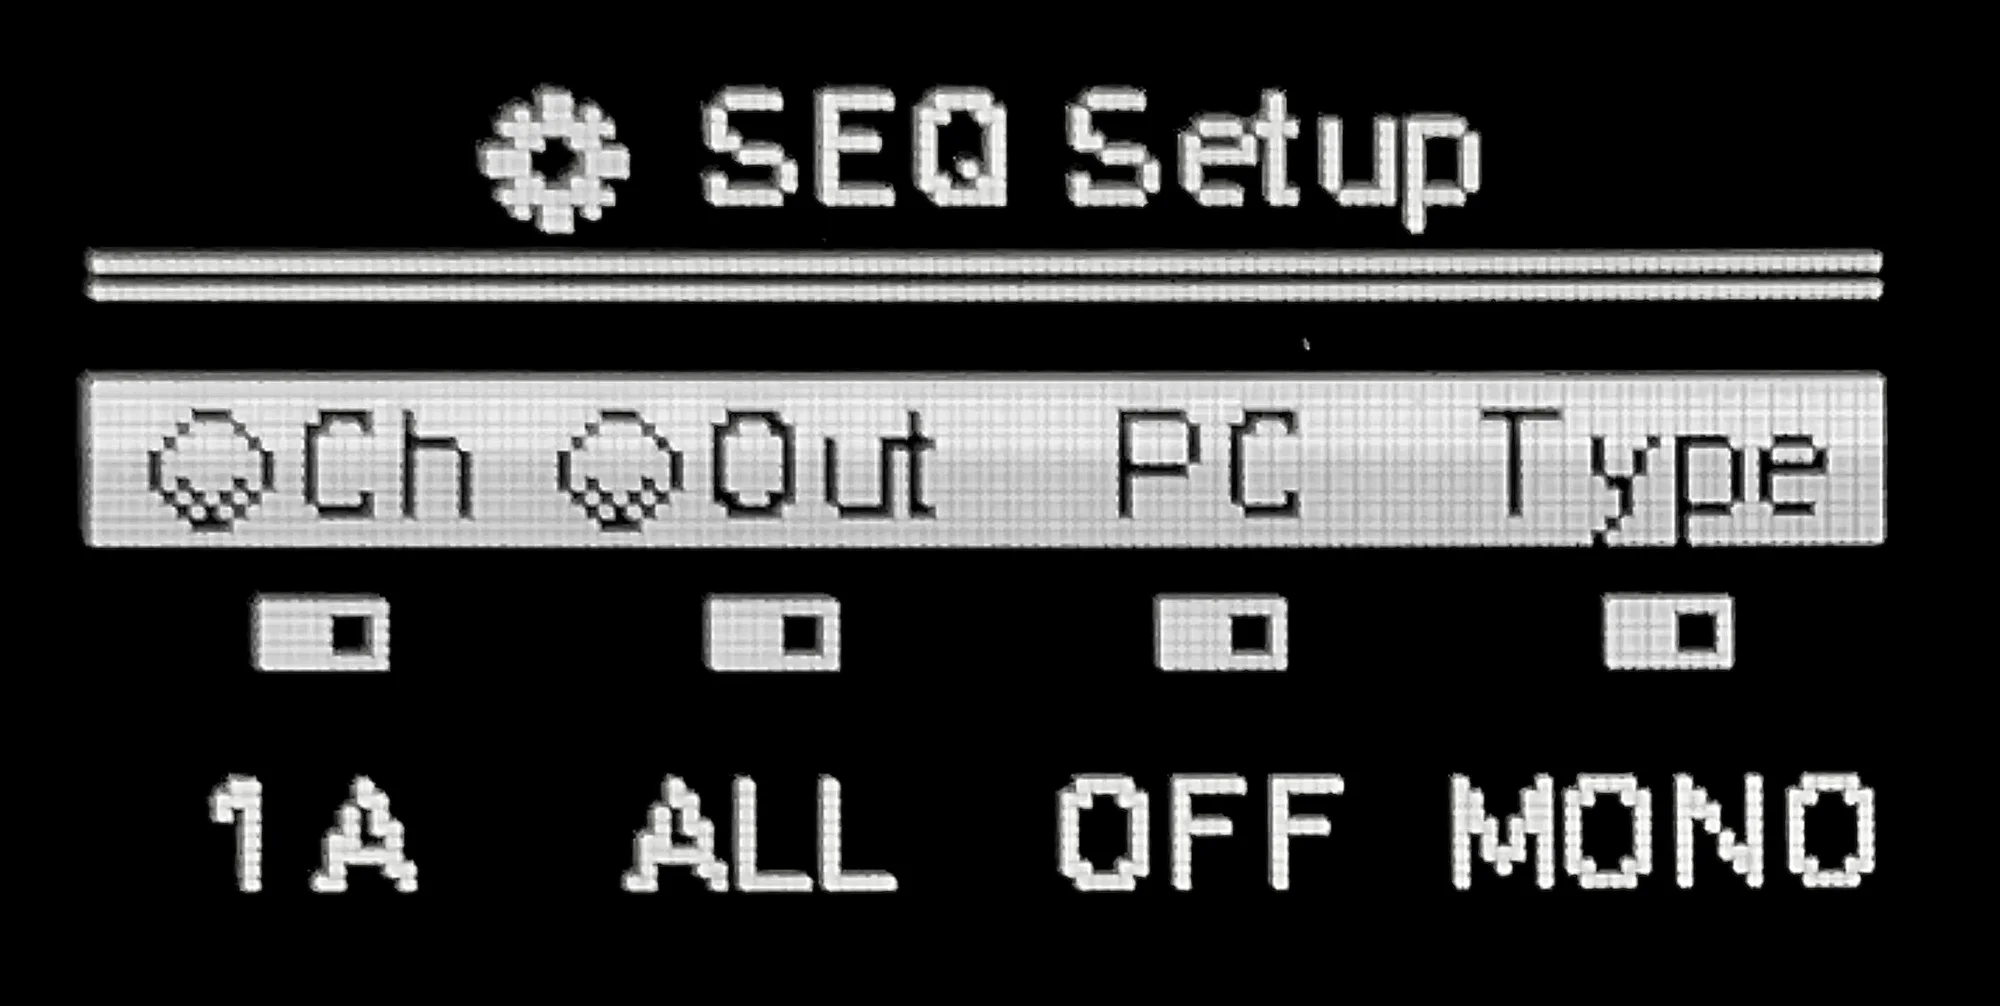
This is where you configure Track 1’s settings.
On the OXI ONE, most settings are configured through screens like this. The four items shown on the display correspond to the four encoders. From left to right, turning each encoder changes the following:
- 1st encoder: Global MIDI Channel (
Ch) - 2nd encoder: MIDI Output (
Out) - 3rd encoder: Program Change (
PC) - 4th encoder: Sequencer Mode (
Type)
The important ones here are the 1st (MIDI Channel) and 4th (Sequencer Mode). The 2nd is the MIDI output destination, and the 3rd is MIDI Program Change — you’d change these based on your MIDI device, but if you’re using modular/USB to connect to a DAW, you probably won’t need to change them.
Turning an encoder changes the parameter corresponding to that encoder.
In this article, I’ll explain the 1st item, Global MIDI Channel (Ch), and the 4th item, Sequencer Mode (Type).
Global MIDI Channel (Ch)
First is the Global MIDI Channel (Ch). Modular users can skip this section.
In the default state, the MIDI Channel (Ch) for the 4 tracks is set as follows:
- Track 1:
1A - Track 2:
2A - Track 3:
3A - Track 4:
4A
The OXI ONE’s MIDI output has 3 ports: A, B, and C, each with 16 channels. As you turn the encoder, the number goes up to 16 to become “16A,” then the next value is “1B.” Continue turning and it goes up to “16B,” then “1C,” and so on until “16C” where it stops.
If you’re not planning to control multiple MIDI devices, just using port A is fine. You’ll be sending MIDI on Channel 1, Channel 2, Channel 3, and Channel 4.
Oxi Split
The OXI ONE only has a single TRS MIDI out jack. So you can’t directly connect multiple MIDI devices, but with the OXI ONE add-on Oxi Split, you can split the TRS MIDI out into multiple MIDI outputs.
When using the Oxi Split, you need to enable it in config under MIDI -> OXI Split selection -> ENABLED.
Sequencer Mode
The 4th item, Sequencer Mode (Type), lets you choose the sequencer type for that track.
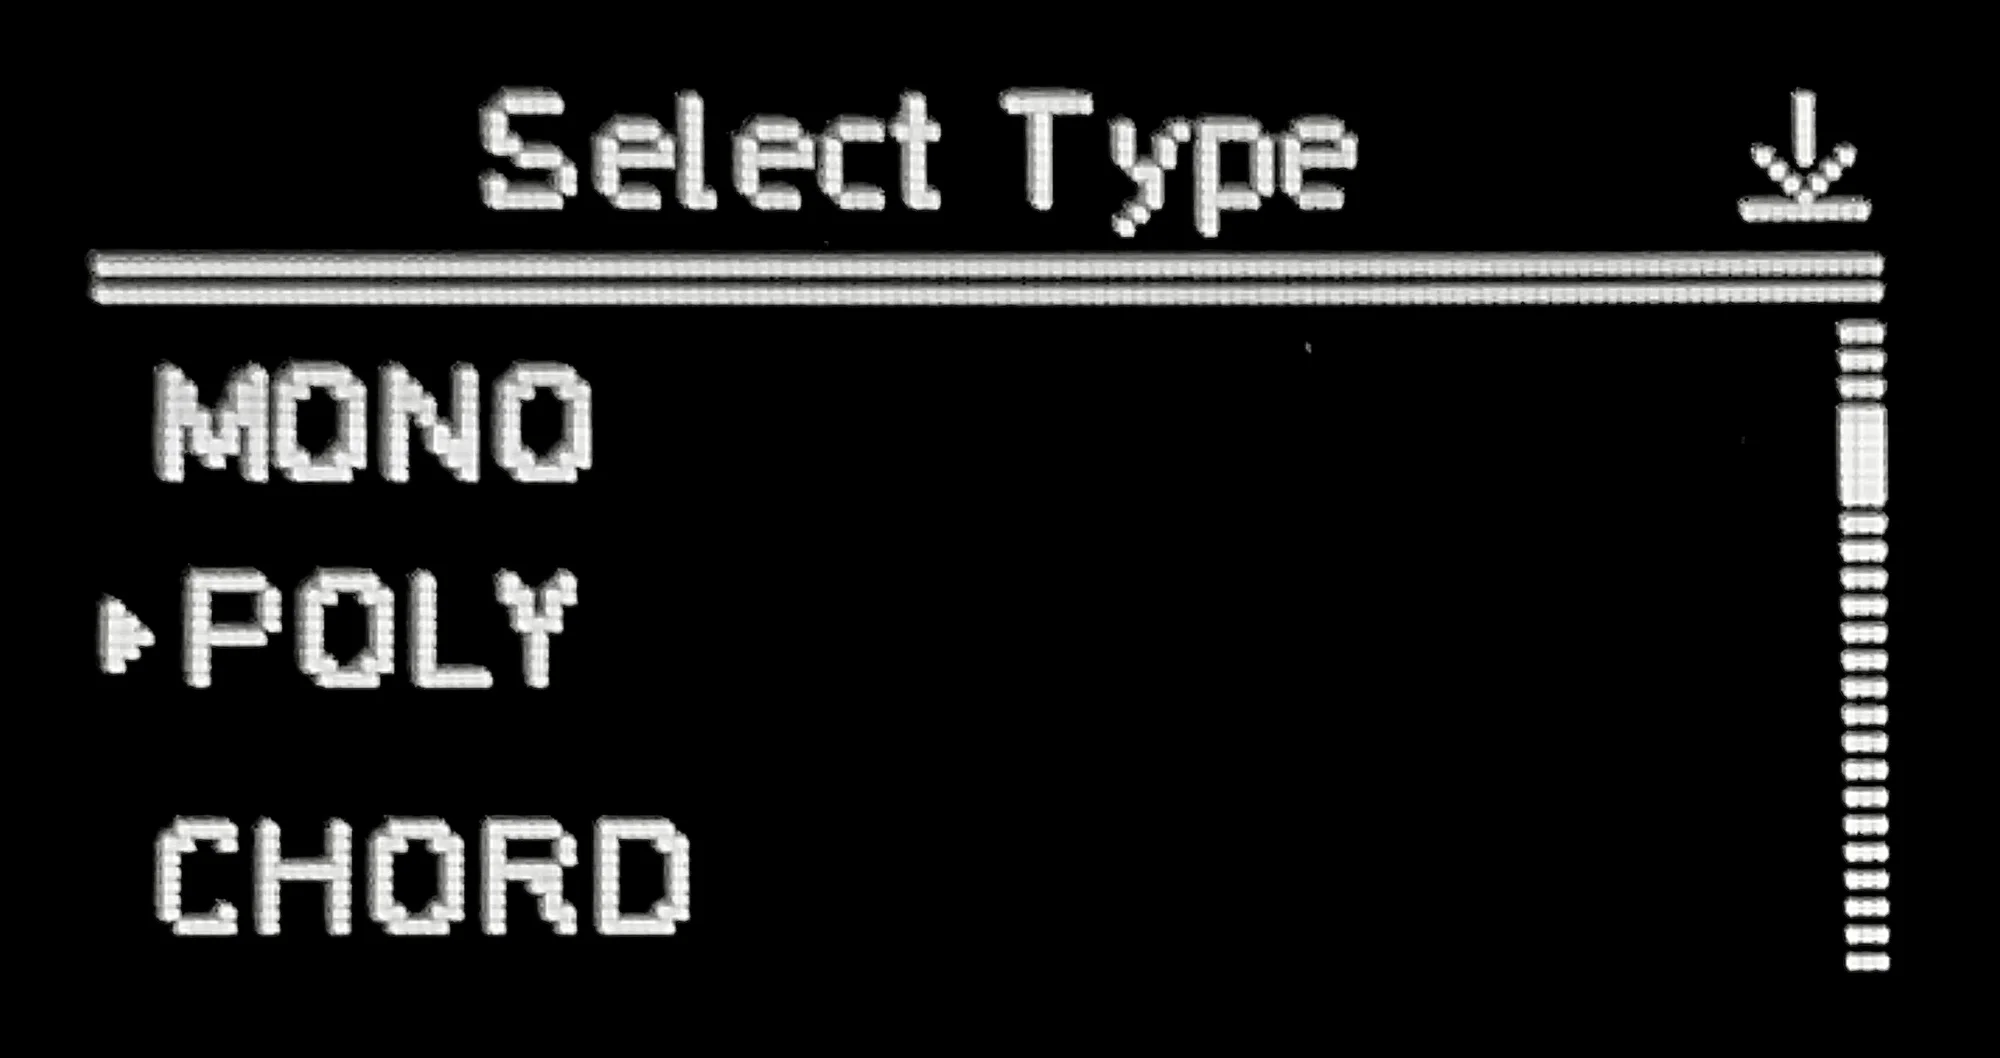
MonoChordPolyphonicMultitrackStochasticMatriceal
For now, I’ll be explaining Mono mode, but as you can see, there are quite a few sequencer types to choose from!
Turn the encoder to the option you want and press it in to confirm. From here on, I’ll proceed assuming Mono mode is selected.
Back Button
After configuring your track settings, press the Back button in the upper left.
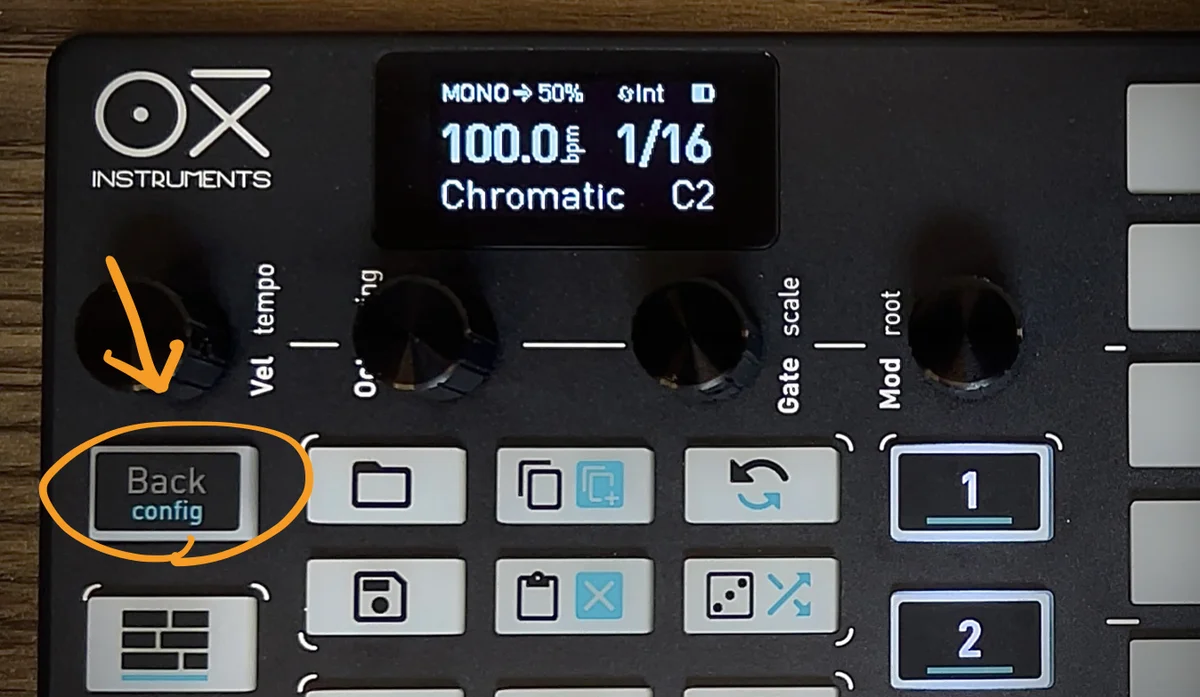
This exits the track settings screen. You’ll be pressing this Back button constantly, so if you accidentally press something and end up somewhere confusing, just press Back to return.
Sync Modes
When you press the Play button, you can see the active step moving from left to right on the timeline.

The OXI ONE is a sequencer and can’t produce sound on its own, so before going further, you need to understand how to sync it with other MIDI devices, DAWs, or modular gear.
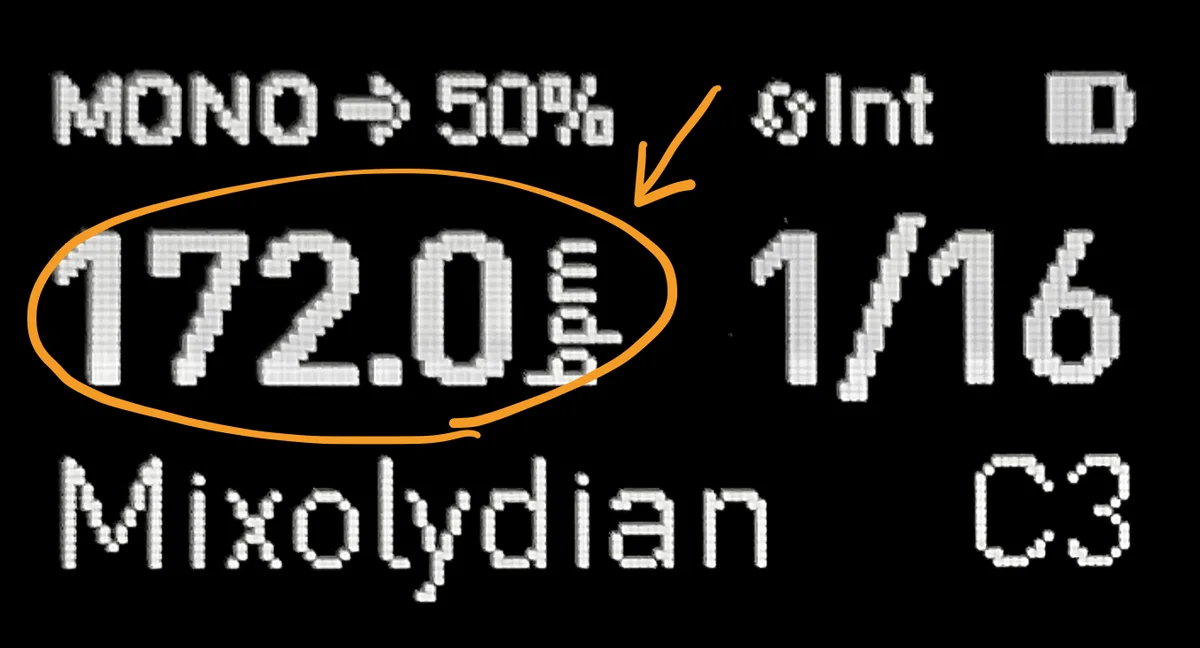
Press Shift while pressing the Stop button, and you’ll see the sync mode change in the upper-right corner of the display:

Blue Text on Buttons
By the way, the blue text written on buttons indicates the function assigned to that button when Shift is held. In this case, it’s “sync” (synchronization mode).

The full list of sync options is as follows:
Int: Internal. The OXI ONE acts as the clock master at its own set tempo.Usb: Connect via USB to a PC/Mac/iPad and receive clock from a DAW, etc.Midi: Receive clock via the rear TRS MIDI / Bluetooth USB connection.Clk: Receive analog clock from the rear Clk In jack.
It’s likely set to Int by default, so pressing Play will generate clock from the OXI ONE itself. If you just want to use the OXI ONE to control things, or if you want to control multiple pieces of gear or modular, select Int.
For DAW sync, choose Usb. This sync mode is for connecting to a PC/Mac/iPad.
To sync with another MIDI device’s clock signal, choose Midi. In this case, MIDI is received through the rear TRS MIDI jack. You can also connect to MIDI devices via Bluetooth.
To sync with another modular synth sequencer, choose Clk. When using Clk, the rear Clk-Cv In receives a gate signal from your modular, and the BPM is detected from the gate interval.
Placing Notes in Mono Mode
So let’s try making some sounds. Select Track 1 and tap some pads on the grid. They change color as shown below — these represent notes. Each vertical column represents a step, and since we’re in Mono mode, each step can only have one note.

Press Play, and MIDI notes are sent at the pitch corresponding to each illuminated pad’s vertical position.
You can also create longer notes by pressing and holding one pad and then pressing another pad in the same row further along. This creates a note spanning 2 or 3 steps.

Undo / Redo
While we’re here, it’s good to learn the Undo function. Pressing the Undo button reverts to the previous state.

Press Shift while pressing Undo for Redo — essentially undoing the Undo. Most operations can be undone, so if you accidentally changed something and aren’t sure what happened, just hit Undo.
Track-Wide Settings
You can place sequence notes like this, and each track has various settings you can configure. The four encoders are used for this, and the text next to them indicates what each one controls.

The text on the bottom indicates settings controlled by turning the encoder directly, while the text on top indicates settings controlled by holding Shift while turning.
- Top
temposwingscaleroot
- Bottom
velocity(Vel)octave(Oct)gate(Gate)modulation(Mod)
The top settings are track-wide settings, and the bottom ones are also track-wide, but they relate more to note-specific parameters. Let’s look at each one.
tempo
Tempo. This is the BPM. Turning slowly adjusts the first decimal place; turning quickly changes the value rapidly. While I said “track settings,” this is actually the exception — it’s a global setting. You can’t set different BPMs for different tracks.
swing
Swing is what you typically find on drum machines. It takes a straight rhythm like “ta-ta-ta-ta” and turns it into a shuffled “ta-ta ta-ta” feel.
scale

Scale. As mentioned, the vertical position on the grid represents pitch, and this sets the musical scale. For example, in Major C2, each pad’s pitch when activated would be as follows:

root

This sets the root note of the scale. For example, in Dorian D2, the pitches would be as follows:

The grid is restricted to only the pitches in the selected scale, which is very convenient.
Even if you’re not familiar with music theory, you can easily choose a scale and experiment to find one that suits your taste.
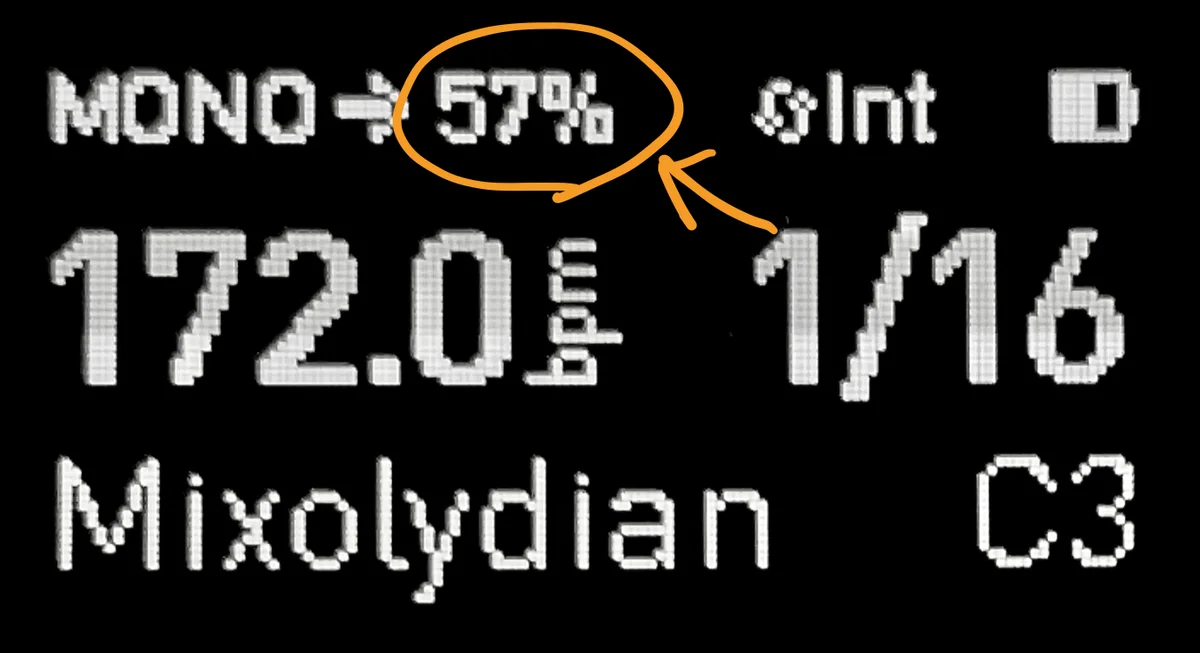
velocity (Vel)

This is the track-wide velocity setting. This one is a bit tricky: in the default state, velocity is set to 75. Turn the encoder slightly and the display should show something around “75-75.”
This “75-75” determines the velocity of newly placed notes. When it reads “75-75,” new notes will be set to a velocity of 75. As you turn the encoder, it changes to values like “60-60” or “43-43,” changing both existing notes’ velocity and the velocity of newly placed notes simultaneously. At “43-43,” new notes will have a velocity of 43.
Velocity can also be set per note (explained later). When notes with different velocities exist on the grid, you can shift them all up or down together.
This gets slightly complicated. If you’re not worried about velocity details right now, feel free to skim this, but for example, if you have the following 4 notes on the grid:
- velocity:
50 - velocity:
55 - velocity:
60 - velocity:
65
The encoder display would show “50-65.” Turning the encoder left to lower the values, the display would change: “42-57”… “38-53”… “30-45.”
I mentioned earlier that this number “determines the velocity of newly placed notes,” but it also represents the lower and upper bounds of velocity on the grid. For example, if you stop at “30-45,” the notes’ velocities will have changed to:
- velocity:
30 - velocity:
35 - velocity:
40 - velocity:
45
Here’s how it works:

When the lower and upper bounds differ, the velocity of newly placed notes will be set closer to the default value of 75 (this default can be changed in config). For example:
30-40: new note velocity ->4050-60: new note velocity ->60100-110: new note velocity ->100
Complicated, right?
In practice, when you want to work with velocity, just turn the encoder and sounds will get louder or softer — you’ll understand it intuitively once you try it.
Modular users may not use this much unless they specifically want to…
octave (Oct)

This changes the root octave. For example, changing C2 to C3 shifts the grid pitches from the C2-C3 range to the C3-C4 range.
gate (Gate)

This is the track-wide gate (note length) setting. The default is 50-50, which means that when you place a note, its length is half of one step. In the default state, one step is 1/16, so the note length would be equivalent to 1/32.
Turning the encoder right and increasing the value to 100-100 changes the display to TIE-TIE.

This indicates that the note length is 100% of one step.
Like velocity, gate can be set per note (explained later). When notes with different gate values exist on the grid, the 50-50 display shows the lower and upper bounds of gate values, and they can all be changed together.
modulation (Mod)

This adjusts the currently selected Modulation Lane parameter for all notes at once. What Modulation Lane is will be explained later, but for now, in Mono mode’s default behavior, turning this encoder sets the value for CC1 (MIDI Control Change 1).
Like velocity and gate, this is a lower/upper bound operation that shifts all values together. But since this won’t make much sense without understanding Modulation Lane, for now just think of this encoder as “a shortcut to the Modulation Lane.”
That covers the track-wide settings.
Per-Note Settings
As I’ve mentioned throughout, the parameters available as track-wide settings can also be set on a per-note basis. The method is simple: press and hold a note’s pad on the grid. The display will change as follows:
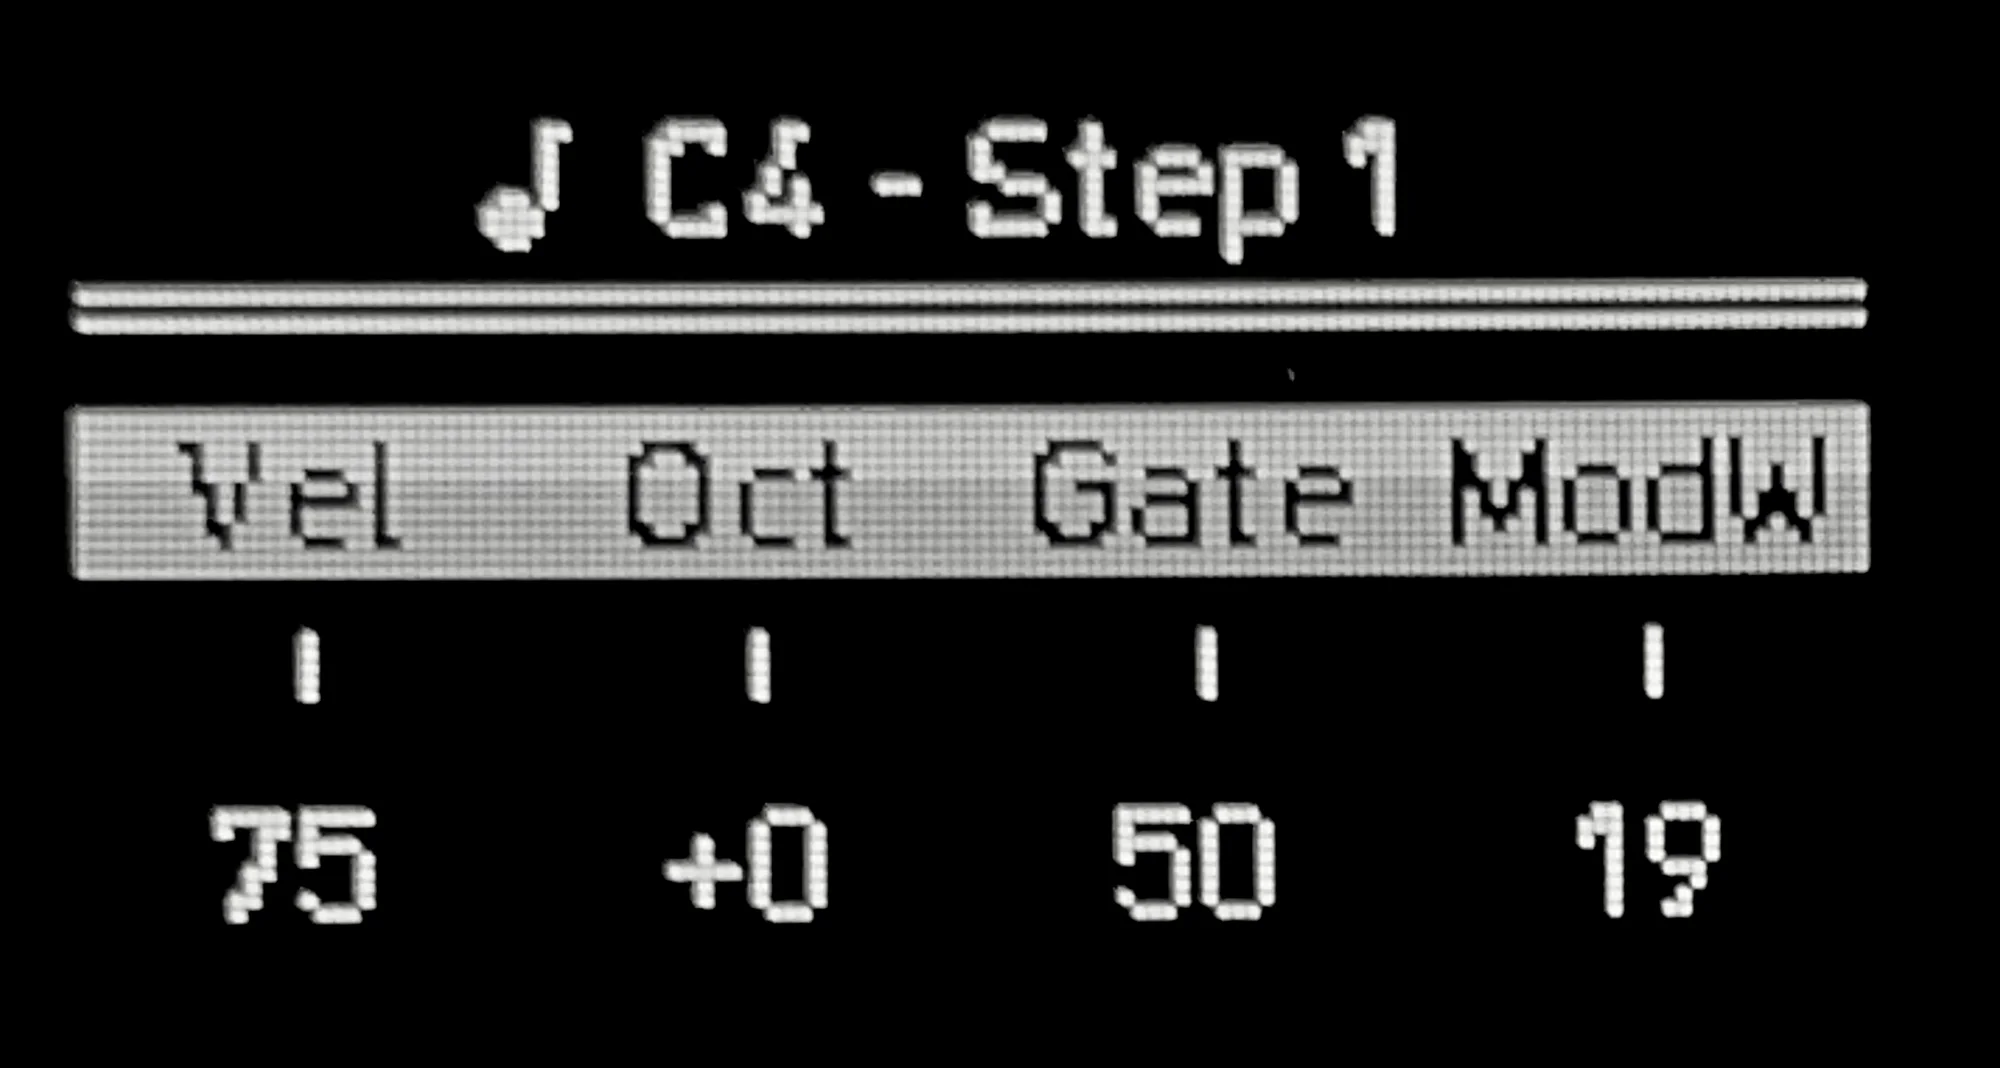
The items shown here are the same as the bottom row of track-wide settings, meaning the following can be set individually per note:
- velocity (Vel)
- octave (Oct)
- gate (Gate)
- modulation (Mod)
While holding the pad, turn the encoder for the setting you want to change, and the modification applies to that individual note. This lets you set velocity and octave on a per-note basis.
How much you use each setting depends on the person, but since the grid only has 8 vertical pads, octave is particularly useful. Notes whose octave has been changed using this feature are displayed with illuminated top or bottom row indicators, showing that the note belongs to an octave above or below the current view.

That’s it for Part 1. Part 2 is available here: