
I’m kicking off the SHIK Guide series.
SHIK is a manufacturer that develops high-quality, programmable MIDI controllers. Among their lineup, the N32B Slim stands out — it features 32 knobs, each capable of up to 4 macros, making it an incredibly flexible MIDI controller. A major highlight is its web-based editor, which lets you customize every knob’s behavior in detail.
In this series, I’ll be walking through how to use the N32B Slim based on the official tutorial videos and manual.
I’ve published a Japanese translation of the manual at the link below — check it out if you’d like more detail.
- What Is the N32B Slim?
- N32B Slim Product Details
- Accessing the Editor and Screen Layout
- MIDI Thru Settings
- Knob Mode Types and Settings
- Detailed Per-Knob Settings
- Output Routing Settings
- Preset Management
- Faceplate PDF Export
- Practical Tips
What Is the N32B Slim?
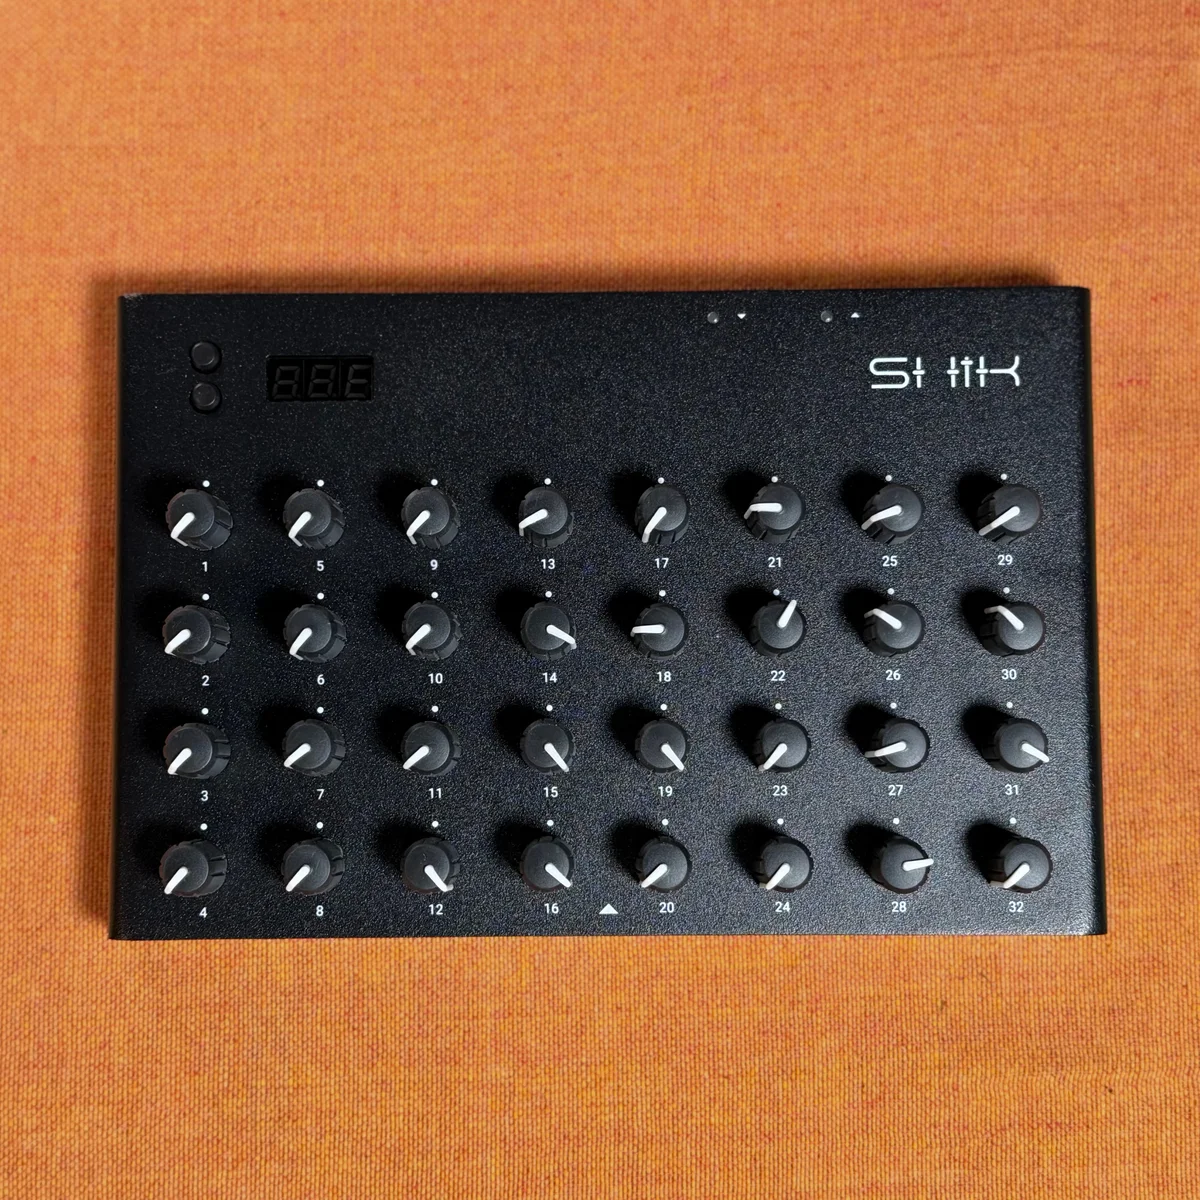
The N32B Slim is a programmable MIDI controller with 32 knobs, developed by SHIK. It packs a lot of functionality into a compact enclosure, all at an attractive price point.
Here are the key specs:
- 32 potentiometer knobs: The main control surface. Each knob is individually customizable
- 4095-step high resolution: Supports 14-bit high-resolution CC for precise control
- Up to 4 macros per knob: Send multiple MIDI messages simultaneously from a single knob
- 10 on-device presets: Store up to 10 presets directly on the unit
- USB-C connection: For connecting to PCs and Macs, and for power
- TRS MIDI in/out/thru: Type A specification. Compatible with traditional MIDI gear via DIN5 adapters
- 2 buttons + 3-digit 7-segment display: Used for on-device menu navigation and preset switching
What’s especially noteworthy is the very reasonable price for all these features. By combining the highly customizable web editor with the flexible MIDI routing provided by macros, the N32B Slim can handle a wide range of uses in both DAW and hardware setups.
N32B Slim Product Details
Accessing the Editor and Screen Layout
The N32B Slim editor is a web-based tool accessed at editor.shik.tech in your browser. Chrome is the recommended browser. When you open the editor with the N32B Slim connected via USB, it communicates with the device and lets you edit the knob settings.
The editor interface is divided into three main areas:
- Main View (center): Displays the N32B Slim’s knob layout. You can zoom in and out, and click on any knob to select it for editing
- Editor Controls (right panel): The area for detailed settings of the selected knob. Configure mode, channel, control number, range, and more
- Action Panel (left panel): Houses file-related functions such as saving/loading presets, syncing with the device, and exporting faceplate PDFs
MIDI Thru Settings
The N32B Slim functions not only as a MIDI controller but also as a MIDI hub. The Through setting in the editor lets you change the MIDI thru routing.
The available routing modes are:
- TRS to TRS: Passes MIDI input from TRS directly to TRS MIDI output
- TRS to USB: Forwards TRS input to USB. Useful for connecting MIDI gear without USB to your PC
- USB to TRS: Sends MIDI signals from USB to TRS output
- TRS + USB (both): Bidirectional routing combining TRS and USB
This feature lets you bridge MIDI messages between older MIDI gear without USB and your PC/Mac. MIDI thru settings are saved per preset, so you can use different routings depending on the situation.
Note that the N32B Slim V3 also has a dedicated hardware MIDI thru output jack. For daisy-chaining MIDI devices, using this hardware thru is recommended. The hardware thru operates independently of the editor settings and is always active.
Knob Mode Types and Settings
Clicking any knob in the editor’s main view brings up its detailed settings in the right panel. You can rename a knob by clicking the text at the top of the panel.
Each knob can be set to the following modes:
- Disabled: Deactivates the knob. No MIDI messages are sent
- Control Change: Standard 7-bit CC. Used for the most common MIDI controls
- Macro Control Change: Sends two CC messages simultaneously. Useful when you want to control multiple parameters with a single knob
- NRPN (Non-Registered Parameter Number): Extended messages for controlling parameters not covered by standard CC
- RPN (Registered Parameter Number): Controls MIDI-standard parameters such as pitch bend range and tuning
- High Resolution Control Change: 14-bit CC. Enables extremely smooth parameter changes with up to 4095 steps of resolution
- Program Change: Sends program change messages. Used for switching sounds or presets
- Mono Aftertouch: Controls the aftertouch value for a specific note
- Poly Aftertouch: Controls the aftertouch value for the entire channel
When you change the mode, the knob’s color on the unit also changes accordingly, giving you a quick visual indicator of which mode each knob is set to.
Detailed Per-Knob Settings
Beyond mode selection, each knob has several additional settings.
- Channel: MIDI channel. You can set it individually or use the device’s global channel
- Control Number (CC number): Specifies the control change number to send
- MSB Value: MSB value setting used in NRPN/RPN modes and similar
- Min / Max: Restricts the knob’s operating range. Handy when you want to limit output to a specific portion of the 0—127 range rather than using the full range
- Invert: Reverses the value. Use this when you want the value to decrease as you turn the knob clockwise
Output Routing Settings
Each knob’s MIDI message output destination can be configured individually.
- TRS: Send to TRS MIDI output only
- USB: Send to USB output only
- Both: Send to both TRS and USB
- No Output: No output
Since you can set different output destinations per knob, you can create flexible routings like “knobs 1—16 go to DAW via USB, knobs 17—32 go to hardware synths via TRS.”
Preset Management
The Action Panel on the left side of the editor handles preset saving, loading, and device syncing.
Saving and Loading Presets
- Load Preset: Loads a preset file (JSON) saved on your PC
- Save Preset: Saves the current editor configuration as a JSON file to your PC. You can give it a name for easy management
Preset files are stored on your PC, making them convenient for backups and sharing.
Writing to the Device
Clicking Store Preset writes the editor settings to the N32B Slim’s on-device storage. Select the target preset slot (0—9) and click Update.
It’s recommended to write to the device only after you’ve finished configuring your settings, rather than writing after every individual knob change. This helps keep the device’s memory in good shape.
Syncing with the Device
Clicking the Sync button loads a preset stored on the N32B Slim’s device into the editor. Select the preset slot you want to sync and click Sync.
One thing to keep in mind: knob names are not stored on the device itself. After syncing, the knob names will be blank. Since knob names are primarily used for generating faceplate PDFs, I’d recommend also keeping your preset JSON files saved on your PC.
Faceplate PDF Export
Clicking Export Face Plate generates a PDF file of the faceplate based on the current preset settings.
It creates a template with the names you’ve assigned to each knob laid out in position. Print it out and attach it to your unit, and you’ll be able to see at a glance which knob corresponds to which parameter. Definitely give this a try whenever you create a custom preset.
Practical Tips
Here are some tips for getting the most out of your N32B Slim:
- Always save presets to your PC too: Since on-device presets don’t include knob names, back them up as JSON files on your PC
- Take advantage of output routing: With per-knob output destinations, it’s easy to build a setup that controls both your DAW and hardware simultaneously
- Use it as a MIDI hub: By leveraging the thru settings, you can use the N32B Slim as a controller while also having it function as a MIDI signal router
- Make use of faceplates: Export a PDF for each preset, and you’ll never have to guess which knob does what during a live set or studio session
- Try High Resolution CC: The 4095-step resolution really shines with parameters that need smooth changes, like filter cutoff
That’s it for EP.1. In the next episode, we’ll look at how to use the N32B Slim in a real-world live setup.