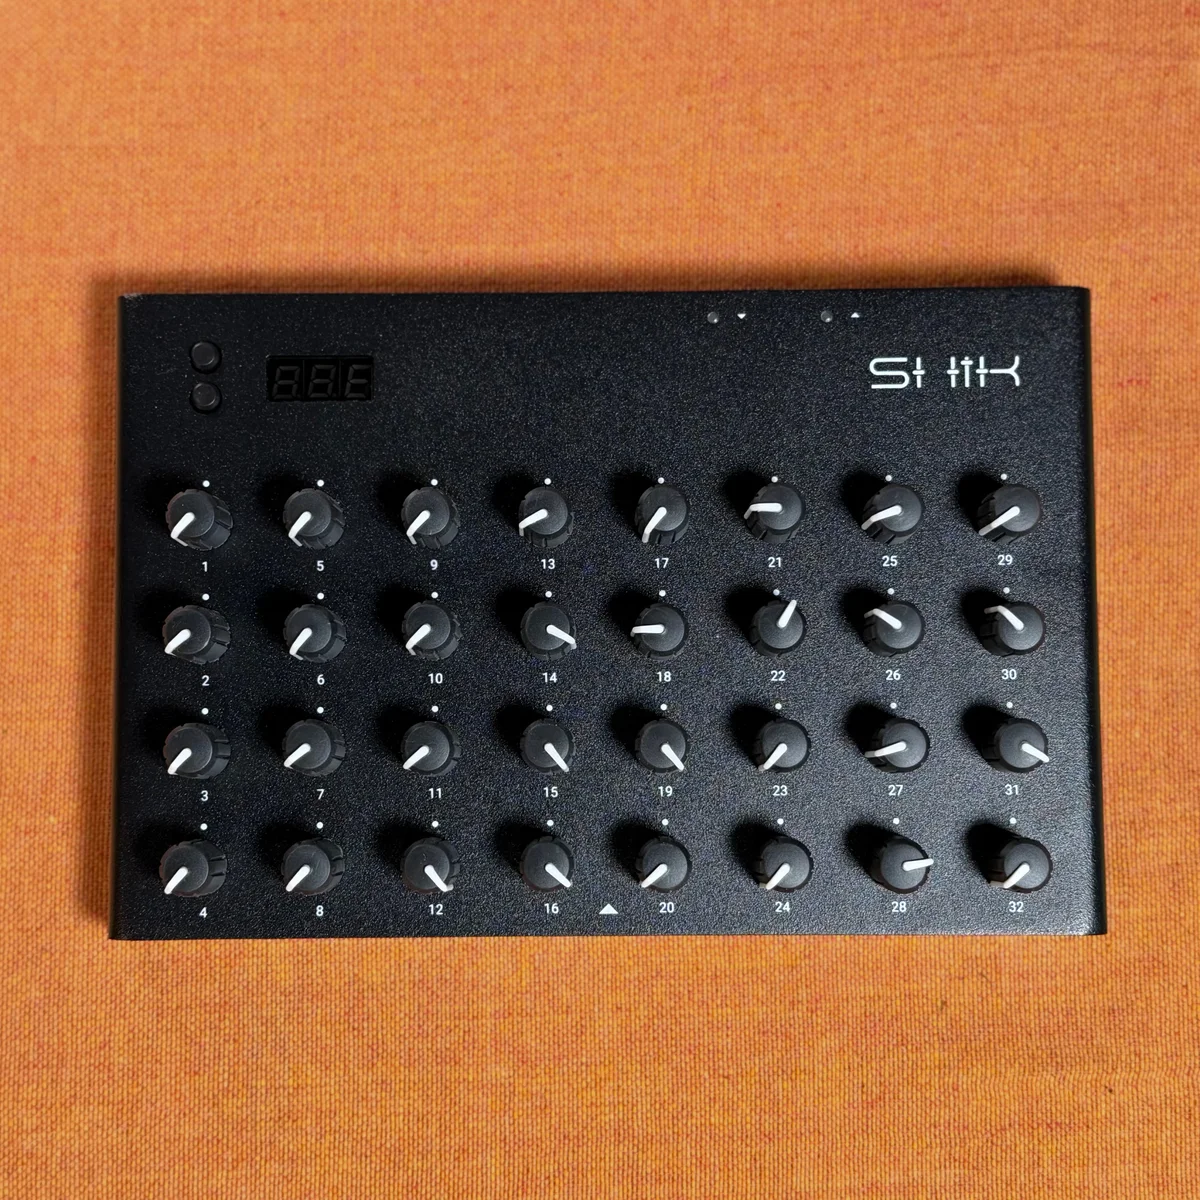
In EP.2, we covered the overall picture of the new web editor — screen layout, the role of each page, and the key changes from the old editor. With that foundation in place, this episode dives into what is arguably the N32B Slim’s defining feature: the macro system.
Assigning up to 4 macros to a single knob and controlling multiple MIDI messages simultaneously — once you understand how this works, the possibilities with the N32B Slim open up dramatically. In this episode, we’ll explain how macros work and then walk through concrete setup examples for DAW control and hardware synth control.
- How the Macro System Works
- Practical Example: DAW Control
- Practical Example: Hardware Synth Control
- Making the Most of Copy & Paste
- Range Limits and Invert
- Practical Tips
- Takazudo’s Thoughts
How the Macro System Works
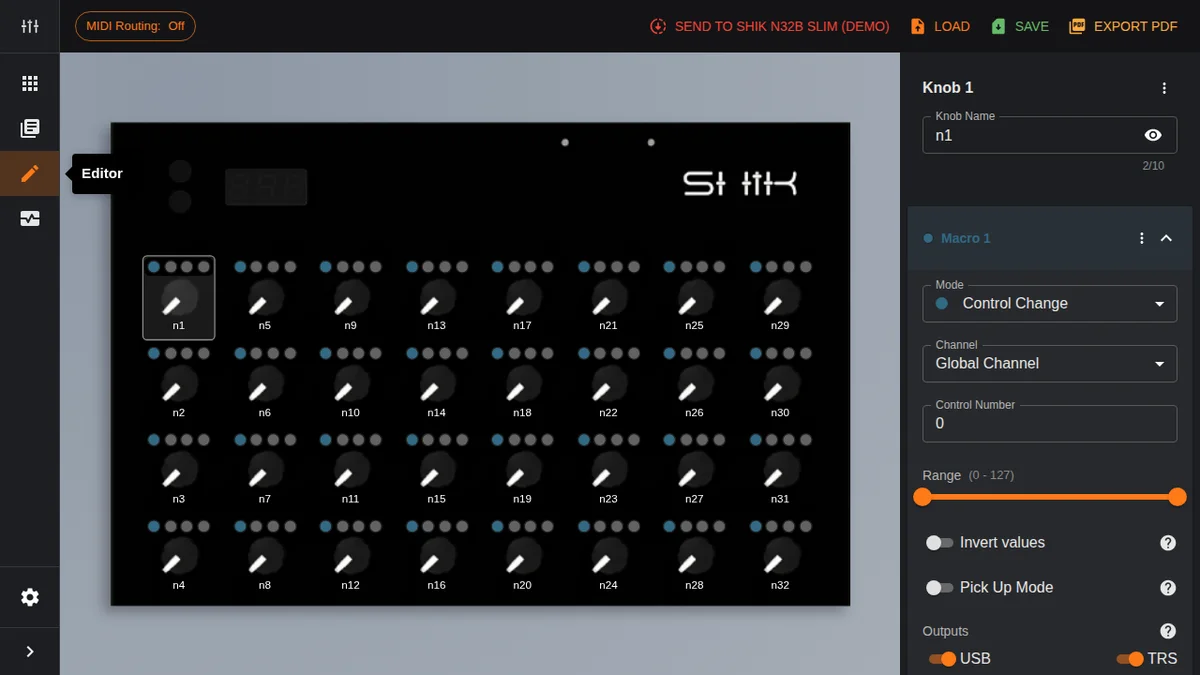
As mentioned in EP.2, the new editor provides four independent macro slots — Macro 1 through Macro 4 — for each knob. While the old editor’s Macro Control Change mode limited you to 2 CCs per knob, the new editor gives every knob access to all 4 macros right from the start.

Each macro has its own independent settings. Specifically, you can configure the following per macro:
- Mode: The type of MIDI message to send — Control Change, NRPN, Program Change, etc.
- Channel: MIDI channel (Global Channel or individually specified)
- Control Number: CC number or program number
- Range: Min and max value range
- Invert values: Reverses the knob direction
- Pick Up Mode: Prevents value jumps
- Outputs: USB and TRS output destinations
In the editor, macros are collapsed by default. Click on one to expand the accordion and reveal its detailed settings. A macro is active as long as its Mode is set to anything other than Disabled. In other words, you don’t need to use all four macros — just enable the ones you need.
This “1 knob = 4 macros” structure is the source of the N32B Slim’s flexibility. Turning a single knob can send up to 4 different MIDI messages simultaneously. On top of that, since each macro can have a different output destination and channel, you can send signals to different devices via USB and TRS at the same time.
Practical Example: DAW Control
Let’s start with an example of controlling two parameters simultaneously from a single knob in a DAW (Digital Audio Workstation).
The scenario: you want to move a synth plugin’s filter cutoff and resonance at the same time with one knob. CC74 for cutoff and CC71 for resonance are the commonly used CC numbers.
Setup Steps
First, click the knob you want to configure in the editor to select it.
Set up Macro 1 as follows:
- Mode: Control Change
- Channel: 1 (match this to your DAW track)
- Control Number: 74 (Filter Cutoff)
- Range: 0—127 (full range)
- Outputs: USB only

Next, expand Macro 2 and configure it:
- Mode: Control Change
- Channel: 1 (same channel as Macro 1)
- Control Number: 71 (Resonance)
- Range: 0—100 (limited because you don’t want resonance going all the way up)
- Outputs: USB only
There are two key points here.
First, both macros have Mode set to Control Change with the same Channel. By assigning different CC numbers on the same channel, a single knob controls two parameters simultaneously.
Second, Range can be set independently for each macro. You might want full 0—127 range for cutoff, but limit resonance to 0—100 to avoid self-oscillation at extreme values — and you can do exactly that.
Outputs is set to USB only for both since the signals are going to the DAW. This avoids sending unnecessary signals to TRS.
Practical Example: Hardware Synth Control
Next, let’s look at controlling a hardware synth via TRS MIDI.
Basic TRS Output Setup
When controlling a hardware synth, set Outputs to TRS only. The setup involves connecting from the N32B Slim’s TRS MIDI output to the synth via a MIDI cable (or DIN5 adapter).

A sample configuration looks like this:
- Mode: Control Change
- Channel: 2 (match the synth’s MIDI receive channel)
- Control Number: Check your synth’s manual for the corresponding CC number
- Outputs: TRS only
Controlling Multiple Synths Simultaneously
The macro system really shines when you want to control multiple synths from a single knob.
For example, you can have Macro 1 drive a soft synth in your DAW while Macro 2 drives a hardware synth connected via TRS — all from the same knob.
- Macro 1: Channel 1, CC74, output USB only — to the DAW soft synth
- Macro 2: Channel 3, CC74, output TRS only — to the hardware synth

Just turning one knob sends different messages on different channels to both USB and TRS. This is extremely useful if you’re running a hybrid setup (DAW + hardware).
By using different channels, you can send the same CC number to multiple synths without crosstalk. As long as each synth is set to receive on its assigned channel, everything works exactly as intended.
Making the Most of Copy & Paste
Manually configuring all 32 knobs one by one is, honestly, a daunting task. That’s where copy & paste comes in.
Per-Knob Copy & Paste
From the menu button in the upper-right corner of the knob settings panel, you have the following operations:
- Copy Knob: Copies all settings (all 4 macros) from the selected knob
- Paste Knob: Pastes the copied settings onto another knob as-is
- Paste Special…: Selectively paste only certain settings
- Reset to Default: Resets the knob to its factory state
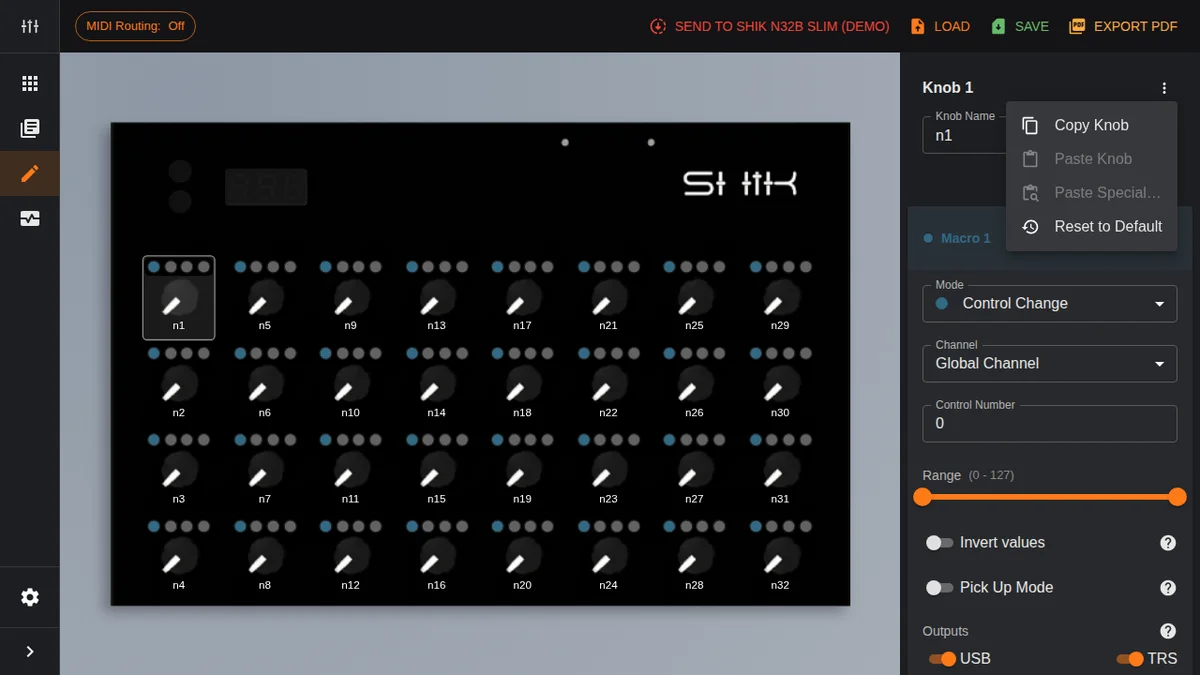
Copy Knob copies all four macros’ settings in their entirety. Use Paste Knob on another knob, and all macro settings are duplicated immediately.
Paste Special lets you selectively paste only specific items from the copied settings. This is handy when you want to, say, match the output settings across knobs or change just the channel.
Per-Macro Copy & Paste
Beyond knob-level operations, you can also copy and paste individual macros. Use the menu in each macro’s header area.
This lets you do things like copy the settings from Knob A’s Macro 2 to Knob B’s Macro 3. Use this when you want to flexibly rearrange macro settings between different knobs.
Efficient Workflow
Here’s an efficient approach for setting up all 32 knobs:
- Fully set up one knob first (macro configuration, channel, output, etc.)
- Copy Knob to copy it
- Paste Knob onto the other knobs
- Change just the CC number on each pasted knob
This way, you can quickly replicate knobs that share the same base configuration but send different CCs. Spend your time getting the first knob right, then expand with copy & paste — that’s the trick to efficient N32B Slim setup.
Range Limits and Invert
The Range and Invert values settings available per macro play an important role in practical setups.
Range (Value Limits)
Range uses a dual slider to set the minimum and maximum values. The default is 0—127, but you can narrow the range to suit your needs.

Range limiting is useful in several scenarios:
- As a safety measure: For parameters where extreme values cause audio problems — like filter cutoff or feedback amount — you can cap the upper limit
- For fine adjustment: Narrowing the range reduces the amount of parameter change per degree of knob rotation, enabling more precise control
- Preventing accidental changes during performance: In a live setting, you can set limits to prevent values from being pushed too high accidentally
Invert Values (Reversal)
Turning Invert values on reverses the relationship between knob direction and value change. Normally, turning the knob clockwise increases the value; with invert, clockwise decreases it.
At first glance this might not seem all that useful, but it gets interesting when combined with macros.
Crossfade Effect
Set up two macros on a single knob and enable Invert values on just one of them. Now when you turn the knob, one value goes up while the other goes down.

Here’s a concrete setup example:
- Macro 1: CC74 (filter cutoff), Range 0—127, Invert values off
- Macro 2: CC71 (resonance), Range 0—127, Invert values on
With this configuration, turning the knob clockwise raises cutoff while lowering resonance. Turning counter-clockwise does the opposite. A crossfade-like effect where two parameters move in opposite directions — achieved with just one knob.
This approach also works for dry/wet balance adjustments and blending between two effects.
Practical Tips
Here’s a summary of key points for getting the most out of the macro system:
- Leave unused macros Disabled: You don’t need to use all 4 macros. Leaving unnecessary macros enabled can cause unintended MIDI messages to be sent
- Keep output destinations to a minimum: If you’re only sending to the DAW, enable USB only. If only to hardware, TRS only. Enabling unnecessary outputs risks connected devices receiving unexpected messages
- Make full use of copy & paste: Perfect one knob, then expand with Copy Knob — that’s the most efficient approach. Just change the CC numbers afterward, and all 32 knobs can be configured in no time
- Use range limits as a live safety net: Especially in live environments, limiting the range helps prevent audio blowouts from extreme values
- Try creative uses of Invert: Beyond simple reversal, combining it with macros lets you achieve crossfade and balance adjustments
- Save your settings to your PC: As mentioned in EP.1, back up your preset JSON files to your PC. This is important to avoid losing macro settings you’ve spent time crafting
Takazudo’s Thoughts
The 4-macro system is capable of some seriously advanced things…! I think it’s the kind of feature that makes you want to sit down and brainstorm all the possible ways you could use it.
For example, we carry a module called OXI Meta in our shop. It’s designed for what are known as transition effects — applying a whole chain of effect changes all at once for dramatic scene switches, all within a single module.
The idea that such functionality is packaged into a single piece of hardware is something Takazudo finds really fascinating about modular synths. But setting that aside for now, what’s really happening behind the scenes is that multiple effects’ dry/wet levels and parameters are all being controlled simultaneously — and that’s exactly what you can do with the 4-macro feature.
For instance, to recreate a big breakdown, you might want to change all of the following at once:
- Reverb wet level
- Delay wet level
- High-pass filter cutoff
- Noise volume
When you start doing things like that, the MIDI controller gradually starts feeling more and more like your own personal instrument — and that, I think, is the real charm of the N32B Slim. You’ve got plenty of knobs to map your ideas to, after all. I really hope you’ll give this feature a try…!
That’s it for EP.3. We covered how the macro system works, controlling DAWs and hardware synths, making the most of copy & paste, and applying range limits and invert creatively. In the next episode, we’ll dig into System Exclusive messages, using MIDI Monitor, and other advanced features.