In EP.3, we covered advanced macro configurations and real-world setup examples. In this episode, we’re diving into the more advanced features that the N32B Slim has to offer.
Specifically, we’ll look at System Exclusive (SysEx) for controlling manufacturer-specific parameters, MIDI Monitor for viewing MIDI messages in real time, and features like Pick Up Mode, MIDI Learn, 14-bit Control Change, and Snapshot sending.
These are the features that take the N32B Slim beyond “just a CC controller” and into something much more capable. Let’s go through them one by one.
- System Exclusive (SysEx) Mode
- MIDI Monitor
- Pick Up Mode
- MIDI Learn
- 14-bit Control Change
- Snapshot Sending
- Practical Tips
- Takazudo’s Thoughts
System Exclusive (SysEx) Mode
What Is SysEx?
SysEx (System Exclusive) is a type of MIDI message that manufacturers can define however they like. It’s used to control deep, device-specific parameters that standard Control Change or Program Change messages can’t reach.
For example, if you want to tweak a specific reverb parameter on a Roland synth, or directly adjust channel strip settings on a Yamaha mixer, you’ll need SysEx. Being able to send SysEx directly from a MIDI controller — rather than only from a DAW — is extremely handy in hardware-centric setups.
SysEx Message Structure
SysEx messages follow a fixed structure:
- F0: The start byte (Start of Exclusive)
- Data bytes: Manufacturer ID, device ID, parameter address, value, etc.
- F7: The end byte (End of Exclusive)
In other words, every SysEx message begins with F0 and ends with F7. The data bytes in between vary depending on the manufacturer and device. You’ll need to consult the target device’s MIDI implementation chart (found in the manual) to assemble the correct byte sequence.
SysEx Settings in the Editor
In the N32B Slim’s new editor, you can select System Exclusive as a knob’s macro mode. Choose it from the Mode dropdown introduced in EP.2.
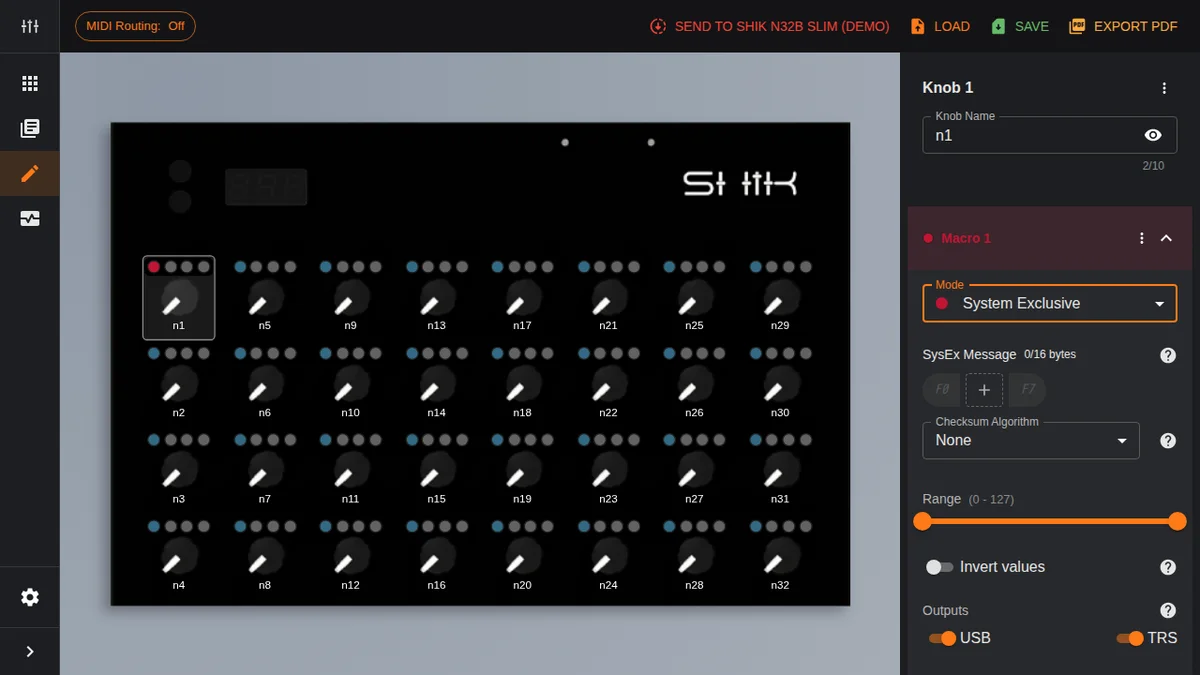
When you select System Exclusive, a SysEx Message builder appears. The screen displays fixed F0 and F7 framing bytes, and you add data bytes in between.
Here’s how it works:
- Adding bytes: Click the ”+” (add byte) button to add a data byte. You can add up to 16 bytes
- Editing bytes: Tap an added byte to edit its value. Specify a hexadecimal value from 0x00 to 0x7F
- Reordering bytes: Drag and drop to rearrange byte order
- Range: Use the slider to set the range of the variable-value byte (0—127). This is the value that changes when you turn the knob
The editor automatically adds the F0 and F7 framing bytes, so you only need to enter the data bytes in between.
Checksum Algorithm
Some manufacturers (notably Roland and Yamaha) require a checksum byte in their SysEx messages to verify data integrity. In the N32B Slim editor, you can select the appropriate algorithm from the Checksum Algorithm dropdown.
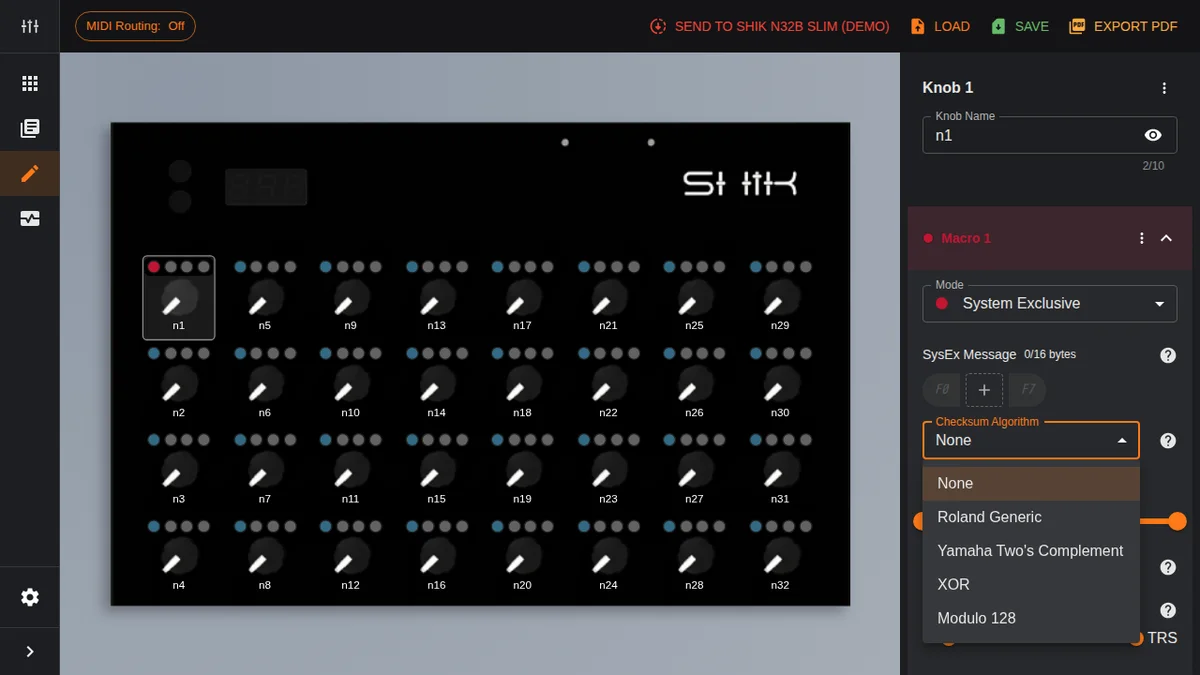
The five options are:
- None: No checksum. For devices that don’t require one
- Roland Generic: Roland’s standard checksum method. Used by many Roland devices including GS sound modules and V-series
- Yamaha Two’s Complement: Yamaha’s two’s complement method. Used by digital mixers and synths
- XOR: Exclusive-OR checksum. Adopted by some manufacturers
- Modulo 128: Modulo-128 checksum
When you select a checksum algorithm, the editor automatically calculates and appends the checksum byte for you — no manual calculation needed.
Note that Invert (value inversion) and Outputs (output routing) are available in SysEx mode just like in other modes.
SysEx Use Cases
SysEx is especially useful in scenarios like these:
- Roland synths: Real-time control of GS parameters (reverb, chorus, part levels, etc.)
- Yamaha digital mixers: Controlling channel faders and EQ parameters
- Lighting gear: Lighting control via DMX bridges (for devices that accept SysEx control values)
The workflow is: check the target device’s MIDI implementation chart, figure out the required byte sequence, then assemble it in the editor.
MIDI Monitor
MIDI Monitor is one of the new features in the redesigned editor, briefly introduced in EP.2. Here we’ll take a closer look at how to use it in practice.
Basic Usage
Open the MIDI Monitor tab in the left sidebar. First, select the MIDI input device you want to monitor from the MIDI Inputs dropdown in the toolbar. If you have the N32B Slim connected, select its device to see knob movements displayed as MIDI messages in real time.
Table View
This is the default display mode. Received MIDI messages are shown as a list, one per row. Each row contains the following information:
- Message type: Control Change, Program Change, SysEx, etc.
- Channel: MIDI channel number
- Data: CC number and value, SysEx byte sequence, etc.
A new row appears each time you turn a knob, making it easy to see at a glance which knob is sending which CC message.
Graph View
Click the graph toggle button in the toolbar to switch to Graph View. CC values are displayed as a line graph along the time axis.
Graph View is handy for visually checking how values change as you move a knob. For example, after setting Range min/max values, you can verify that the actual output range matches what you intended.
Pause / Clear All Data
- Pause: Pauses monitoring. Useful when a flood of messages is coming through and you want to inspect the data at a specific point
- Clear all data: Clears all displayed data. Handy for resetting before starting a new test
Practical Use Cases
MIDI Monitor is your go-to tool for confirming that “the messages I think I’m sending are actually what’s going out.”
- CC number verification: Confirm that the CC number you assigned to a knob matches what’s actually being sent
- Routing verification: Check that USB and TRS output settings are correctly applied
- SysEx verification: Verify that your assembled SysEx message is being sent as the correct byte sequence
- Macro verification: Confirm that multiple messages are being sent simultaneously from a single knob
The key advantage is that everything happens within the editor — no need to fire up a separate MIDI monitor app.
Pick Up Mode
The Value Jump Problem
When using a MIDI controller, you may encounter a situation where turning a knob causes the value to jump dramatically — typically after switching presets or manually changing a parameter in your DAW.
For example, say a filter cutoff is currently set to 80 on the receiving end, but the N32B Slim’s physical knob position corresponds to 20. If you nudge the knob slightly, the value suddenly jumps from 80 to around 21. During a live performance, this can be a real problem.
How Pick Up Mode Works
Pick Up Mode solves this issue. When enabled, the knob won’t send any MIDI messages until its physical position matches the current MIDI value.
As the manual puts it: “Pick-Up mode prevents a macro from sending MIDI until the knob position matches the target value on the connected device.”
So in the example above, the knob won’t start sending MIDI values until you turn it all the way to 80. Until then, turning the knob does nothing. This “catch up” behavior changes the feel slightly, but it reliably prevents unintended value jumps.
Setup and Notes
Pick Up Mode is toggled on a per-macro basis. Use the toggle switch within each macro’s settings in the editor. Note that it’s per macro, not per knob — so on the same knob, you could have Pick Up Mode enabled for Macro 1 but disabled for Macro 2.
For Pick Up Mode to work correctly, the connected device (DAW or hardware) needs to send the current parameter value back via MIDI. The N32B Slim receives this value as the “current target” and compares it to the knob’s physical position.
Pick Up Mode is especially useful in situations like:
- Live performance: Preventing value jumps after preset switches
- After switching presets: Right after changing presets in the editor
- Multi-device control: Setups where the same knob operates different devices
MIDI Learn
Quick On-Device Setup
MIDI Learn lets you assign macros directly on the N32B Slim itself, without using the web editor. It’s perfect for situations when you don’t have a PC nearby.
Procedure
- Navigate the N32B Slim’s 3-digit display until Lrn appears
- Long-press the bottom button to enter MIDI Learn mode
- Turn the knob you want to assign (to select the target knob)
- Turn the same knob again to choose a macro slot (1—4)
- Send a MIDI message from your DAW or hardware. The received message is assigned to that macro
Key Points
MIDI Learn settings are saved on a per-macro basis. This means you can teach each of a knob’s four macro slots a different MIDI message.
This feature is especially handy at live venues or rehearsal studios where you’d rather not bring a PC. Just have the DAW send a MIDI message for the parameter you want to control, and let the N32B Slim learn it — done.
That said, detailed settings like SysEx checksum configuration or enabling Pick Up Mode can only be done through the web editor. Think of MIDI Learn as a quick-setup tool for basic CC assignments.
14-bit Control Change
The Need for Higher Resolution
Standard Control Change is 7-bit, meaning 0—127 — just 128 steps. That’s plenty for most parameters, but for things like filter cutoff, pitch, and main volume where smooth changes matter, 128 steps can feel coarse.
You’ll notice “stepping” when you slowly turn a knob — the so-called zipper noise effect.
How 14-bit CC Works
14-bit Control Change (formerly called High Resolution Control Change) combines an MSB (Most Significant Byte) and LSB (Least Significant Byte) across two CC numbers to achieve a range of 0—16,383 — up to 4,095 steps of resolution.
Since the N32B Slim has potentiometers with a physical resolution of 4,095 steps, 14-bit CC lets you take full advantage of the hardware’s capabilities.
Setup and Notes
When you set the Mode to 14-bit Control Change in the editor, the MSB and LSB CC number pair is automatically assigned. Per the MIDI specification, CCs 0—31 serve as MSBs and CCs 32—63 as the corresponding LSBs (e.g., the LSB for CC 1 is CC 33).
The trade-off is that each parameter consumes two CC numbers. If you’re tight on CC assignments, it’s practical to reserve 14-bit CC for only the parameters that truly benefit from higher resolution.
14-bit CC is especially effective for parameters like:
- Filter cutoff: Smooth tonal sweeps on synths
- Pitch-related: Pitch bend amount, detune
- Volume: Silky smooth fade-ins and fade-outs
- Pan: Fine-grained stereo positioning
Snapshot Sending
Bulk-Sending the Current State
Snapshot sending (Sync) bulk-sends the current state of all 32 knobs as MIDI messages at once.
How to Use It
- Navigate the N32B Slim’s 3-digit display until Syc appears
- Long-press the bottom button
- The current MIDI values of all 32 knobs are sent at once, using their configured CC numbers and channels
Use Cases
Snapshot sending is useful in scenarios like:
- Right after loading a preset: Sync the current knob state with the DAW or hardware so the controller and receiver are on the same page
- After powering on: Push the N32B Slim’s current settings to the connected device after boot
- Synchronizing multiple devices: When controlling multiple devices with the same preset, bulk-sync their state in one shot
It works especially well in combination with Pick Up Mode. If you send a Snapshot to sync the DAW’s values to the N32B Slim’s state before you start performing, you won’t have to worry about value jumps.
Practical Tips
Here are some key takeaways for getting the most out of these advanced features:
- SysEx requires the target device’s manual: SysEx byte sequences differ per device. Always consult the MIDI implementation chart before configuring
- Make “verify with MIDI Monitor” a habit: After creating a new configuration, take a moment to verify the actual output in MIDI Monitor. It’ll save you headaches later
- Pick Up Mode is a must for live setups: Value jumps might be tolerable in the studio, but they’re a showstopper on stage. Enable Pick Up Mode in your live presets
- Use 14-bit CC only where needed: You don’t need every knob running at 14-bit. Reserve it for parameters where smoothness matters, like filter cutoff or volume
- Make Snapshot sending part of your ritual: Get in the habit of sending a Snapshot at the end of your setup routine to prevent state mismatches between the controller and receiver
- Use MIDI Learn and the web editor for what they’re best at: Quick CC assignments go to MIDI Learn; detailed configurations like SysEx and Pick Up Mode go to the web editor
Takazudo’s Thoughts
I have to be honest here — I personally haven’t spent much time trying to wrangle hardware synths over MIDI, so my take on these features is going to be a bit less hands-on than usual.
That said, what this episode reminds me of is when we first brought in the N32B Slim. During an online call, the SHIK team told us they were putting a lot of effort into the connection between the web editor and the hardware. At the time, my reaction was basically “Oh, that’s nice.” But now, having written these articles walking through the editor, I can genuinely feel just how much thought has gone into it.
In particular, for anyone who’s trying to control multiple hardware synths from a single MIDI controller, the N32B Slim seems like it could serve as the command center of your MIDI setup. Definitely give it a try!
That’s it for EP.4. We covered SysEx, MIDI Monitor, Pick Up Mode, MIDI Learn, 14-bit CC, and Snapshot sending — a full tour of the N32B Slim’s advanced features. In the next episode, we’ll dig into preset management and how to make the most of the N32B Slim in live performance.