This is an introduction and overview of Wingie2 by Meng Qi, available at Takazudo Modular.
Wingie2 is not a modular synth module but a standalone musical device. It applies various resonance processing to ambient sounds or audio input. It’s a device that takes the concept of a resonator and refines it into a standalone instrument—one you can enjoy making music with even without any music theory knowledge.
This product is available for purchase below.
- What Is Wingie2?
- What It Sounds Like
- Manual and Firmware Updates
- What Is a Resonator, Anyway?
- Wingie2 as a Resonator
- Controls and Notes: Front Panel
- Controls and Notes: Rear Panel
- Getting Started: Making Some Sound
- The Four Modes
- 1. Poly Mode (White)
- 2. String Mode (Green)
- 3. Bar Mode (Red)
- 4. Cave Mode (Purple)
- Internal Volume Adjustments
- MIDI Control
- Additional Features
What Is Wingie2?
Wingie2 is a standalone resonator developed by Meng Qi.
First, let’s clarify what a resonator does: it’s a device that performs audio processing to emphasize frequencies around a specific target frequency in the input signal. In practice, there are many variations of such processing, so “resonator” is a categorical term for devices that perform this type of audio processing.
Below is a very simplified image of a resonator. Imagine it has a knob that controls which frequency to emphasize. If you feed in a signal with a wide frequency distribution, like white noise, the frequencies around the selected target are boosted while the rest is attenuated.

Wingie2 is a type of resonator, but it’s designed to perform various musically useful processing, making it essentially a device that elevates the resonator concept into a musical instrument.
Wingie2 has keyboard buttons on its front panel that allow you to intuitively adjust the frequency range. For audio input, you can choose between the LINE In jack or the built-in microphones that capture ambient sound. Four resonator modes are available, each producing distinctive acoustic effects.
Additionally, MIDI input can be received via the MIDI TRS jack, allowing external control of pitch and many other parameters. In this way, Wingie2 combines gadget-like ease of enjoyment with the functionality needed for serious music production.
What It Sounds Like
Rather than explaining everything in detail, hearing it is the quickest way to understand. Here are three videos of Takazudo playing the Wingie2.
1. Using the Built-in Microphone as the Audio Source
This first video shows Takazudo experimenting with various features right after receiving the Wingie2.
In this video, the audio source is consistently the microphone input. Crumpling plastic bags, tapping, and other sounds in front of the Wingie2 serve as the audio source for the resonance processing. MIDI is sent from the OXI ONE sequencer to the Wingie2 for pitch control as well.
The background sound is from Instruo Lúbadh, which is looping sampled audio and is not connected to the Wingie2.
2. Session Using Poly Mode
The second video shows drums (kick + hi-hat) being processed through Wingie2.
The audio sources in this video are:
- Drums (Mutable Instruments Braids kick and TipTip Audio Hats808)
- Instruo Lúbadh
Of these, Lúbadh is simply looping a pad-like sound, and everything else is just kick + hats passed through Wingie2—no other oscillators are being used. Throughout this session, Wingie2 is in Poly mode.
3. Session Using Various Wingie2 Modes
The third video uses drum audio output (kick + hi-hat + clap + cowbell) as the Wingie2’s audio source.
Here, Erica Synths drum modules are sequenced by OXI ONE, and their combined output is fed through Wingie2. Delay/reverb is applied to the result—there are no other oscillators.
In this session, the Wingie2 modes are switched sequentially. The only sources with clear tonal content are the cowbell and the Wingie2 itself.
As you can see, Wingie2 can create this kind of ambient atmosphere. That’s the sort of sound it produces.
Manual and Firmware Updates
Wingie2 is built on Arduino, and its firmware is published as an open-source project on the following GitHub page:
The Wingie2 you receive may have an older firmware version installed. Newer firmware versions include improvements and new features, and this page’s explanations are written based on v3.1, the latest version at the time of writing. To avoid confusion, we recommend installing the latest firmware first.
Firmware installation instructions are available at:
The content on this page is also based on the English manual for v3.1, which can be downloaded from the link above.
This page focuses on understanding the basic operation of Wingie2 and does not cover every feature. For more detailed information, please refer to the original manual.
What Is a Resonator, Anyway?
Now, this article is about explaining Wingie2, but let’s first talk about what a resonator actually is.
When I started writing this product description after receiving the Wingie2, I realized that I didn’t actually understand what a resonator even is. In this section, I’ll share my understanding of resonators, which I pieced together over weekends watching YouTube explainers and repeatedly asking ChatGPT questions. This isn’t meant to be perfectly accurate, but I think it can be helpful for getting a general sense of what resonators do. If you already know all this, feel free to skip ahead. And corrections are very welcome!
Resonance / Sympathetic Vibration
First, the word “resonator” in English essentially means “something that performs resonance.” And resonance translates to sympathetic vibration or sympathetic oscillation. It’s a word that anyone who regularly works with synthesizers has probably seen many times. But what exactly is resonance? That’s the question. It’s not immediately obvious.
To understand this, imagine a pipe about 10cm in diameter and 1 meter long. This pipe is sealed on both ends, with only a small hole on one side.

If you shout “Ahhh!” into the pipe, you can imagine the sound being amplified and resonating, somewhat like shouting in a tunnel.
Why does this happen? Speaking generates vibrations in the air, and these vibrations bounce back and forth inside the pipe, causing the pipe itself to vibrate. The pipe’s vibrations in turn create more air vibrations, producing additional sound. This mixes with the voice being produced, resulting in that hollow, reverberant character.
The vibration of the pipe is called sympathetic vibration, and the amplification of certain parts of the sound through this vibration is called resonance.
The Guitar’s Resonance Box
The way sound resonates depends on the structure and properties of the material. For a pipe, it varies with the pipe’s material and length. A small pipe produces less resonance, while a very large pipe creates heavier, more impactful resonance.
Resonance is used in many instruments. For example, a guitar’s body serves to resonate the sound produced by plucking the strings. This body is called a resonance box.
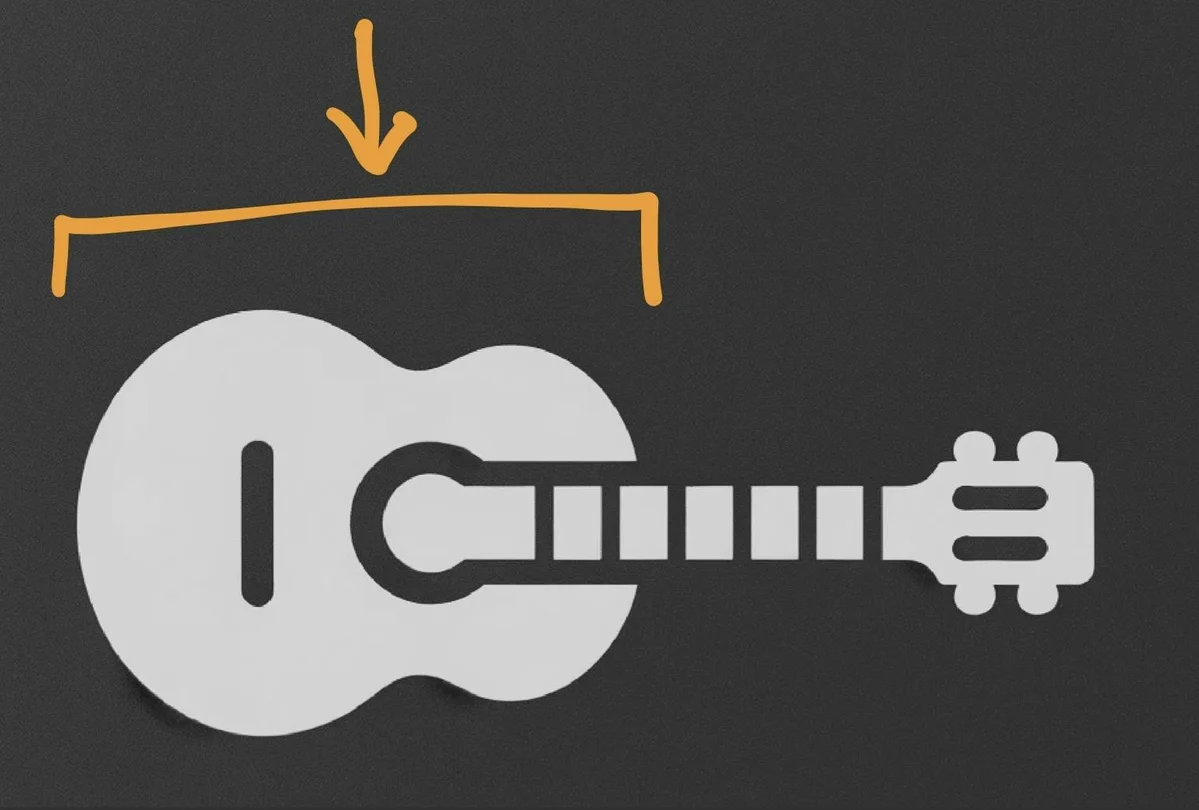
If the guitar’s resonance box were completely absent and only the strings were there, it’s easy to imagine that the pleasant, rich sound of a guitar wouldn’t emerge.
In that sense, while nobody would actually call it that in practice, a guitar’s resonance box could be considered a type of resonator. (At least, that’s what ChatGPT told me.)
Recorder Resonance
In addition to guitars, instruments like recorders and flutes also use resonance to produce sound. Let me explain how. You’ve probably played a recorder at some point in school, so imagine one now.
First, the actual sound of a recorder is produced by the green-highlighted area in the following diagram:

Near where you blow into a recorder, there’s a hole on top. The blown air splits at this hole, and this interaction creates the base tone of the recorder. The sound produced here is similar to whistling or a grass flute. In synthesizer terms, you might think of this part as the oscillator.
The tube part of the recorder—the area you grip with your hands—serves to amplify the sound generated by the green section. This amplification is the same principle as the resonance that occurs when you shout “Ahhh!” into a pipe, as described earlier.
How the Recorder Creates Pitch
Now, think about what happens when you play a recorder. You cover the holes on the tube with your fingers before blowing.

Do you remember that when all holes are closed, a low pitch sounds, and as you gradually lift your fingers, the pitch gets higher? This change in pitch occurs because the length of the resonating space inside the tube changes.
The holes on a recorder are positioned so that covering them produces pitches that correspond exactly to musical scale notes—do, re, mi, fa, sol, la, ti, do.
But why does opening more holes make the pitch higher? That part might not be immediately intuitive.
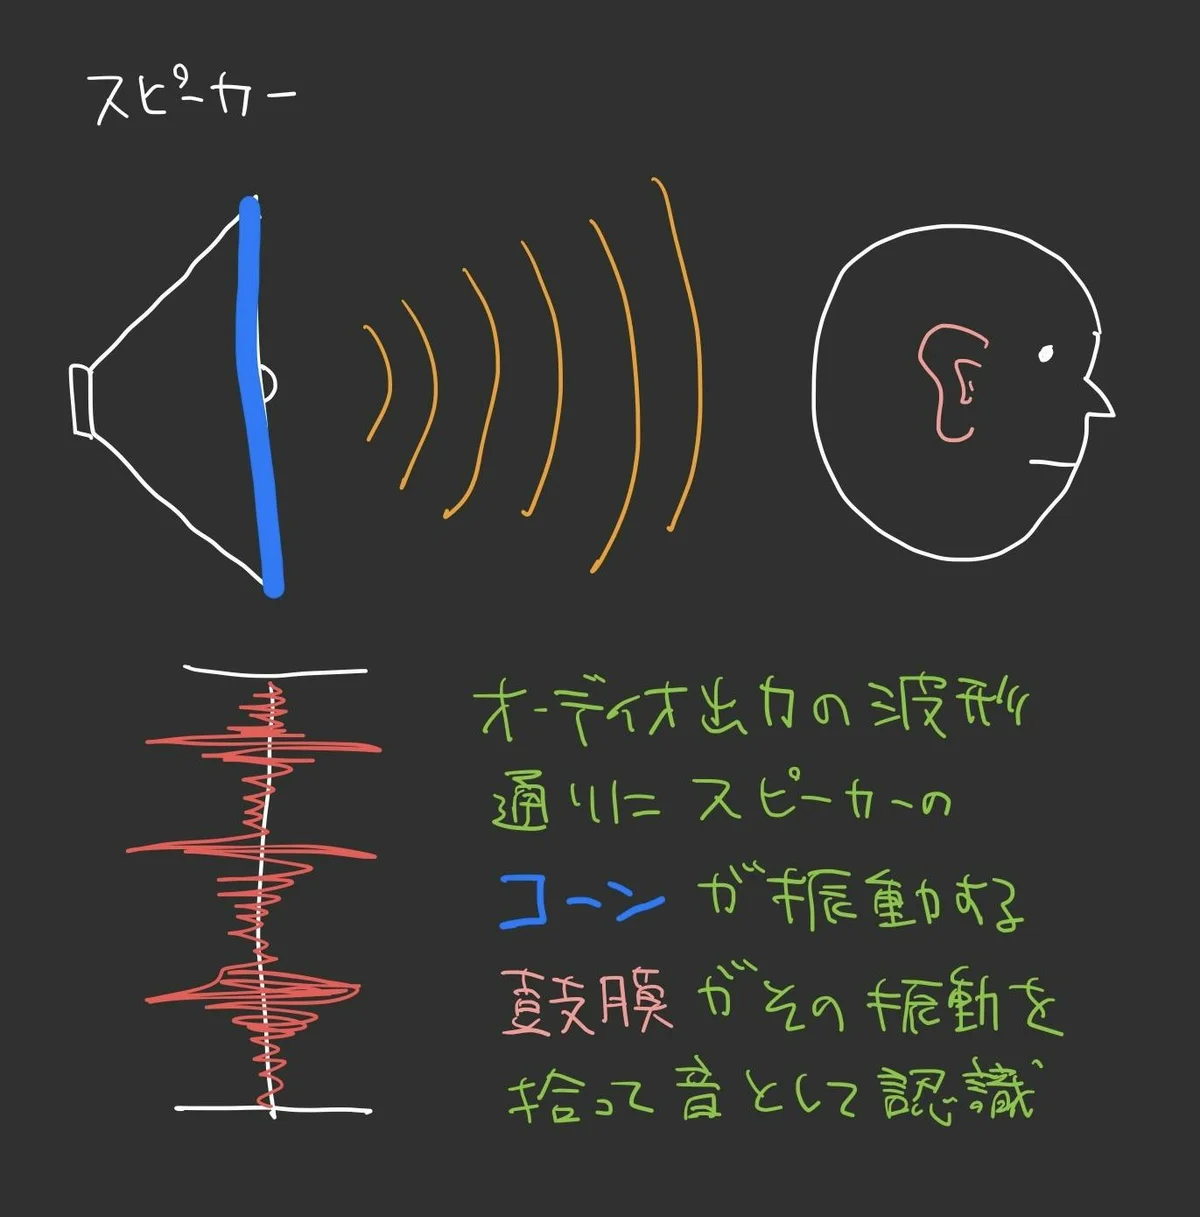
Speakers and Eardrums
Let’s briefly change topics and talk about speakers.
Do you know how speakers produce sound? I only had a vague understanding, but in the process of understanding resonators, I inevitably came to understand the mechanism.
First, when you look at audio waveform data on an oscilloscope or in a recorded audio file, you typically see waveforms like the following:

When this data is processed and finally sent to a speaker, sound comes out. The up-and-down oscillation of the waveform line represents instructions for the speaker cone to move up and down in exactly that pattern. If you place your hand on a speaker cone, you can feel intense vibrations—those vibrations are the cone moving according to that jagged, undulating line.
When the speaker cone vibrates, it creates air vibrations. These air vibrations made by the rapidly oscillating cone reach the human eardrum, causing it to vibrate, and the person perceives sound.
As a result, the audio waveform data causes the cone to oscillate at high speed, reproducing the data as sound in physical space. Speakers are amazing, aren’t they?
Larger cone movements are perceived as louder sound, and smaller movements as quieter sound.
This is how speakers reproduce sound from audio data. The electrical signal conveyed through an audio jack is essentially information about how to vibrate the speaker cone.
Pitch and Vibration Frequency
Next, let’s talk about oscillators that produce sine waves. Below are the waveforms displayed on an oscilloscope when the same oscillator plays a note one octave higher versus one octave lower. (Using miRack)

If you have an oscilloscope or experience viewing waveforms in a DAW, you may already know that the waveform period is longer for lower pitches and shorter for higher pitches.
These waveforms ultimately connect to a speaker and vibrate its cone, as discussed in the previous section. A low-octave sine wave produces a “booo” low sound, while a high-octave sine wave produces a “peee” high sound.
From these observations, we can understand that long-period air vibrations create low sounds and short-period air vibrations create high sounds. An oscillator creates periodic voltage changes, and by controlling that period, pitch changes are produced.
Recorder Pitch Is Determined by Air Vibration Period
Now let’s return to how the recorder creates pitch.
The recorder has holes that you cover with your fingers, and covering all holes produces a low sound while opening them produces higher sounds. What changes between covered and open holes? It’s the length of the space where sound resonates inside the tube.

When all holes are covered, the resonating area spans the entire tube. When only half the holes are covered, the blown air escapes through the uncovered holes, and the resonating area becomes only half the tube length.
In these two states, the same principle that makes pitch change with sine wave wavelength period applies inside the tube. If the resonating area is long, the flute’s pitch is lower; if the resonating area is short, the pitch is higher. This occurs because the air vibration period differs between these two cases.
You might think, “Do flutes really do something that complicated?” But it’s just the theory behind it—humans discovered this phenomenon and built instruments based on it, and when you analyze them scientifically, that’s what’s happening.
What’s Being Resonated
Finally, the important thing to understand is that in the pipe/guitar/recorder examples, the original audio sources are:
- Pipe: Human voice
- Guitar: Sound created by string vibration
- Recorder: The hole near where air is blown in
In synthesizer terms, these are oscillators. The resonating parts amplify certain frequency ranges of these sounds, creating the final sound that reaches your ears. This acoustic effect is what’s called resonance.
“Oh, so that’s what resonance is!” — that’s what I thought as I researched all this.
So, About Resonators…
Right. So the point was that musical instruments have parts that use resonance to create sound.
Back to resonators. The sound produced by devices like Wingie2, or the sound you get when you turn up the resonance on a filter—these are created by electronic components or software programs that simulate these physical phenomena, boosting frequencies around a specific target. And devices that perform this type of audio processing are called resonators.
So in short: a resonator is a device that creates the kind of resonant effect that occurs when you shout “Ahhh!” into a pipe. And it gives you various ways to control that resonance.
Wingie2 as a Resonator
If you’re familiar with synthesizers, you probably know that many filters have a resonance parameter. The effect you hear when turning that knob—the boosted sound around the filter frequency—is the result of the audio processing described in the previous section.
Wingie2 is not a filter, so it doesn’t cut high frequencies like a low-pass filter would. Instead, it offers various methods of resonance processing.
In my view, the key points of Wingie2 are:
- Can use the two built-in microphones as audio sources
- Can also use stereo TRS jack line-level input as audio sources
- Contains two built-in resonators (software-implemented), each completely independent
- The frequency range for resonance can be set using the front-panel keyboard buttons
- The frequency range and other parameters can be controlled via MIDI
- Four modes are available, enabling sequenced patterns and reverb-like effects
That’s a lot of bullet points at once, so it might not all click immediately.
Essentially, resonance processing boosts specific frequency ranges, and the specific methods are diverse. The key understanding is that Wingie2 takes resonance processing and makes it musically usable in various flavors—after that, the best approach is to try it hands-on.
Wingie2 is that kind of instrument. Let’s call it an instrument rather than a gadget.
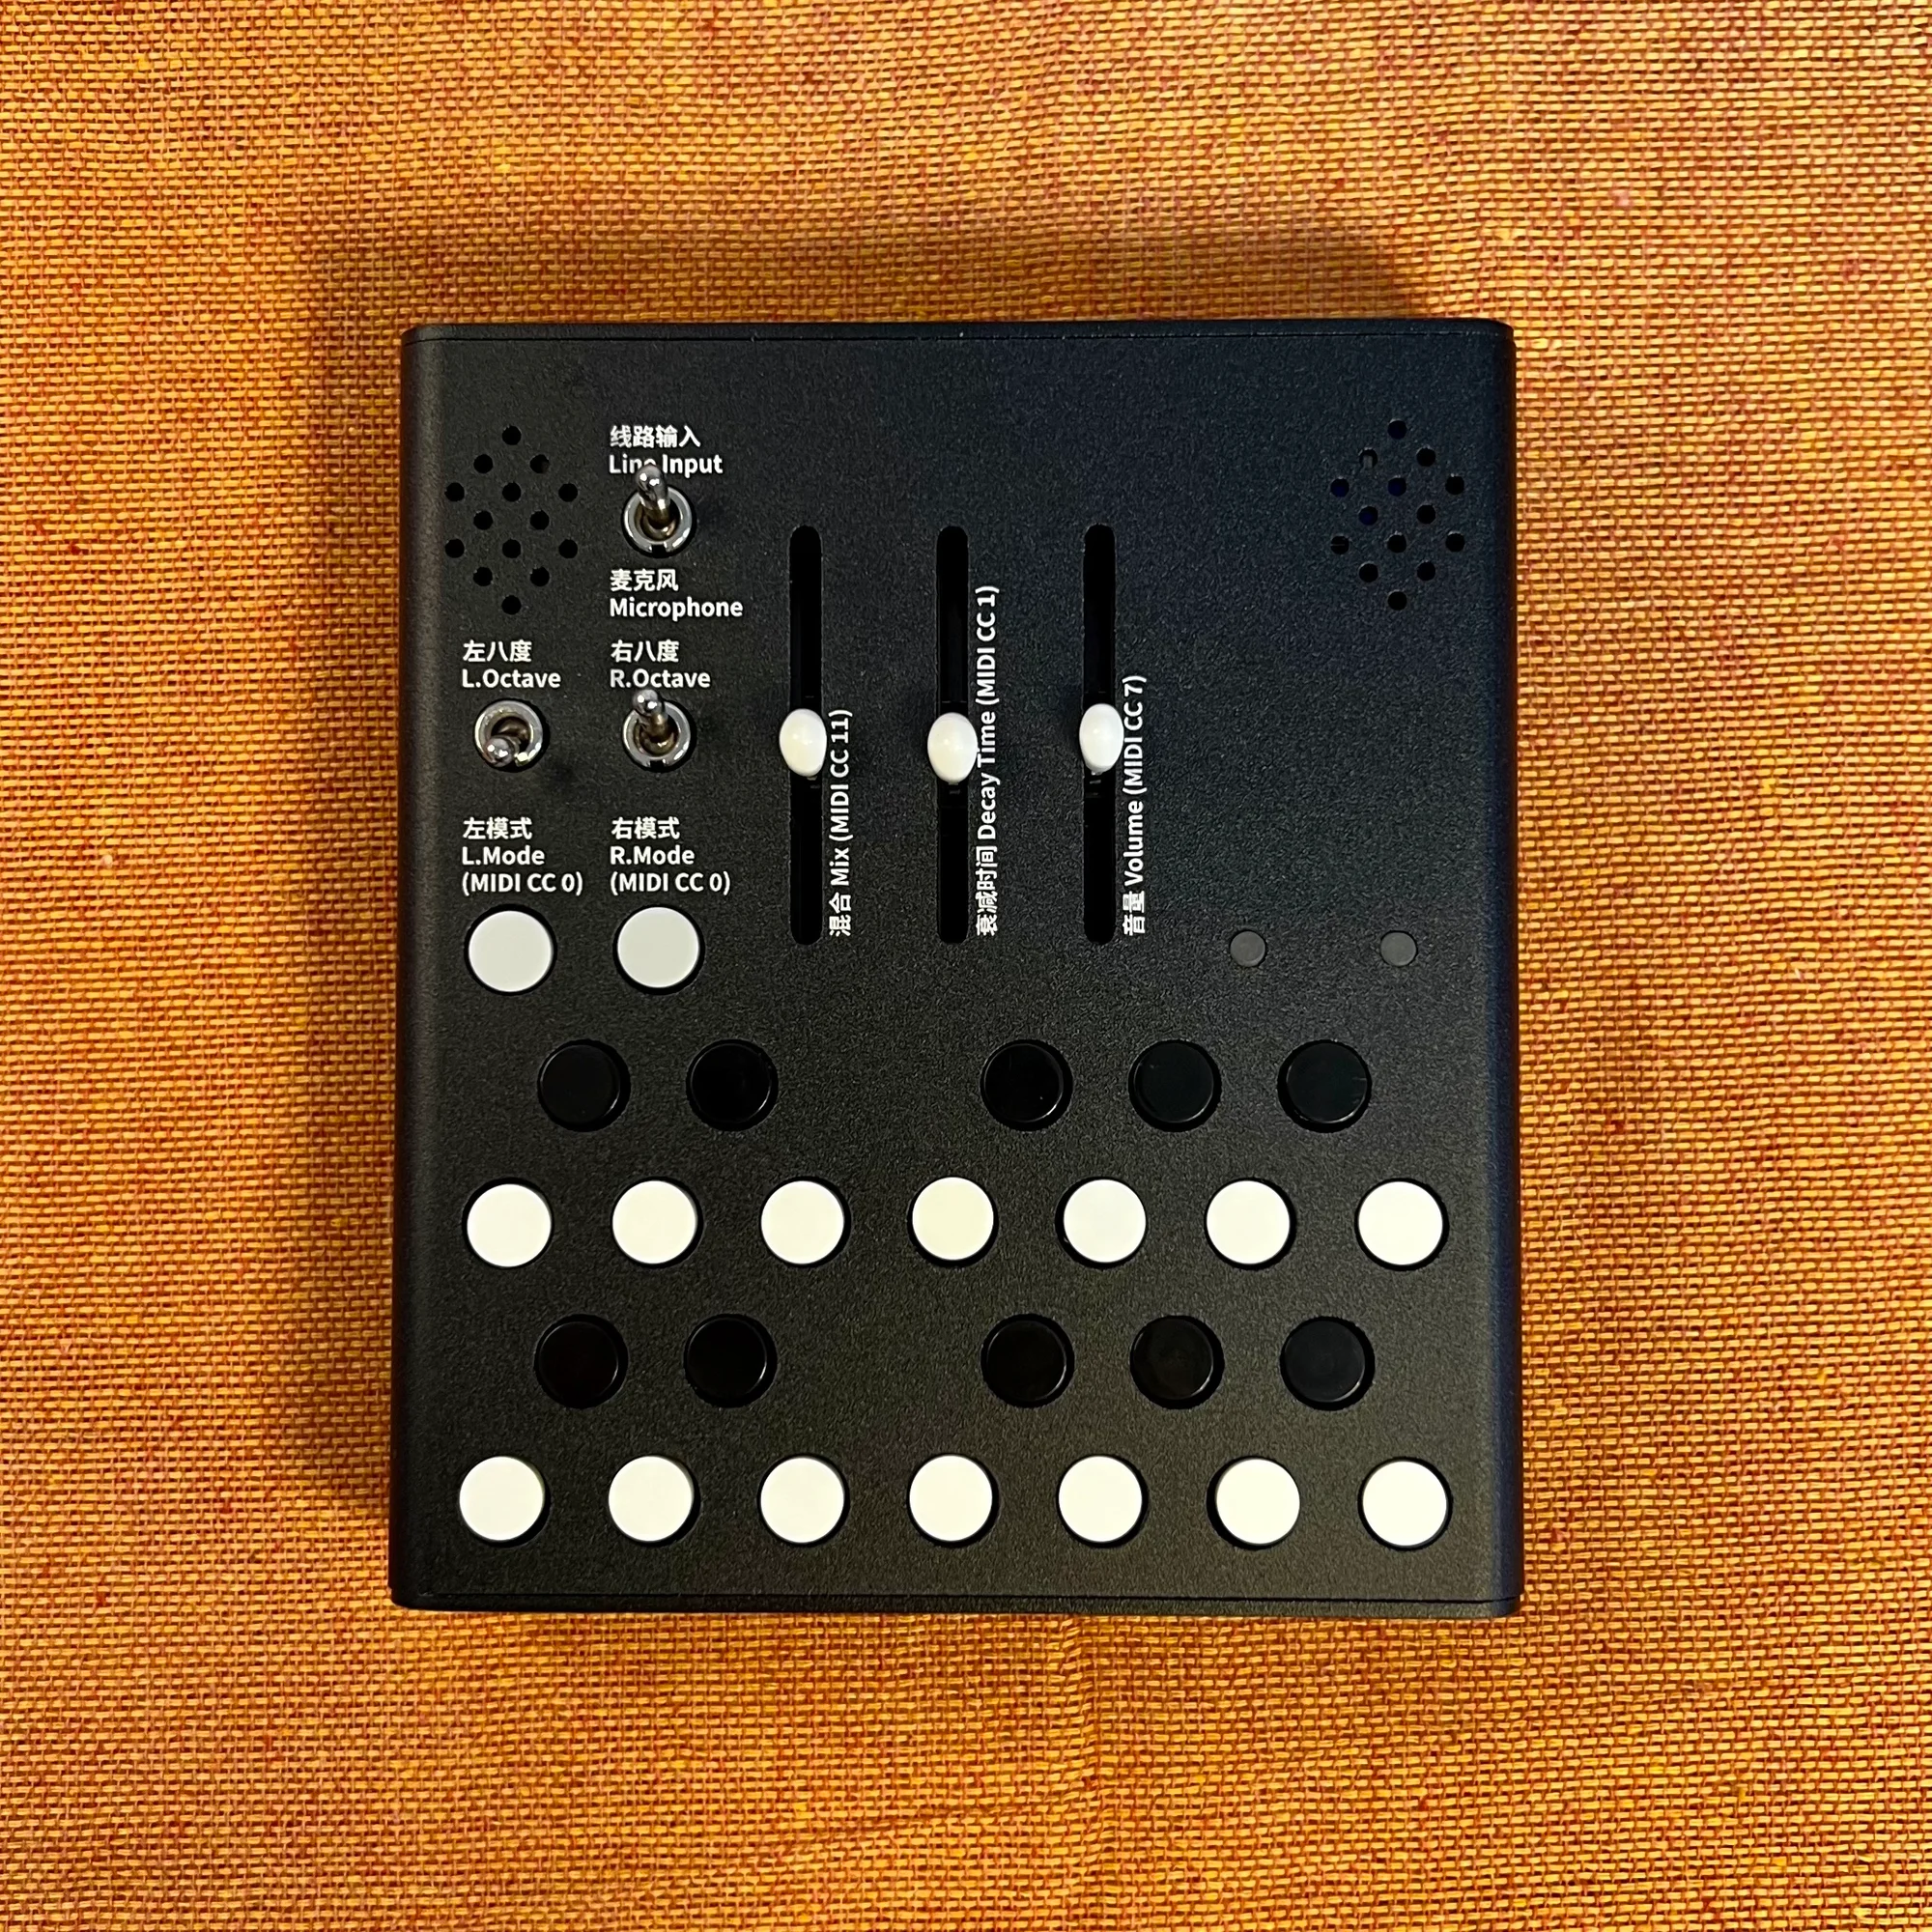
Controls and Notes: Front Panel
Let’s continue explaining the Wingie2 by first going through its controls and usage notes to build a general understanding.

We’ll go through the numbered labels in order.
1. Input Switch
A 2-way switch for selecting the audio source.
Wingie2 can use either the audio input from the stereo TRS jack on the back, or the two microphones on the front panel as its audio source. This switch toggles between them.
Switch positions:
- Up: Line Input: Uses audio input from the rear TRS jack
- Down: Microphone: Uses audio input from the front panel microphones
2. Microphones
Wingie2 has two built-in microphones.
The holes at the upper left and right of the front panel house microphones behind them. The left side is the Left input, and the right side is the Right input.
3. Keyboard Buttons
As mentioned, Wingie2 has two resonators, and the black and white button array on the lower front panel serves as keyboard buttons for controlling them.
Rather than spanning two octaves, they are divided as follows:
- Upper row: Right resonator
- Lower row: Left resonator
Their primary role is controlling the pitch of these two resonators, though some function settings use the keyboard buttons for purposes beyond the Left/Right split.
4. Octave Switch
Switches for changing the octave of the Left and Right resonators. Each resonator’s octave is set independently.
- Left: Left resonator
- Right: Right resonator
Three positions are available, corresponding to the following octaves:
- Up: One octave higher
- Middle: Center octave
- Down: One octave lower
Octave Difference Between Left and Right
As detailed later, Wingie2 has multiple modes. In all modes except Cave, the Right resonator is set one octave above the Left resonator.
So for example, if both switches are in the middle position, the sound from the Right resonator will be one octave higher than the Left resonator.
5. Mode Switch Button
The mode switch button.
Wingie2’s resonator has four modes:
- Poly
- String
- Bar
- Cave
The resonator mode is independent for the Left and Right resonators—you can set a different mode for each. Pressing the button cycles through 1 -> 2 -> 3 -> 4 -> 1 -> 2… Mode details are covered later.
6. LED
An LED that indicates the current mode. It changes color according to the mode:
- Poly: White
- String: Green
- Bar: Red
- Cave: Purple
7. Volume Slider
Controls the audio output level from the Audio Out jack.
When this slider is raised, very high volume levels may be output. If connected to speakers or headphones, this can be dangerous. When powering on, always start at the minimum position and raise it gradually to the desired level.
Volume is shared between the Left and Right resonators.
8. Decay Time Slider
A slider that sets the resonator’s Decay time.
The resonator triggers resonance processing when the audio source level exceeds a threshold, producing a sound that gradually decays. Decay Time sets this decay duration, with a minimum of 0.15s and maximum of 10s.
Decay Time is shared between the Left and Right resonators.
9. Mix Slider
Wingie2 applies resonance processing to the audio input, and its output is mixed with the original audio source. This slider controls the Dry/Wet balance.
Mix is also shared between the Left and Right resonators.
Controls and Notes: Rear Panel
Next, the rear panel jacks.

1. Audio Input Jack
A TRS jack that accepts stereo audio input. If you want to receive two mono inputs, you’ll need a stereo-to-mono splitter cable like the following. (I personally use modular synths, where everything is typically mono, so I always use this type of converter cable.)
Wingie2 will clip if the incoming audio volume is too high.
When receiving dry signals directly from modular synth modules, you’ll need to use a mixer, VCA, attenuator, or similar to attenuate the signal to a non-clipping level before input.
2. Audio Output Jack
A TRS jack that outputs Wingie2’s processed audio as stereo.
Similarly, if you want to split L/R, you’ll need the converter cable mentioned above.
3. USB-C Port
A USB-C port that provides power to Wingie2.
Wingie2 only operates while receiving power through this port—it has no built-in battery or battery compartment. You’ll need to connect it to a portable battery, PC, Mac, phone charger, etc.
This USB-C port is also used for firmware updates or installing custom firmware by connecting to a PC/Mac.
A USB cable is NOT included with the Wingie2 package. Please prepare one separately.
4. MIDI In TRS Jack
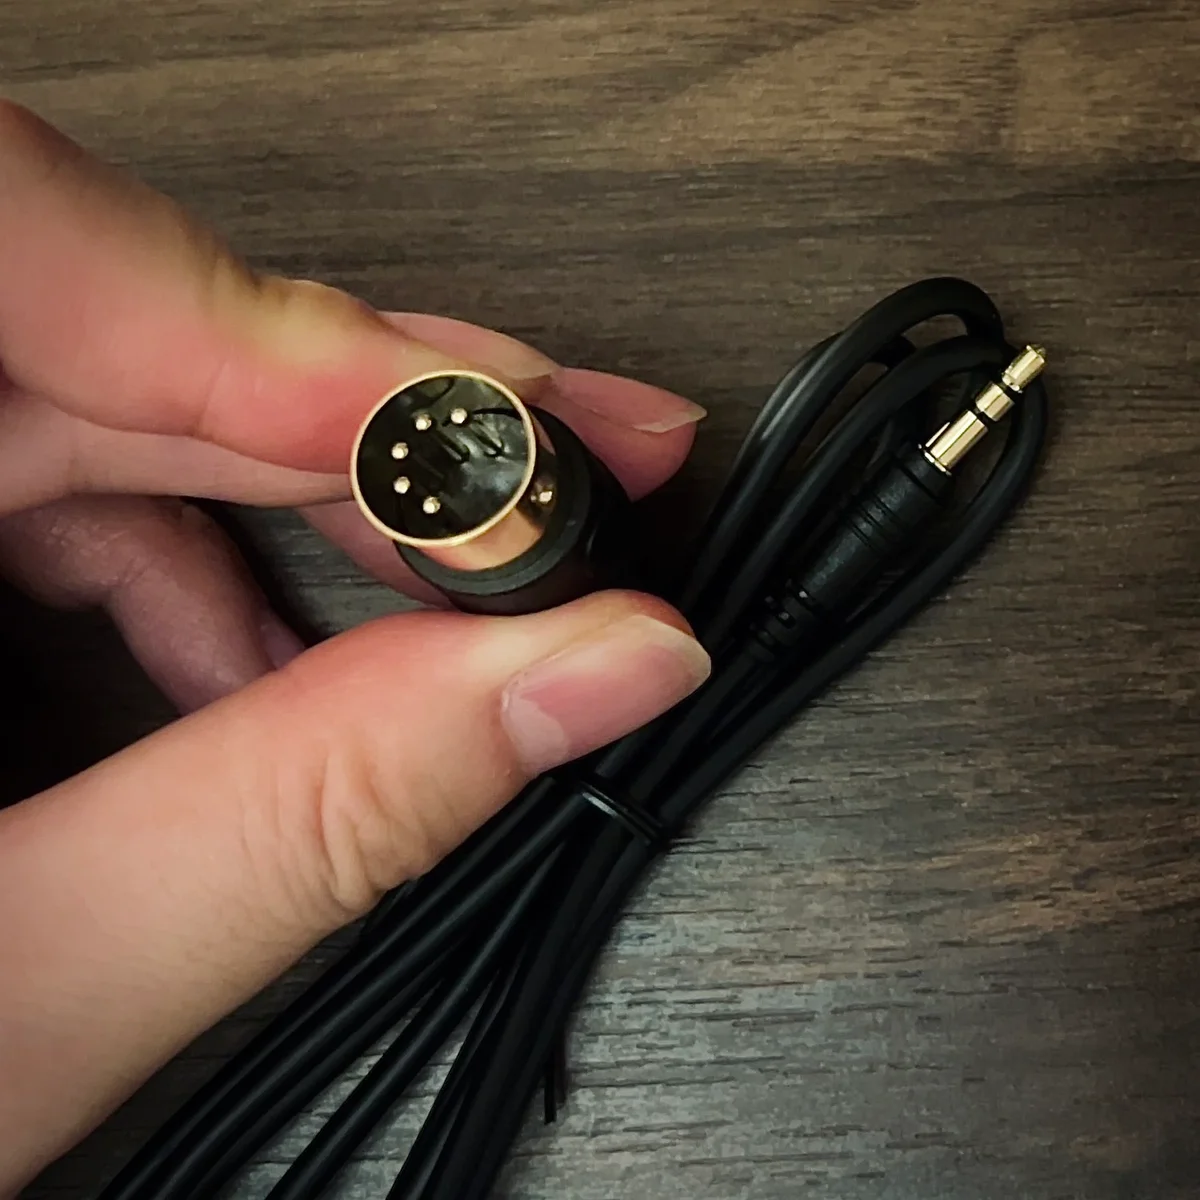
A TRS jack that accepts MIDI input.
To control Wingie2 via MIDI, MIDI signals are received through this TRS jack.
The Wingie2 package includes a TRS (3.5mm) to 5-Pin DIN connector designed to the MMA TRS Standard.
That covers the controls overview.
Getting Started: Making Some Sound
Next, let’s explain how to make sounds with the Wingie2.
Applying the Resonator to Microphone Input
Let’s start by applying the resonator to microphone input. Set up as follows:
- Connect to a portable battery or phone charger via USB cable
- Connect headphones or speakers to the Audio Out jack
- Set the Input switch to the down position (Microphone)
- Set the Octave switches to the middle position
- Set to Poly mode (LED is white)
- Set the Mix slider to about the middle
- Set the Decay Time slider to about the middle
- Set the Volume slider to just slightly above the minimum
Then tap the microphones with your finger, or crumple paper or plastic bags nearby. Through the headphones, you’ll hear the microphone-captured sounds with a reverberant quality added.
In this state, gradually adjust Mix / Decay / Volume to observe the changes each one makes. (Be careful not to raise Decay and Volume too high, as the volume can get very loud.)
Pressing the keyboard buttons or mode switch button changes the resonator’s timbre.
Applying the Resonator to Audio Input Jack
Next, let’s apply the resonator to audio input.
In the previous section, the Input switch was in the down position (Microphone). Switch it to the up position (Line Input). Here’s a video with drum sounds being processed:
By moving the sliders and switching modes, you can hear how the resonator creates rich tones even from simple drum sounds.
Controlling Pitch via MIDI
Next, let’s receive MIDI input to control the resonator’s pitch.
Below, the drums from the previous section are being resonated while MIDI sequences are received from the OXI ONE via the MIDI In TRS jack:
As explained in the resonator section, a resonator boosts specific frequency ranges of the input. But just by controlling that frequency range—even though the audio source is separate—you can achieve an effect similar to playing a synthesizer layered on top. It produces a distinctive, unusual resonance.
Here’s an important point: what you hear has a clear tonal quality, but no synthesizer is actually being played. Well, controlling an oscillator’s pitch is the foundation of a synthesizer, so in that sense, the principle is similar.
And since Wingie2’s processing acts on the audio source, the dynamics and timing naturally follow the audio source’s variations. This gives the sound an organic quality—it doesn’t feel mechanical or programmed. That’s what I find most interesting about Wingie2.
The Four Modes
This is the kind of audio processing that a resonator performs. Wingie2 offers four modes for this resonator processing.
Each has different tonal characteristics and behavioral differences. The details follow, but here’s an overview:
1. Poly (White)
- 3-voice polyphony mode
- Applies resonance processing at three pitches to the input
- Keyboard button pitch input cycles through the 3 voices
- Octave switch changes take effect from the next resonator trigger
2. String (Green)
- 1-voice monophonic mode
- Applies resonance processing at one pitch to the input
- Keyboard button input programs a sequence (Tap Sequencer feature)
- Pressing multiple keyboard buttons simultaneously sets the pitches used in the sequence
- When the input level exceeds a threshold, the pressed pitches cycle in order
- Octave switch changes are immediately reflected in the currently sounding resonator
3. Bar (Red)
- 1-voice monophonic mode
- Behavior is the same as String mode, but with a different resonance processing algorithm
4. Cave (Purple)
- A tone-rich reverb-like mode that sounds 9 voices per L/R simultaneously
- In this mode, the keyboard buttons don’t represent musical notes but serve as mode-specific function buttons
- Each of the 9 voices can be individually toggled ON/OFF, with pitch adjustable up or down
- Octave switch functions the same as other modes, with changes immediately reflected
Let’s look at each mode in detail.
1. Poly Mode (White)
When powered on, the LED on the right side of the device glows white, indicating Poly mode. In this mode, resonance processing is applied at three pitches.
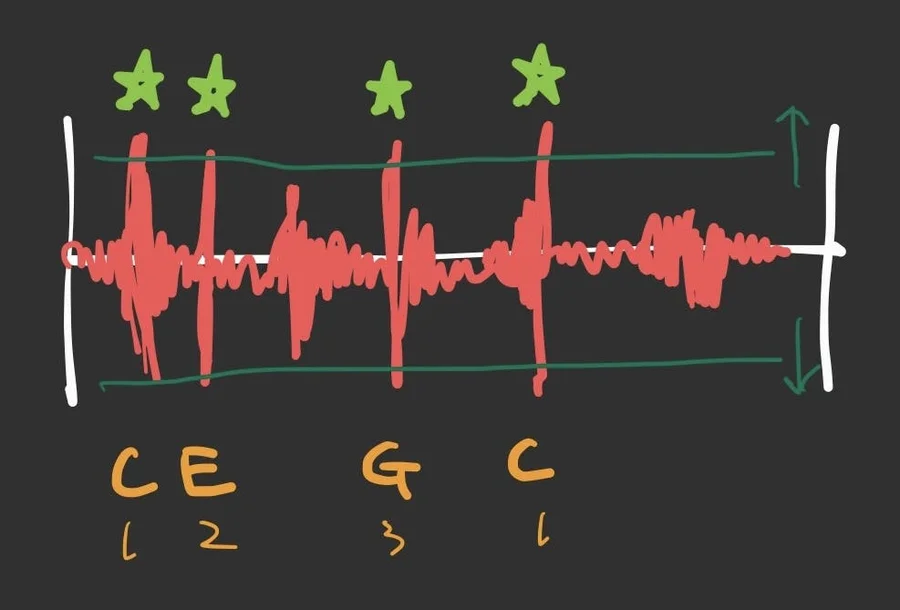
For example, starting with white noise-like audio being received at the Audio Input jack, press the keyboard buttons in the order C -> E -> G:
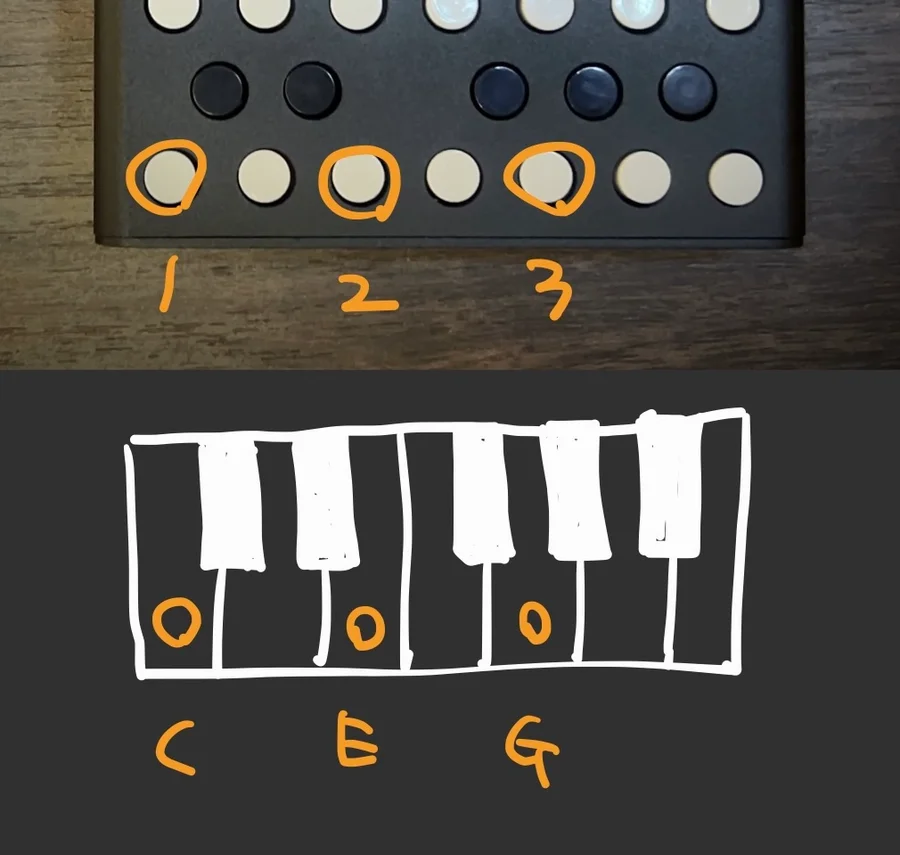
Resonance is applied centered on the frequencies of the three pitches C, E, G.
Roughly diagrammed, this looks like the following, where the frequencies corresponding to these three pitches are boosted:

Next, press the B keyboard button:
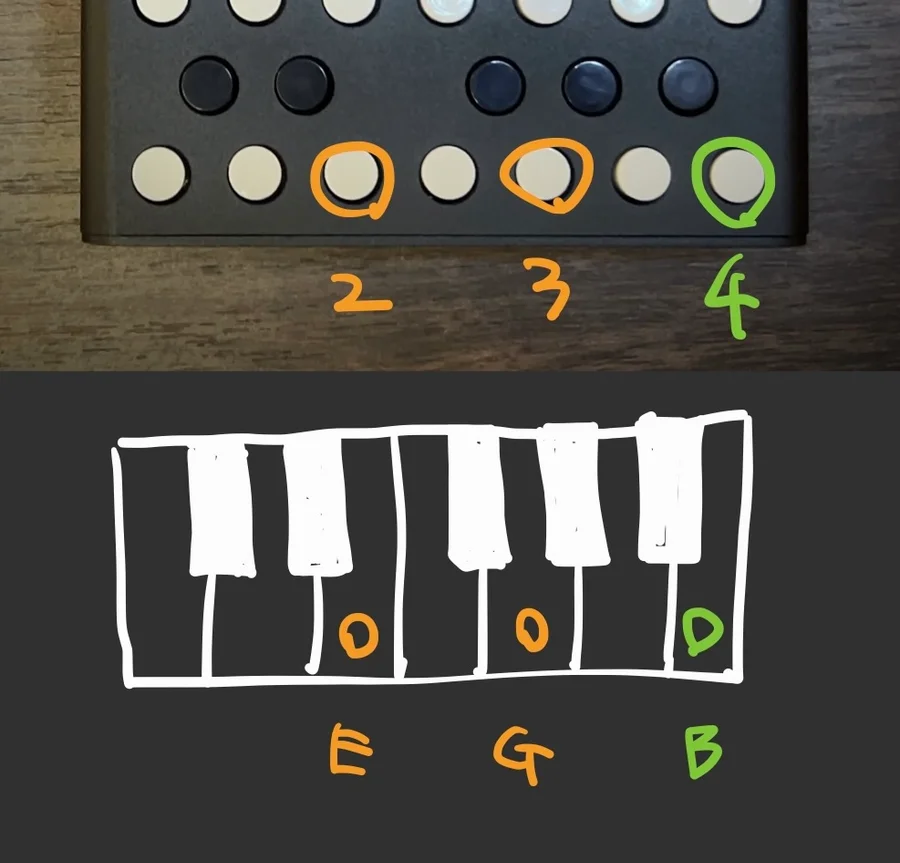
The first pitch C is dropped, and resonance is now applied at E, G, B.
The pitch set when pressing a keyboard button depends on the octave switch position. So when playing with the keyboard buttons, you’ll be working with both the octave switch and the buttons.
The resonators are completely independent for Left and Right: the upper keyboard row controls the Right pitch, and the lower row controls the Left pitch. The examples in this section apply only to the Left output. Setting different pitches for Right creates different resonance on each side.
The processed audio output is mixed with the audio source according to the Dry/Wet balance set by the Mix slider, then output from the Audio Out jack.
Tips: Making Good Use of Left/Right
If you connect the Audio Out directly to speakers, the Left and Right outputs will sound completely separated.
Using a mixer to adjust Left/Right panning, or applying a delay that pans between left and right, lets you blend the Left and Right resonator outputs as needed.
2. String Mode (Green)
From Poly mode, pressing the mode switch button changes the LED from white to green, indicating String mode. The voice count drops from 3 to 1, and the resulting sound has a more defined tone—like a mono synth mode.
Tap Sequencer Feature
Pressing keyboard buttons one at a time produces immediate pitch changes. While one-by-one button playing is possible, pressing multiple keyboard buttons creates a sequencer program.
For example, pressing C -> E -> G (holding C and E down until G is pressed) causes the pitch to cycle C -> E -> G -> C -> E -> G -> …
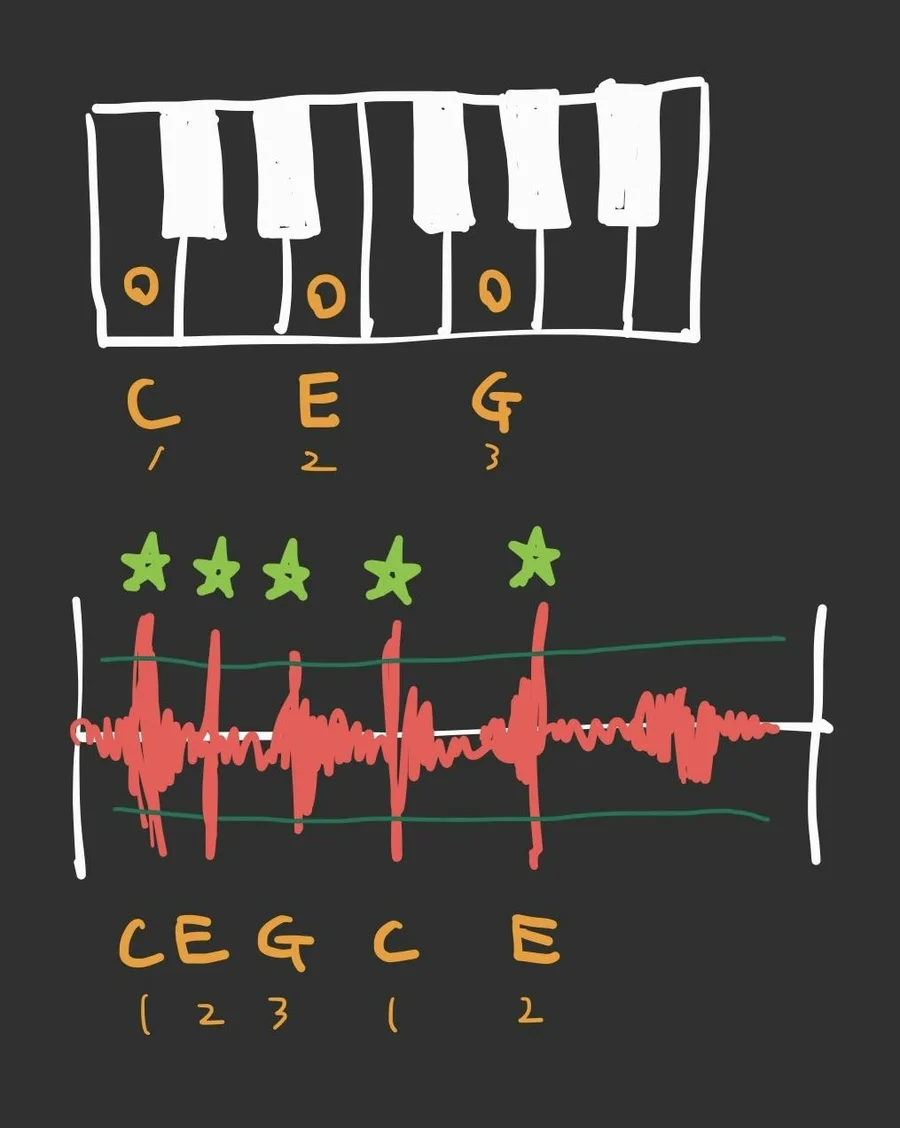
In String mode, the sound produced by the resonator can be understood as percussive sounds with zero attack and a decay, layering on top of each other. (The decay is what the Decay Time slider sets.)
The pitch changes when the audio source volume exceeds a set threshold.
This is the feature the Wingie2 manual calls the Tap Sequencer. The sequence is programmed by the order of simultaneously pressed keys. The sequence resets when new keyboard buttons are pressed.
The sound produced by the Tap Sequencer is essentially triggered when the audio source gets loud. So imagine it as an instant arpeggiator playing synth-like sounds in sync with the audio source—no separate oscillator required.
Tap Sequencer Threshold Setting
As mentioned, the resonator pitch change is triggered when the audio source volume exceeds a threshold, and this threshold is adjustable.
Setting the threshold low means even slight audio source volume increases trigger the resonator. Setting it high means the sequence doesn’t advance unless the audio source reaches very high volume.
For example, imagine a loop of hi-hat (low volume) + kick (medium volume) + crash (high volume). With a low threshold, all three trigger the resonator.
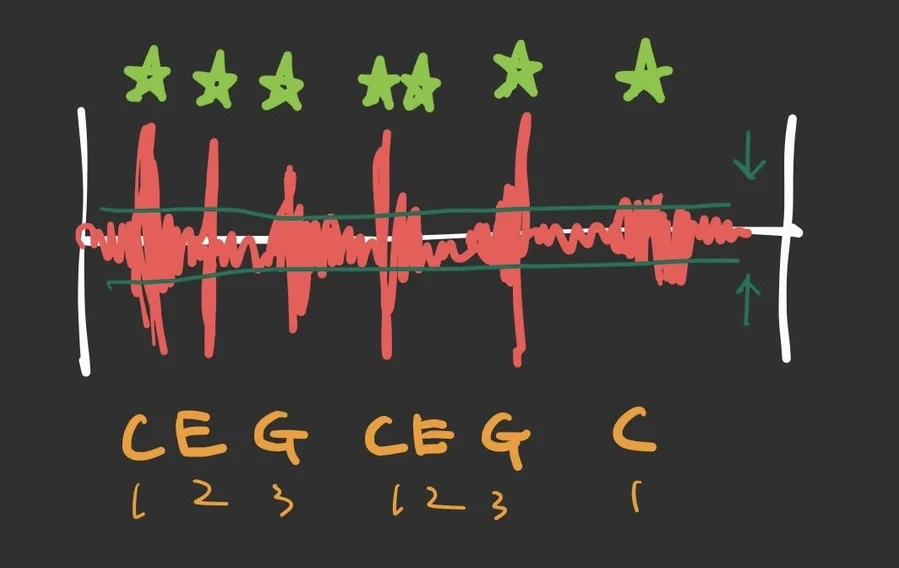
Raising the threshold further, only kick triggers the resonator.
Raising it even further, only crash triggers the resonator.
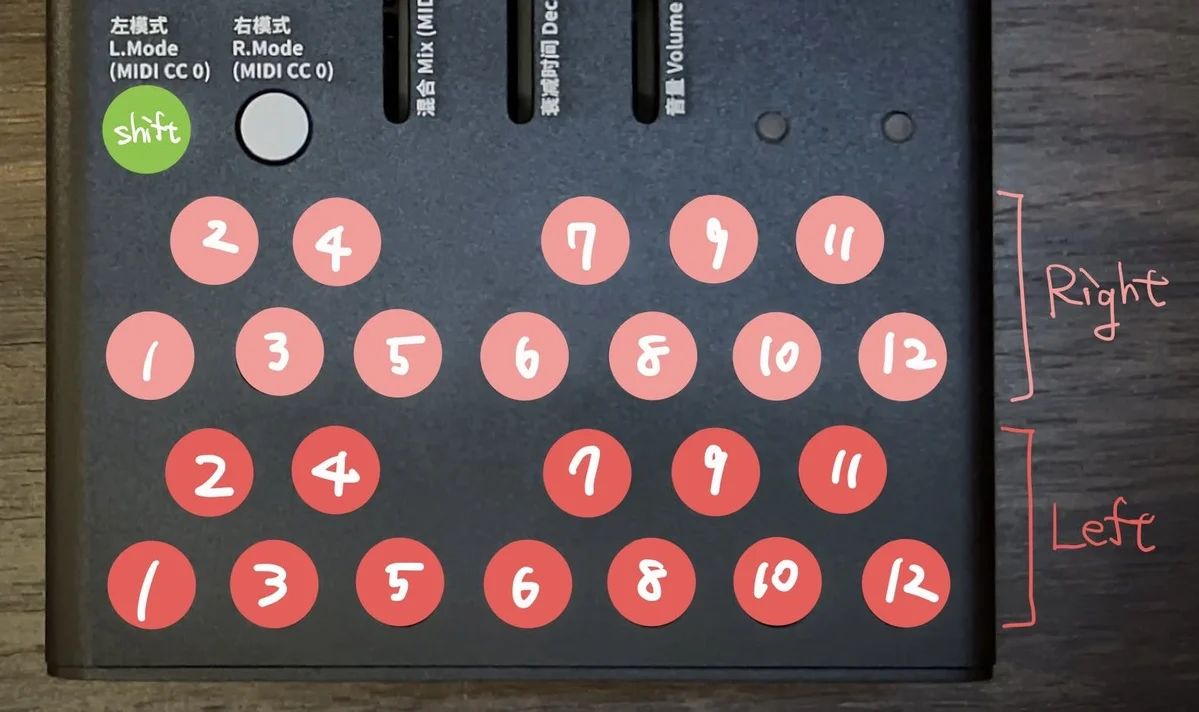
The threshold is adjusted by pressing a keyboard button while holding the left mode switch button (referred to here as the shift button). Holding shift and pressing a lower keyboard button adjusts the Left resonator’s threshold; holding shift and pressing an upper keyboard button adjusts the Right resonator’s threshold.
Below shows the threshold levels, with lower values on the left and higher values on the right:
It feels like adjusting an arpeggiator’s behavior.
3. Bar Mode (Red)
From String mode, pressing the mode switch button changes the LED from green to red, indicating Bar mode. The resonance processing is 1-voice like String mode but with a different timbre. Button behavior is identical to String mode’s Tap Sequencer.
“Bar” refers to the Bar Chime instrument, and this mode simulates its acoustic processing.
4. Cave Mode (Purple)
From Bar mode, pressing the mode switch button changes the LED from red to purple, indicating Cave mode. This is a mode with 9-voice resonance processing. (The manual doesn’t explicitly say “9 voices,” but the behavior seems best described this way.)
While String/Bar modes sound like a 1-voice synthesizer playing along with the audio source, switching to Cave mode transforms the sound into a reverb-like effect with wide, expansive resonance. This is because many pitches of resonance are applied simultaneously.
In Cave mode, the keyboard buttons have entirely different functions.
Voice ON/OFF and Pitch
Cave mode has 9 voices, each of which can be individually toggled ON/OFF. All are ON by default. Each voice’s ON/OFF state is toggled by pressing the corresponding keyboard button.
As with pitch setting, the upper keyboard buttons control Right resonator voice ON/OFF, and the lower buttons control Left resonator voice ON/OFF.
Starting with all voices ON, pressing buttons sequentially gradually reduces the resonance, eventually eliminating all resonator sound.
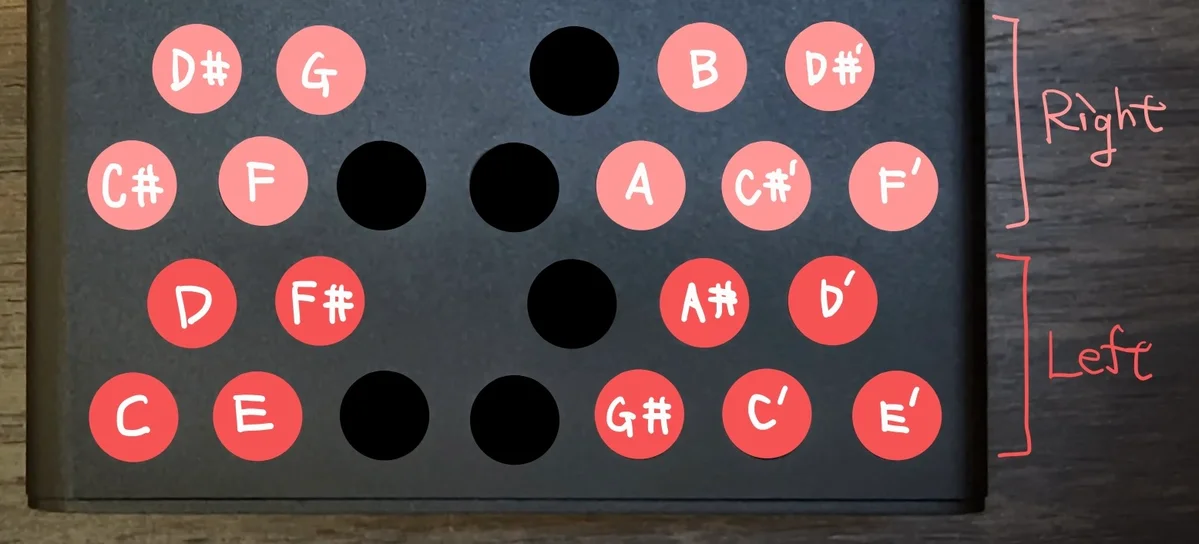
The 9 voices per L/R channel sound at the pitches shown above the buttons in the diagram. As mentioned, in all modes except Cave, the Right resonator is one octave higher than the Left. In Cave mode, however, there is no octave offset between Left and Right.
Looking at the pitch assignments for each button, you’ll notice they’re offset by semitones between Left and Right. This design creates the reverb-like expansiveness with a slightly dissonant quality characteristic of Cave mode.
Tuning Each Voice
The pitch assigned to each voice can be changed.
First, the octave switches work the same as other modes, offering three octave levels. Each voice has its assigned pitch from the previous section. Additionally, individual voice tuning is possible.
To tune, use the - button (E) and + button (F) shown in the diagram below. As before, upper buttons are for Right, lower for Left.
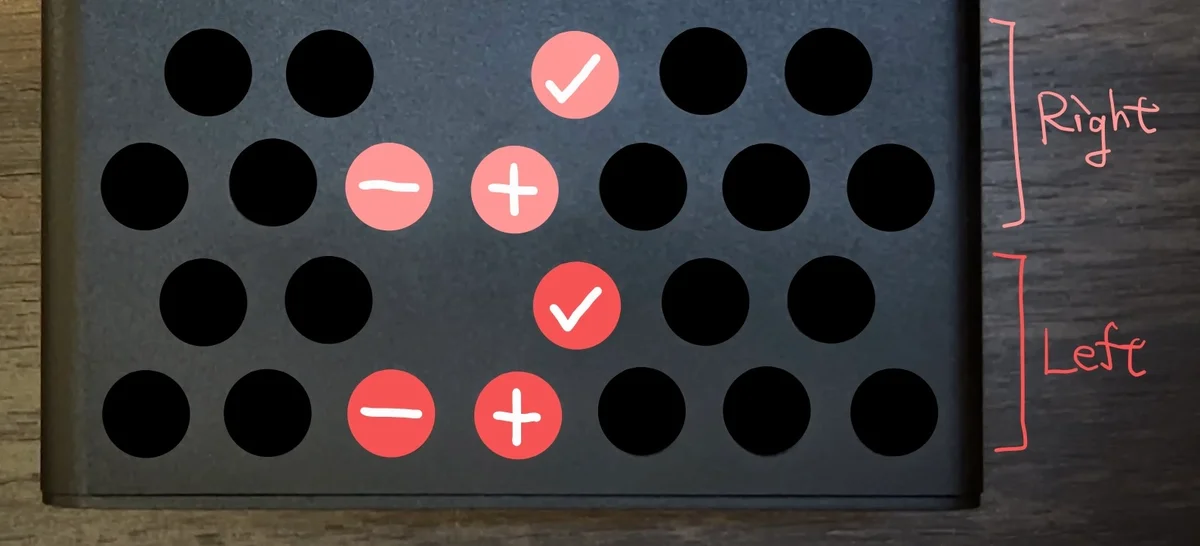
Holding the - button while pressing one of the 9 voice buttons lowers that voice’s pitch. Holding the + button while pressing a voice button raises it.
From my testing, the pitch changes seem to fall outside the chromatic scale.
Mute All / Unmute All
The - and + buttons also serve as mute all / unmute all controls. The operations are:
- Hold
-button (E) and presscheckbutton (F#) to mute all voices - Hold
+button (F) and presscheckbutton (F#) to unmute all voices
Practically speaking, when you’ve lost track of which voices are on or off, using mute all / unmute all is a helpful reset.
Internal Volume Adjustments
Beyond the Volume slider for final audio output control, Wingie2 also allows internal volume adjustments.
The Wingie2 signal flow first applies Saturation to the audio source (Pre), then applies resonance processing. After the resonator, a volume adjustment (Post) is applied, then the result is mixed with the original audio source according to the Mix slider and output from the Audio Out jack.
The following two parameters can be adjusted:
- Pre: Amount of saturation applied before the resonator
- Post: Resonator volume
This may sound confusing, but essentially: if the input is too quiet, raise Pre. If you want more resonance effect, raise Post.
These adjustments use the buttons shown in the following diagram:
The operation is similar to the Tap Sequencer threshold adjustment.
To adjust, hold the right mode switch button (referred to here as the shift button) while pressing a keyboard button. Holding shift and pressing a lower keyboard button adjusts saturation (Pre); holding shift and pressing an upper keyboard button adjusts resonator volume (Post).
The values on the keyboard buttons indicate the saturation amount / volume level, with higher values toward the right, similar to the threshold adjustment.
This volume adjustment is shared between the Left and Right resonators.
MIDI Control
Wingie2 can receive MIDI input through the rear MIDI TRS jack and control nearly all parameters. Since the full scope is quite complex, this section covers the MIDI features most people will use regularly.
MIDI Channels
Three MIDI channels are used: 1, 2, and 3. Their purposes are:
1: Controls the Left resonator2: Controls the Right resonator3: Controls both Left and Right resonators simultaneously
If you want independent control of the Left and Right resonators, use channels 1 and 2. If you want to control both simultaneously, use channel 3.
MIDI Note On
In all modes except Cave, Wingie2 accepts pitch changes via MIDI Note On. Receiving a Note On is essentially the same as pressing a keyboard button. (Note Off is ignored.)
However, in String/Bar mode, the Tap Sequencer feature only works with the keyboard buttons.
MIDI CC (Control Change)
Various Wingie2 parameters can be controlled via MIDI CC.
Numbers like CC11 are printed next to the sliders on Wingie2, indicating the CC number that controls each slider. The CC assignments are:
11: Mix slider (Dry/Wet)1: Decay Time slider7: Volume slider
MIDI Control vs. Physical Controls
For example, Volume can be changed via MIDI but also via the physical Volume slider. In such cases, the most recently received input takes precedence.
For instance, if you set Volume to 0 via MIDI to silence the output and then move the Volume slider even slightly, the slider’s value takes over and sets the Volume to the slider’s position.
Additional Features
That covers the basic usage of Wingie2, but several additional features are available. This section briefly introduces them.
Alternative Firmware: Blippoo
An alternative firmware called Blippoo is available for Wingie2, which transforms it into an entirely different instrument.
Blippoo was inspired by the Blippoo Box synthesizer developed by Dutch synthesizer engineer Rob Hordijk (1958-2022).
I haven’t tried Blippoo at the time of writing, but based on the introduction video below, it seems to produce quite distinctive sounds.
If you’re curious, try installing it yourself and enjoy a different side of Wingie2.
Blippoo is available for download here:
Alternative Tunings
Wingie2 uses standard Western tuning (12-tone equal temperament) by default, but 8 alternative tunings are also available.
For details on alternative tunings, please refer to the manual.
Control via Pd
As mentioned, many parameters can be controlled via MIDI, and Wingie2 Tools software is available for this purpose.
This tool was created in Pd, a graphical programming environment, and can be opened with the following software:
When opened, it looks like this, allowing individual adjustment of parameters covered earlier as well as Alternate Tuning and individual Cave mode tones:

To use Wingie Tools, you’ll need a MIDI interface connected to your PC/Mac, and the Wingie2 receives the input through its rear TRS MIDI jack. (Note: control via USB cable connection is not possible.)
Meng Qiについて
Meng Qiは中国北京を拠点に活動する電子楽器のクリエイターです。
Meng Qiの作る楽器は非常にユニークなモノばかり。それでいて音楽的に高いセンスで作られており、触るとワクワクするものばかりです。是非彼のInstagramを見てください。Meng Qiがすべて手作りしている様子と、異常なまでに細かい技巧に驚くはずです。
オマケ: 電氣美術研究會モジュラー小物セット付き

モジュラーシンセをもっと多くの方に触って欲しいという願いの元、電氣美術研究會さまにご協力頂き、モジュラー小物セットを本商品にバンドルさせて販売させていただいております。
パッチケーブルや電源ケーブル、ドレスナットのサンプルセット、モノラルスプリッターなど、内容は時期に応じて変化します。商品に同梱しますので是非お試し下さい!
That concludes our overview of Wingie2. For more detailed information, please refer to the original manual.
For me, Wingie2 was initially something I brought in alongside the DPLPG as a small addition. But after trying it out, it turned out to be incredibly interesting, and it’s become a product I want to recommend to many people.
There are many resonators available for modular synths, but honestly, I had been using them without really understanding what they do. Specifically, Rings by Mutable Instruments is very famous and considered essential, and while I owned a clone, I didn’t really understand what it was doing for me.
Wingie2 offers many different ways to use resonance, making it an excellent instrument for understanding what resonance actually is. And for music production and live performance, it effortlessly adds rich tonal character to sounds that lack it—it’s remarkably accessible yet deeply rewarding to explore. I personally discovered how fascinating it is to simply run drums through Wingie2.
We hope you find this helpful.