
This is EP.1 of the OXI E16 guide series. This time, I'll cover all of the E16's features, pulling together the content from the two official videos.
The OXI E16 is a MIDI controller with 16 metal endless encoders, LED rings, and a bright display. It's not just a plain MIDI controller — it packs in a lot of features for expanding your musical expression, like Snapshot, Grouping, and asynchronous recording. It's housed in a rugged aluminum unibody, so it'll hold up whether you're on stage or in the studio.
The control scheme is simple too, designed so that you can reach every feature with a single Shift button.
- Hardware Overview
- Scenes and Pages
- Mapping Basics
- Swap Destination
- Grouping
- Snapshot
- Randomization
- Store
- Recording
- Mute
- Making the Most of the OXI App
- Practical Setup Examples
- Practical Tips
Hardware Overview
Here's the physical layout of the E16:
Top: Shift button (also used to power on/off)
Front: 16 high-quality endless encoders (LED colors are configurable, with two mapping destinations plus a press action per encoder)
Rear: USB, MIDI OUT ×2, MIDI IN ×1
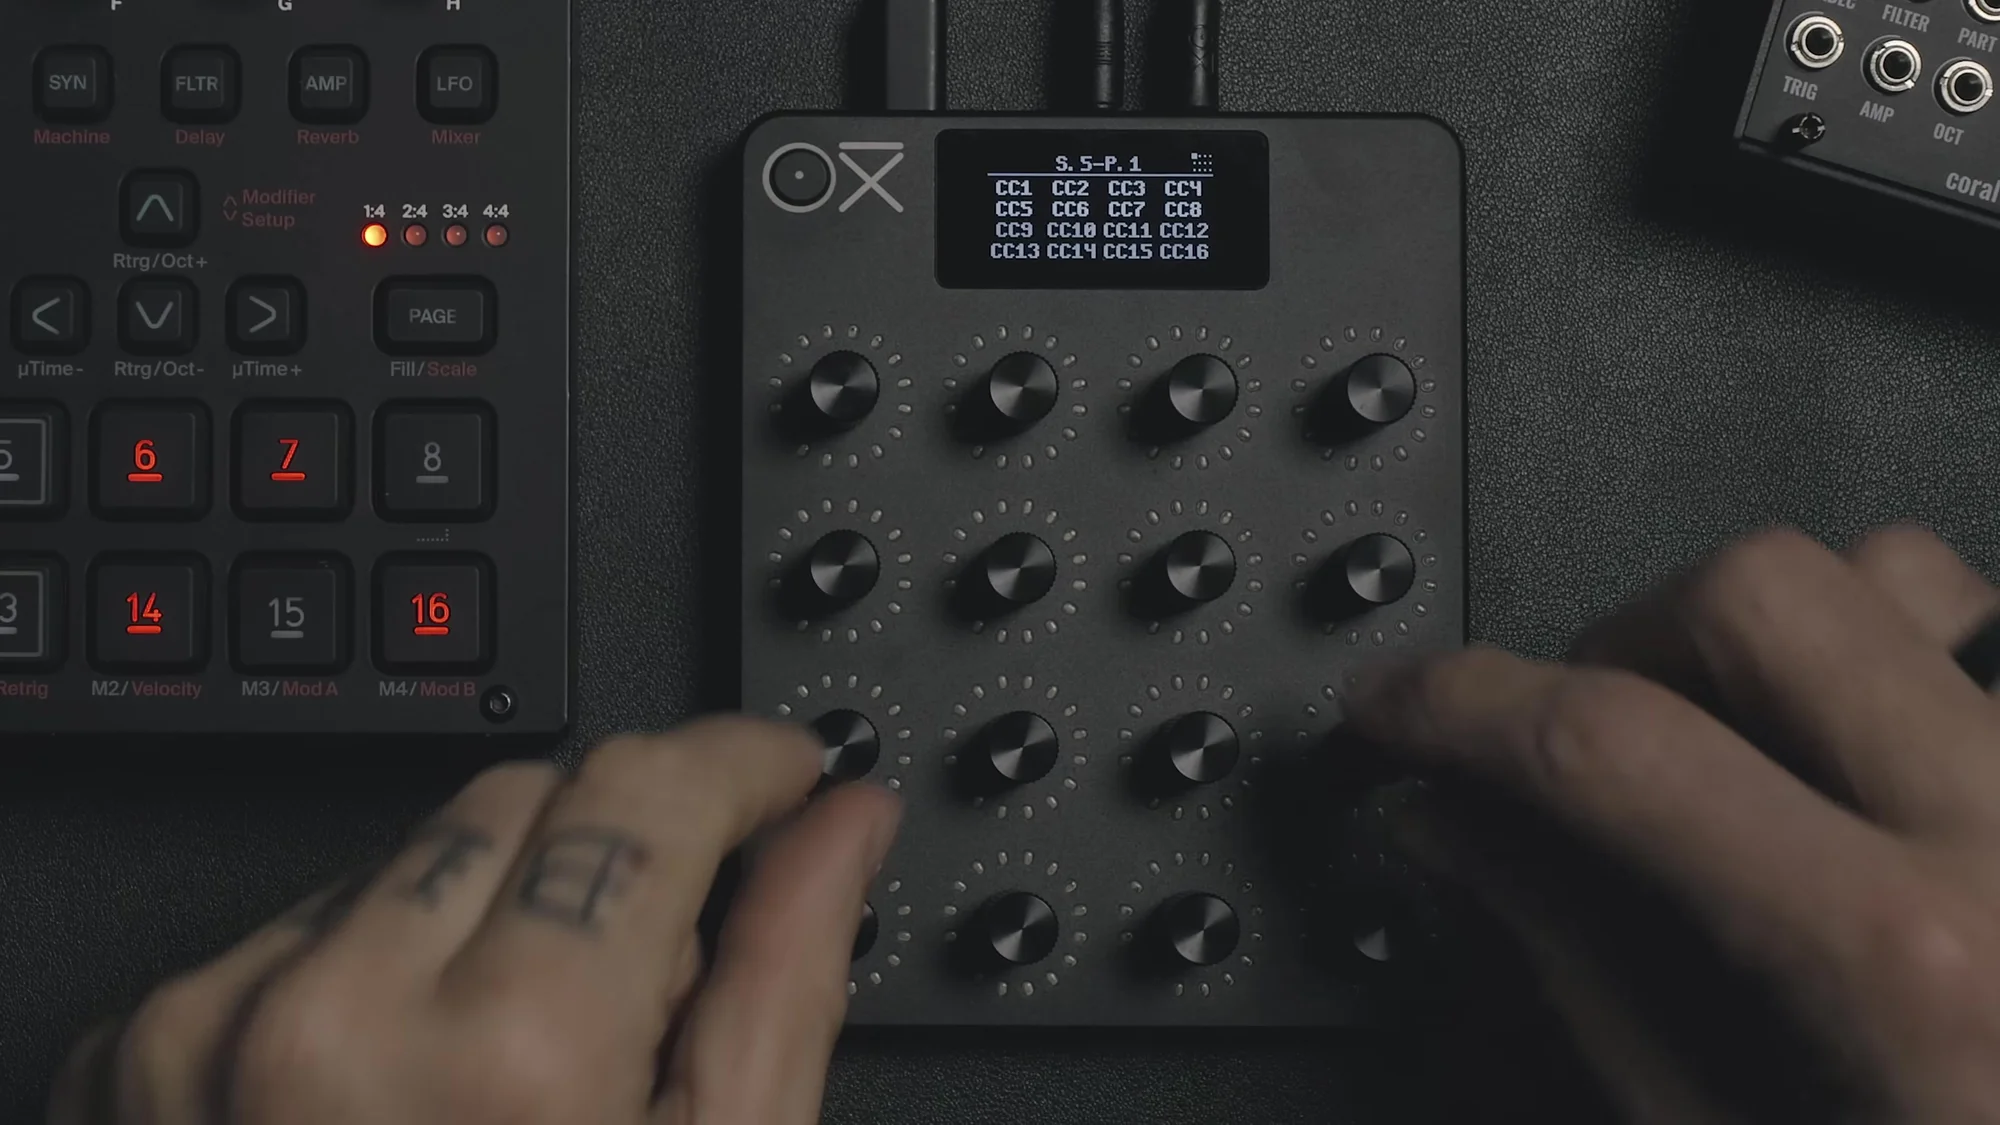
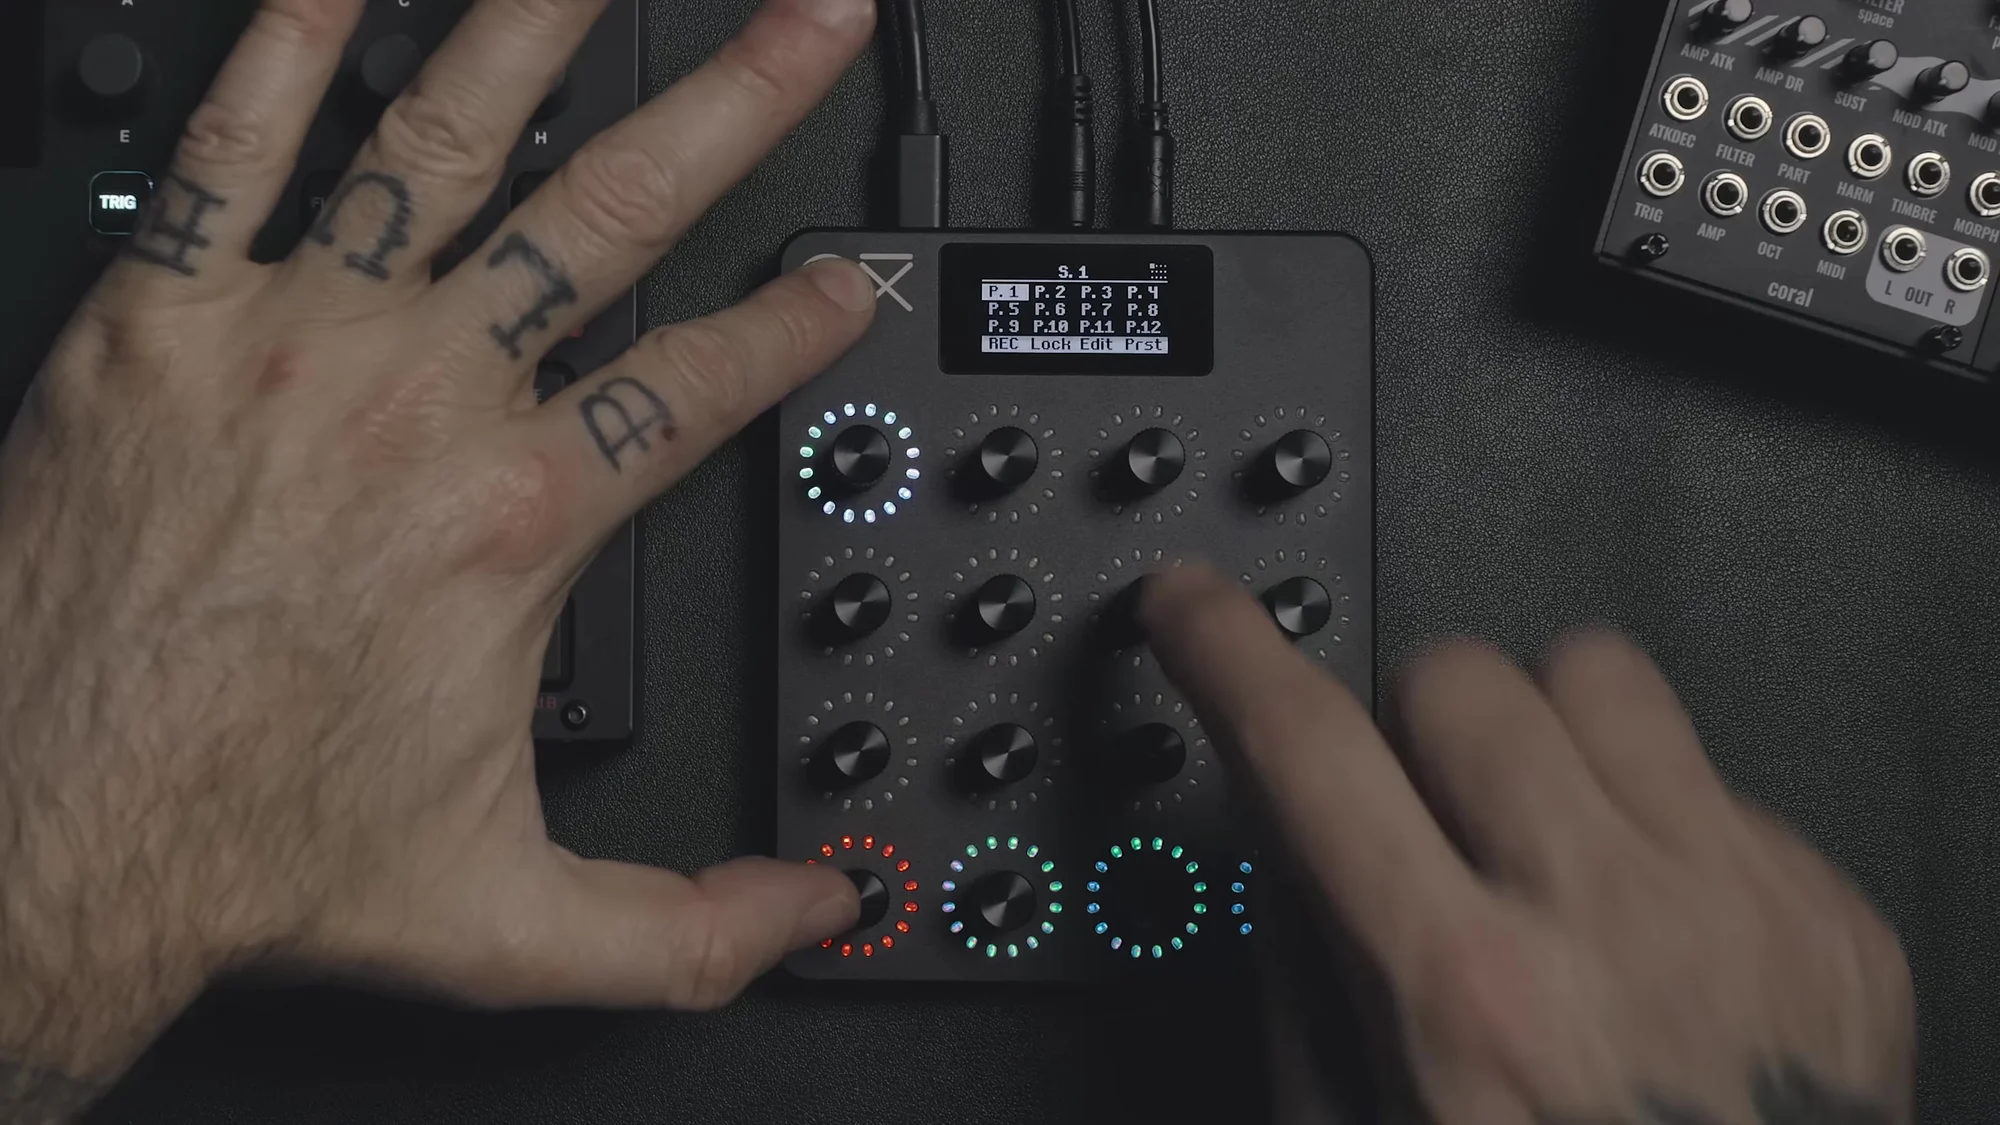
When you power it on, the main page appears, giving you quick access to 7 of the 16 scenes. To reach scenes 8–16, press Shift and then turn an encoder. Scenes can also be switched via MIDI CC.
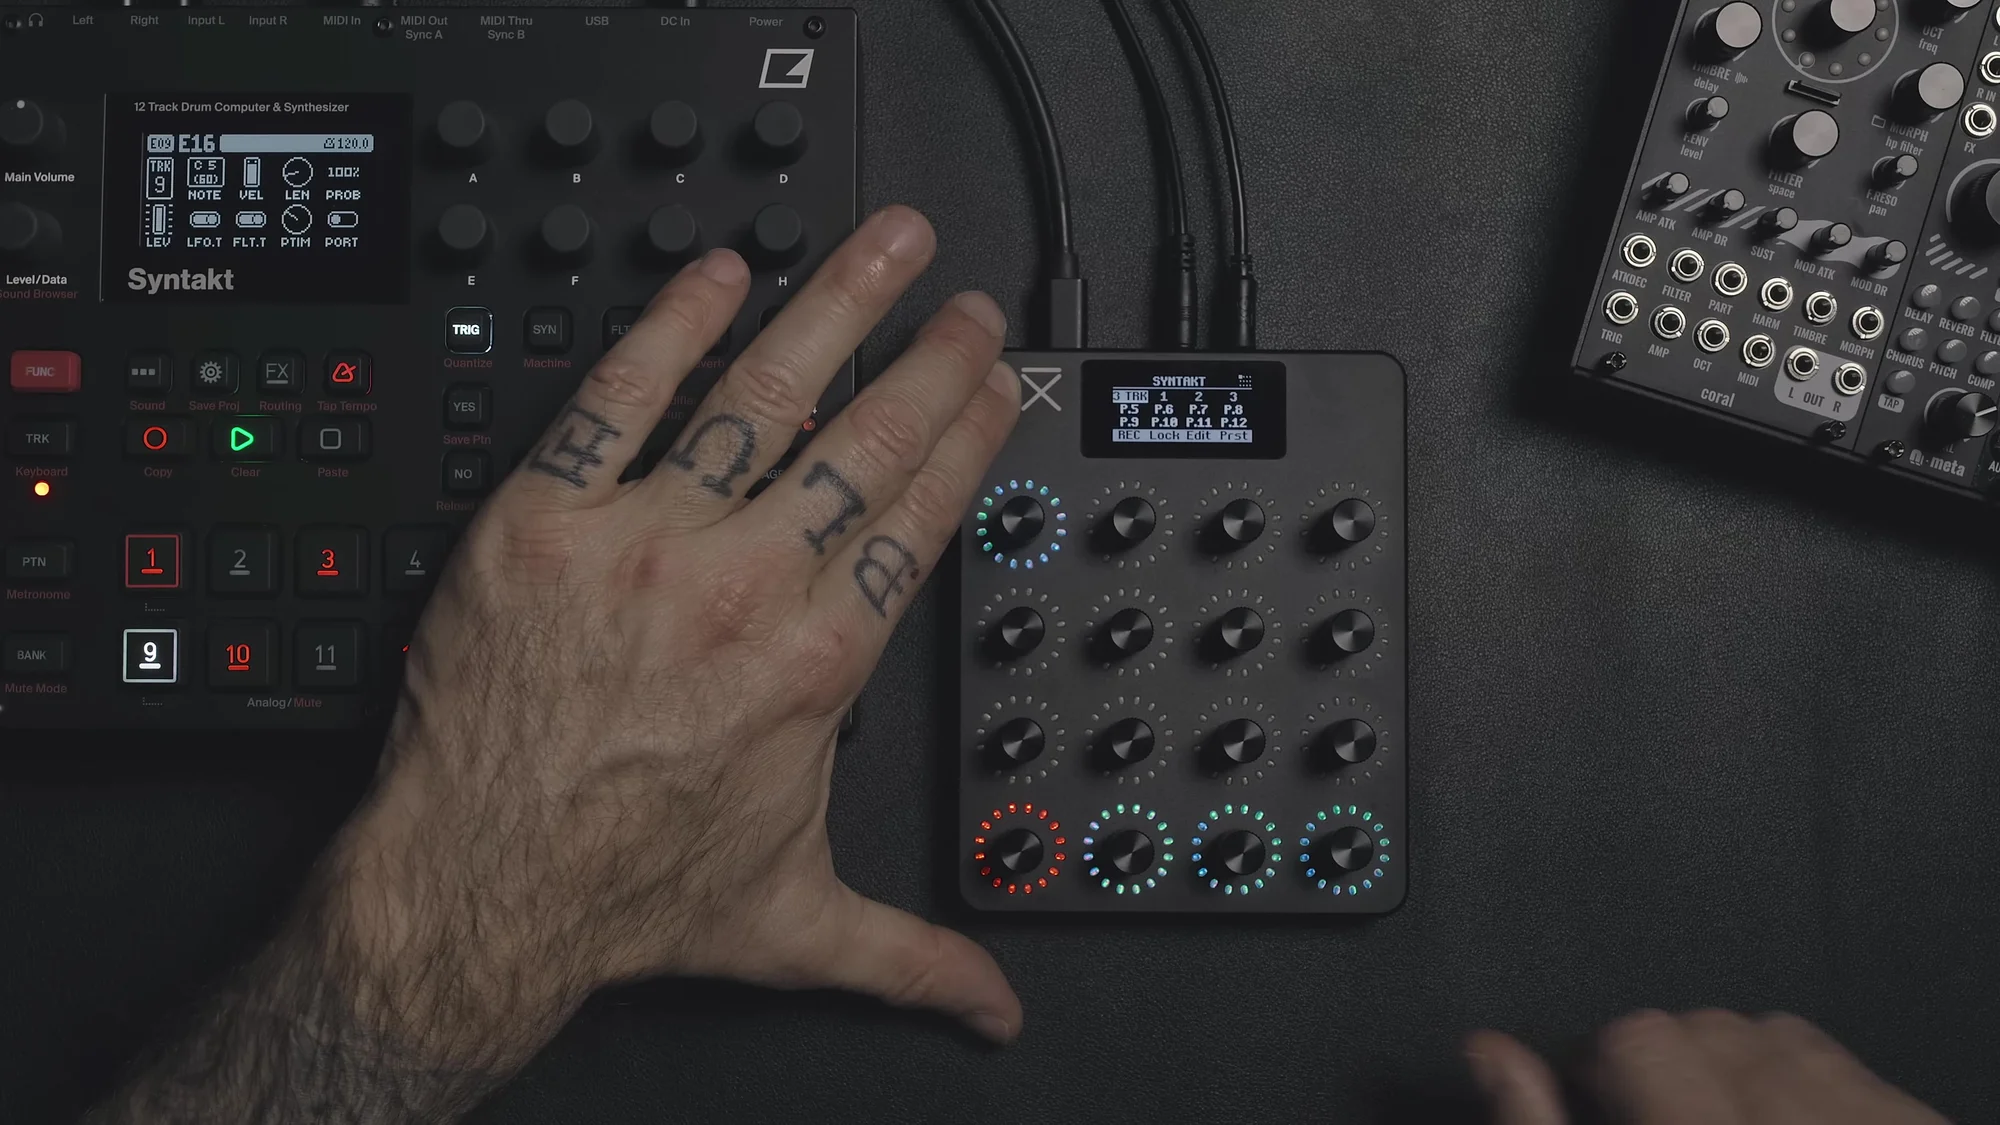
Scenes and Pages
The E16's content is organized into scenes and pages.
1 scene = 12 pages × 16 controls = 192 mappable controls
16 scenes available
Each scene has 16 presets for saving and recalling its state
In other words, the idea is to create a scene per instrument or setup, and organize the parameters within it page by page. For example, page 1 could be the basic parameters for three tracks, page 2 the filter-related controls, and page 3 the mixer.
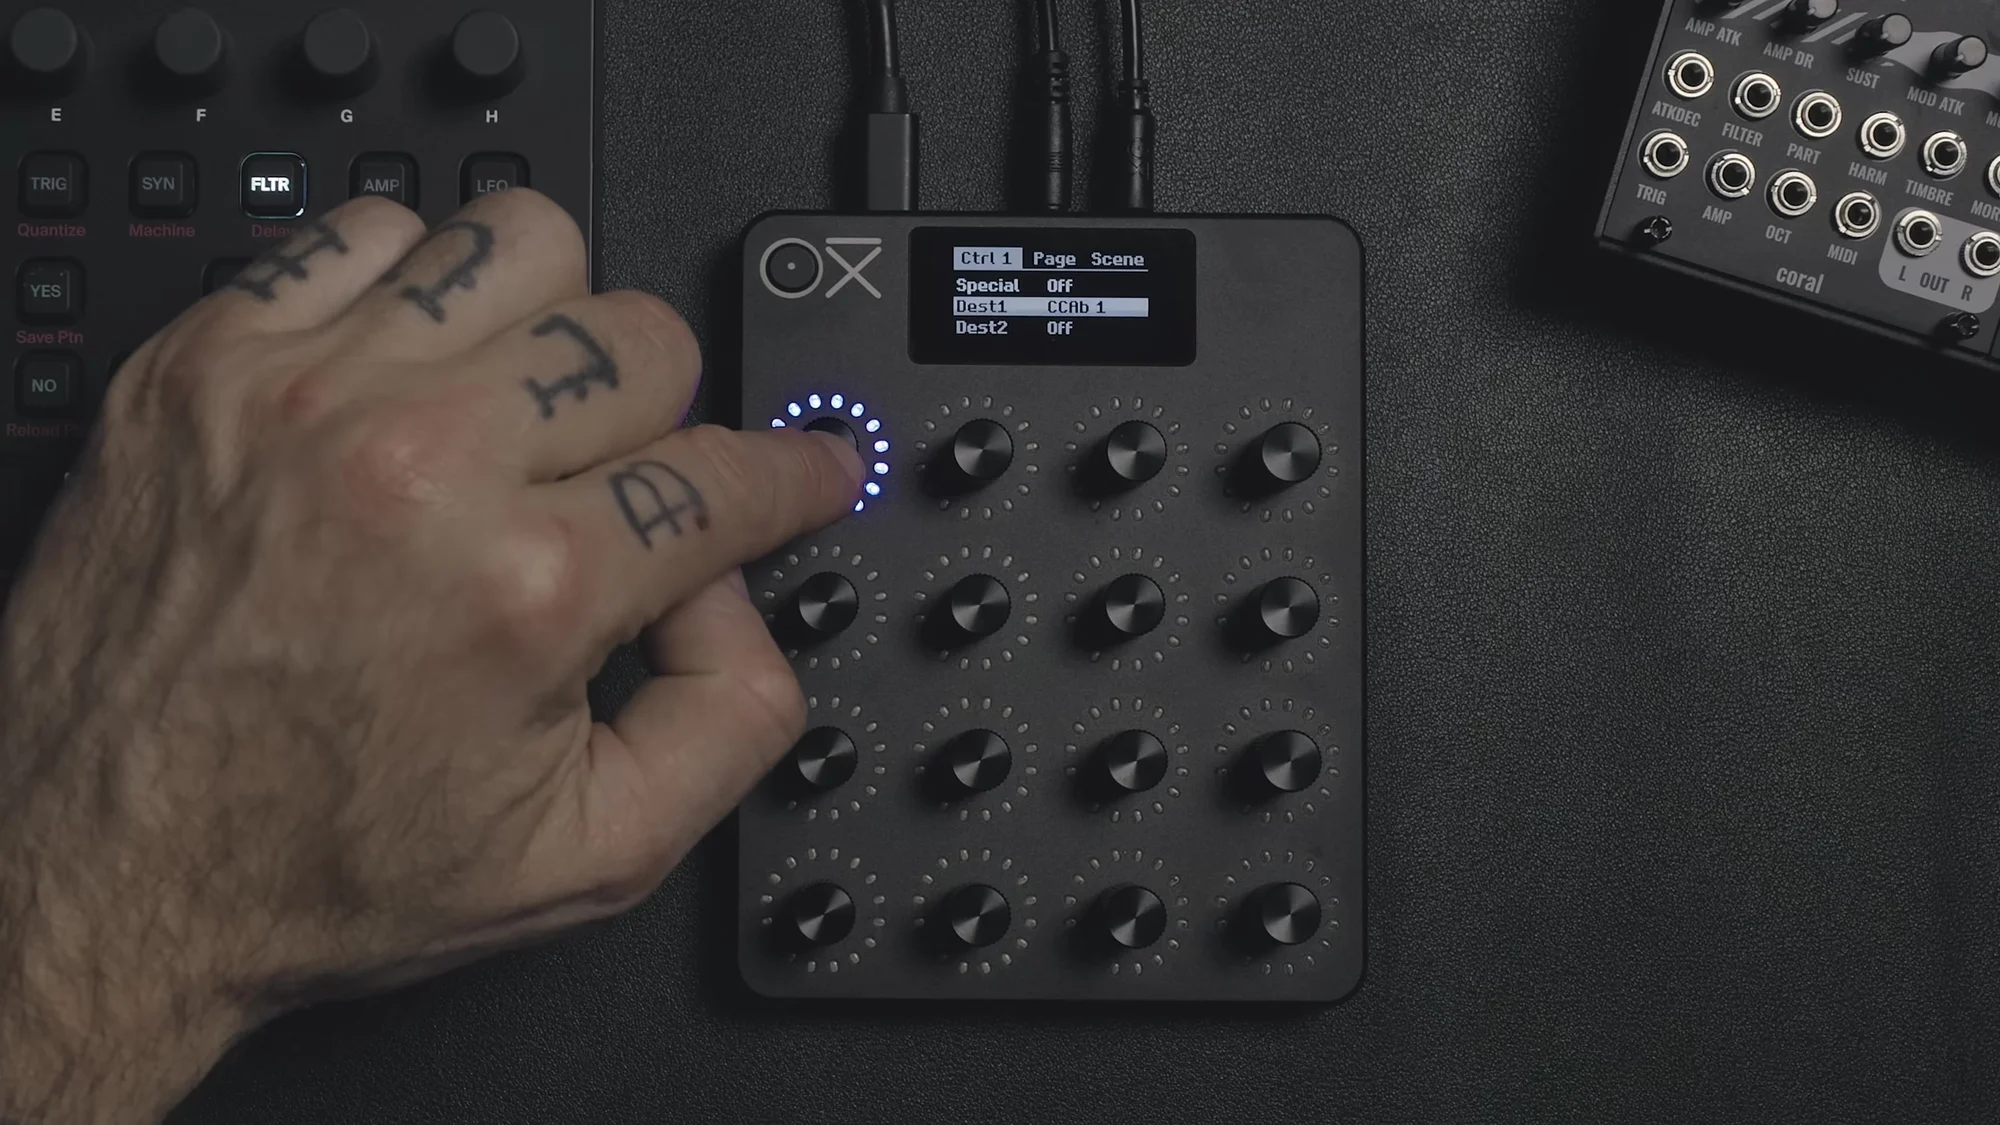
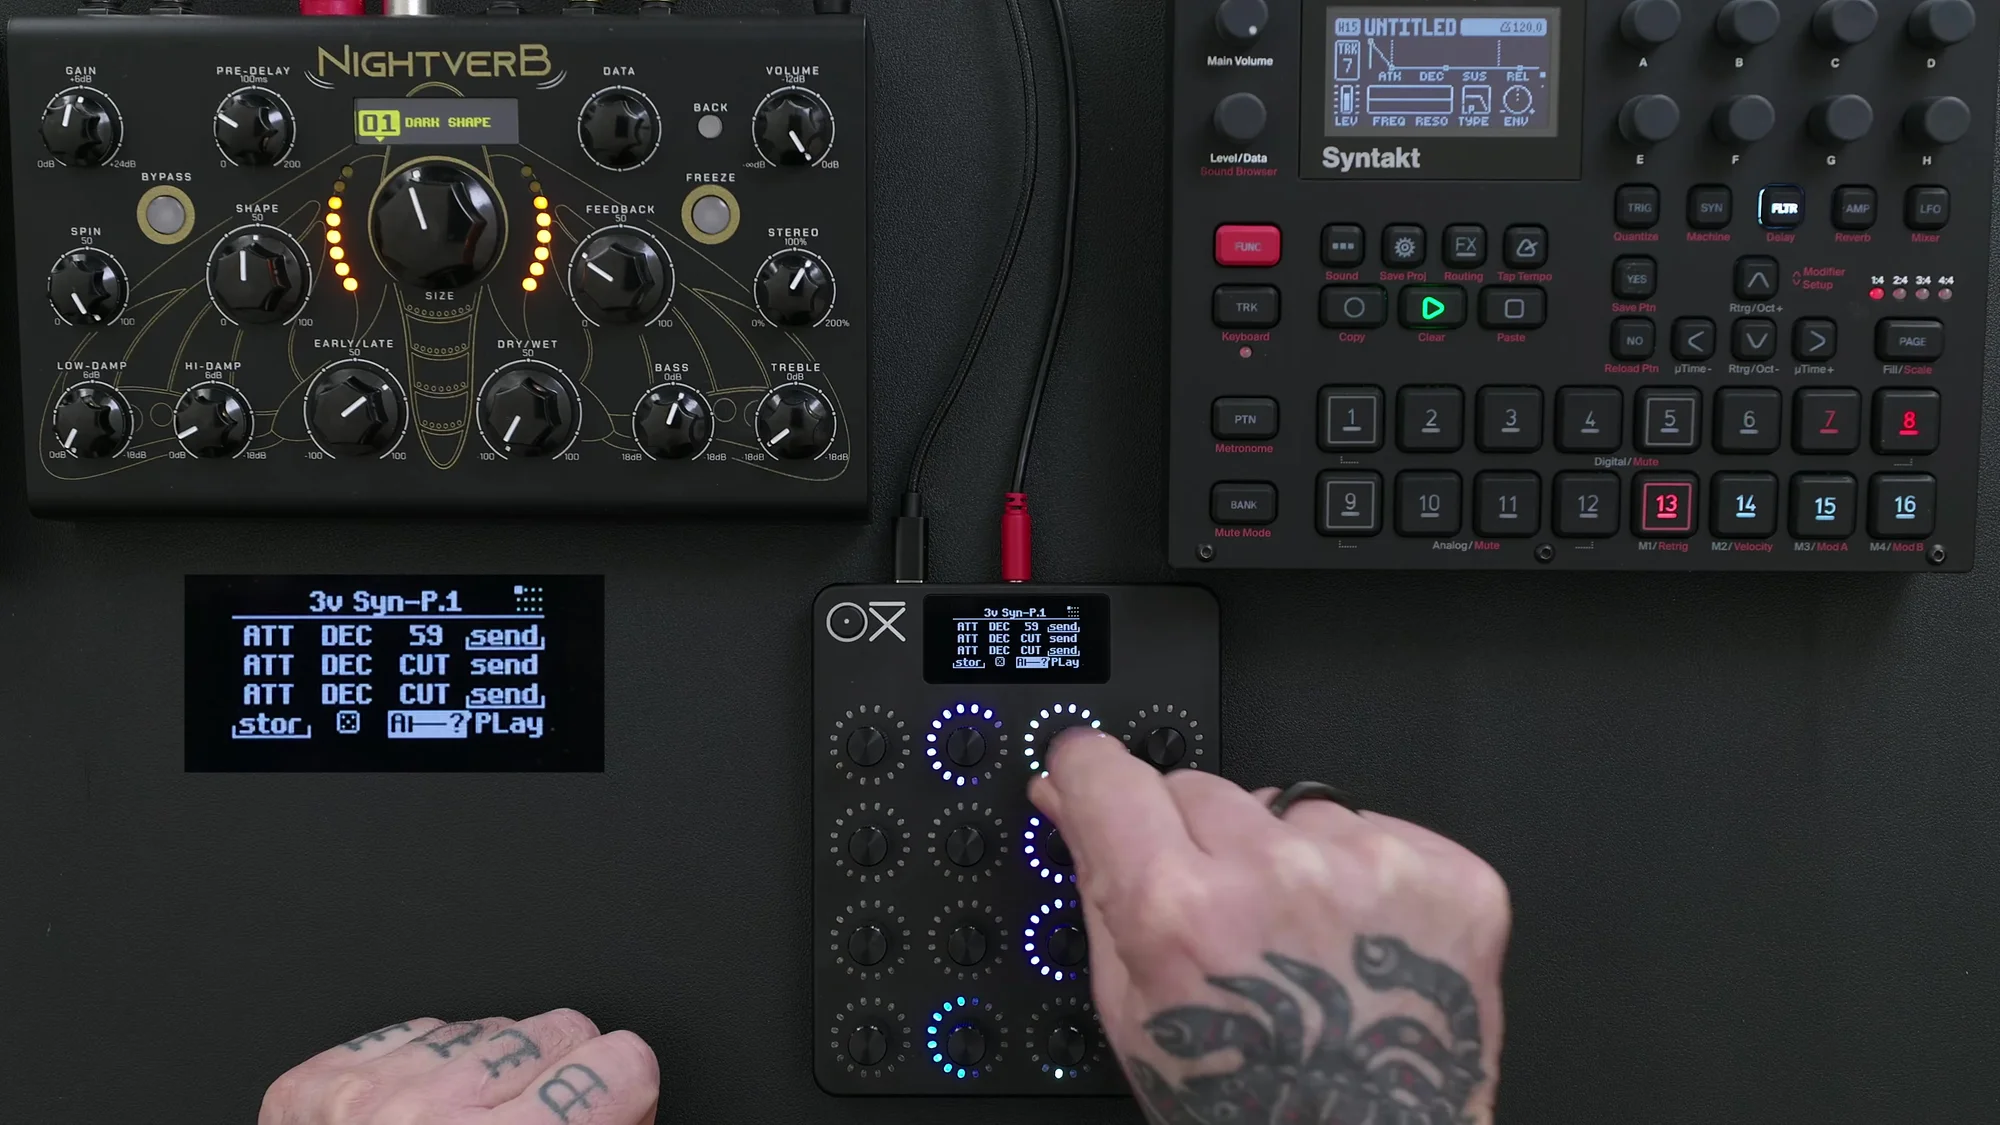
Mapping Basics
Mapping on the E16 is straightforward:
Press and hold an encoder, then press Shift → the edit page opens
Select Destination 1 and set the MIDI CC number
Set the MIDI channel
Choose the output (TRS, USB, Bluetooth, or follow the global setting)
Press Shift to go back
You can do the mapping on the E16 itself, or you can set things up more efficiently using the OXI app. In the app, you can load MIDI CC definition files for your instruments, or create and save your own.
There's also a rename feature for controls, so it's handy to name them so you can see at a glance what's assigned to each one.
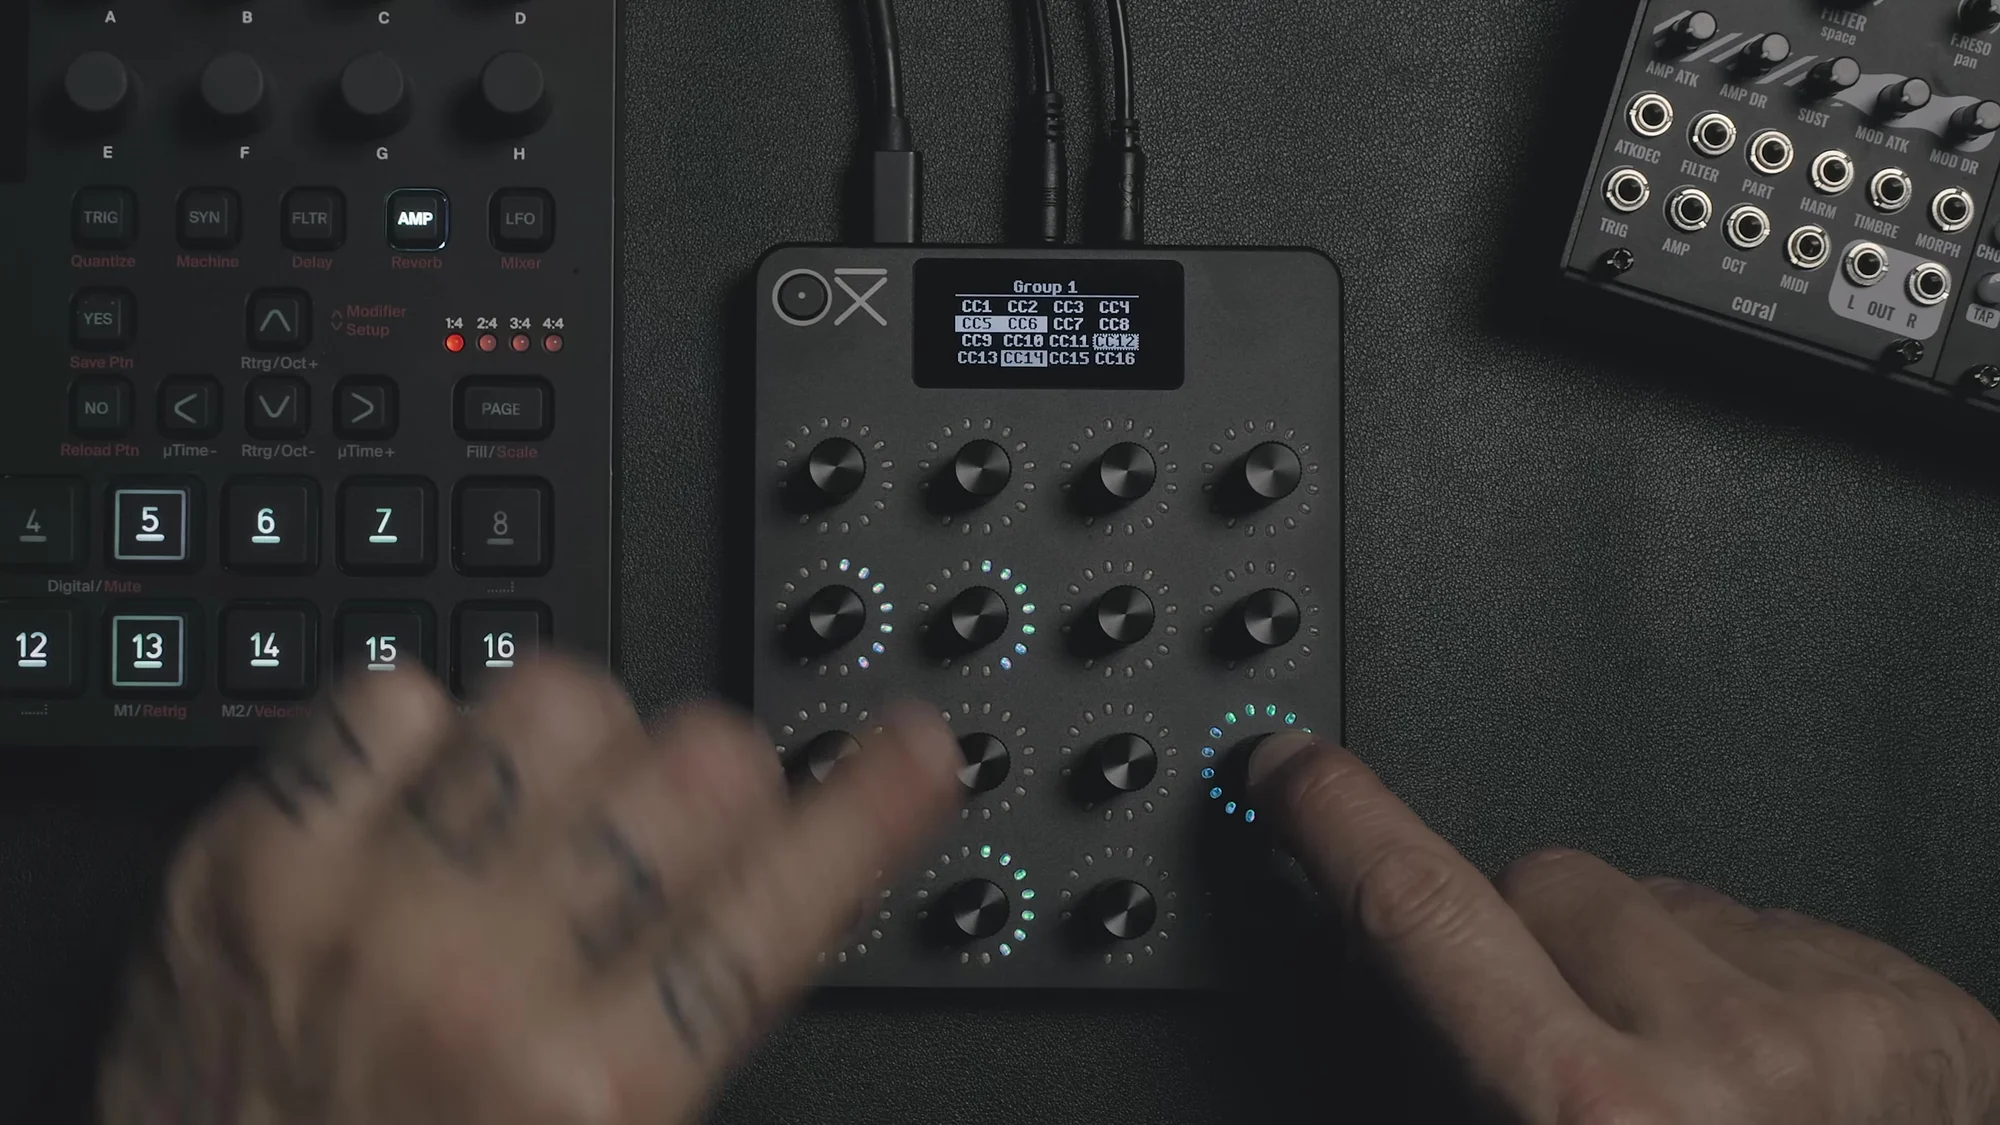
Swap Destination
Swap Destination is a feature that lets you assign two CC destinations to a single encoder. Pressing the encoder switches between the two destinations.
For example, you can assign filter cutoff (purple) and resonance (green) to one encoder. This effectively doubles the number of controls that fit on a single page.
Here's how to set it up:
Press and hold an encoder → Shift → Special tab → select Swap Destination
It can also be set up from the OXI app
You can tell which destination is currently selected by the LED color. When the second destination is in use, a bar appears below the number on the display.
In the video example, each track's encoders were assigned Attack, Decay, Filter Cutoff (+Resonance), and Send (Delay/Reverb switching), letting you operate three tracks from a single page. It's an incredibly handy feature for grouping together the parameters you reach for most during a performance.
Grouping
Grouping is a feature that links multiple encoders so you can operate them all at once from a single master encoder.
How to do it:
Press and hold the encoder you want as the master
Tap the encoders you want to include in the group (their LEDs light up white)
Release the master
Now, turning the master moves all the encoders in the group together. To undo it, press and hold the master again and tap the group members.
Inverting Polarity
There's another fun way to use Grouping. While holding down the master, turn a member encoder counterclockwise, and that member's polarity inverts. In other words, when you turn the master clockwise, the inverted member moves in the opposite direction.
For example, if you group three tracks' volumes so that two go up and one goes down, you get unexpected movement and variation, which makes for an interesting effect.
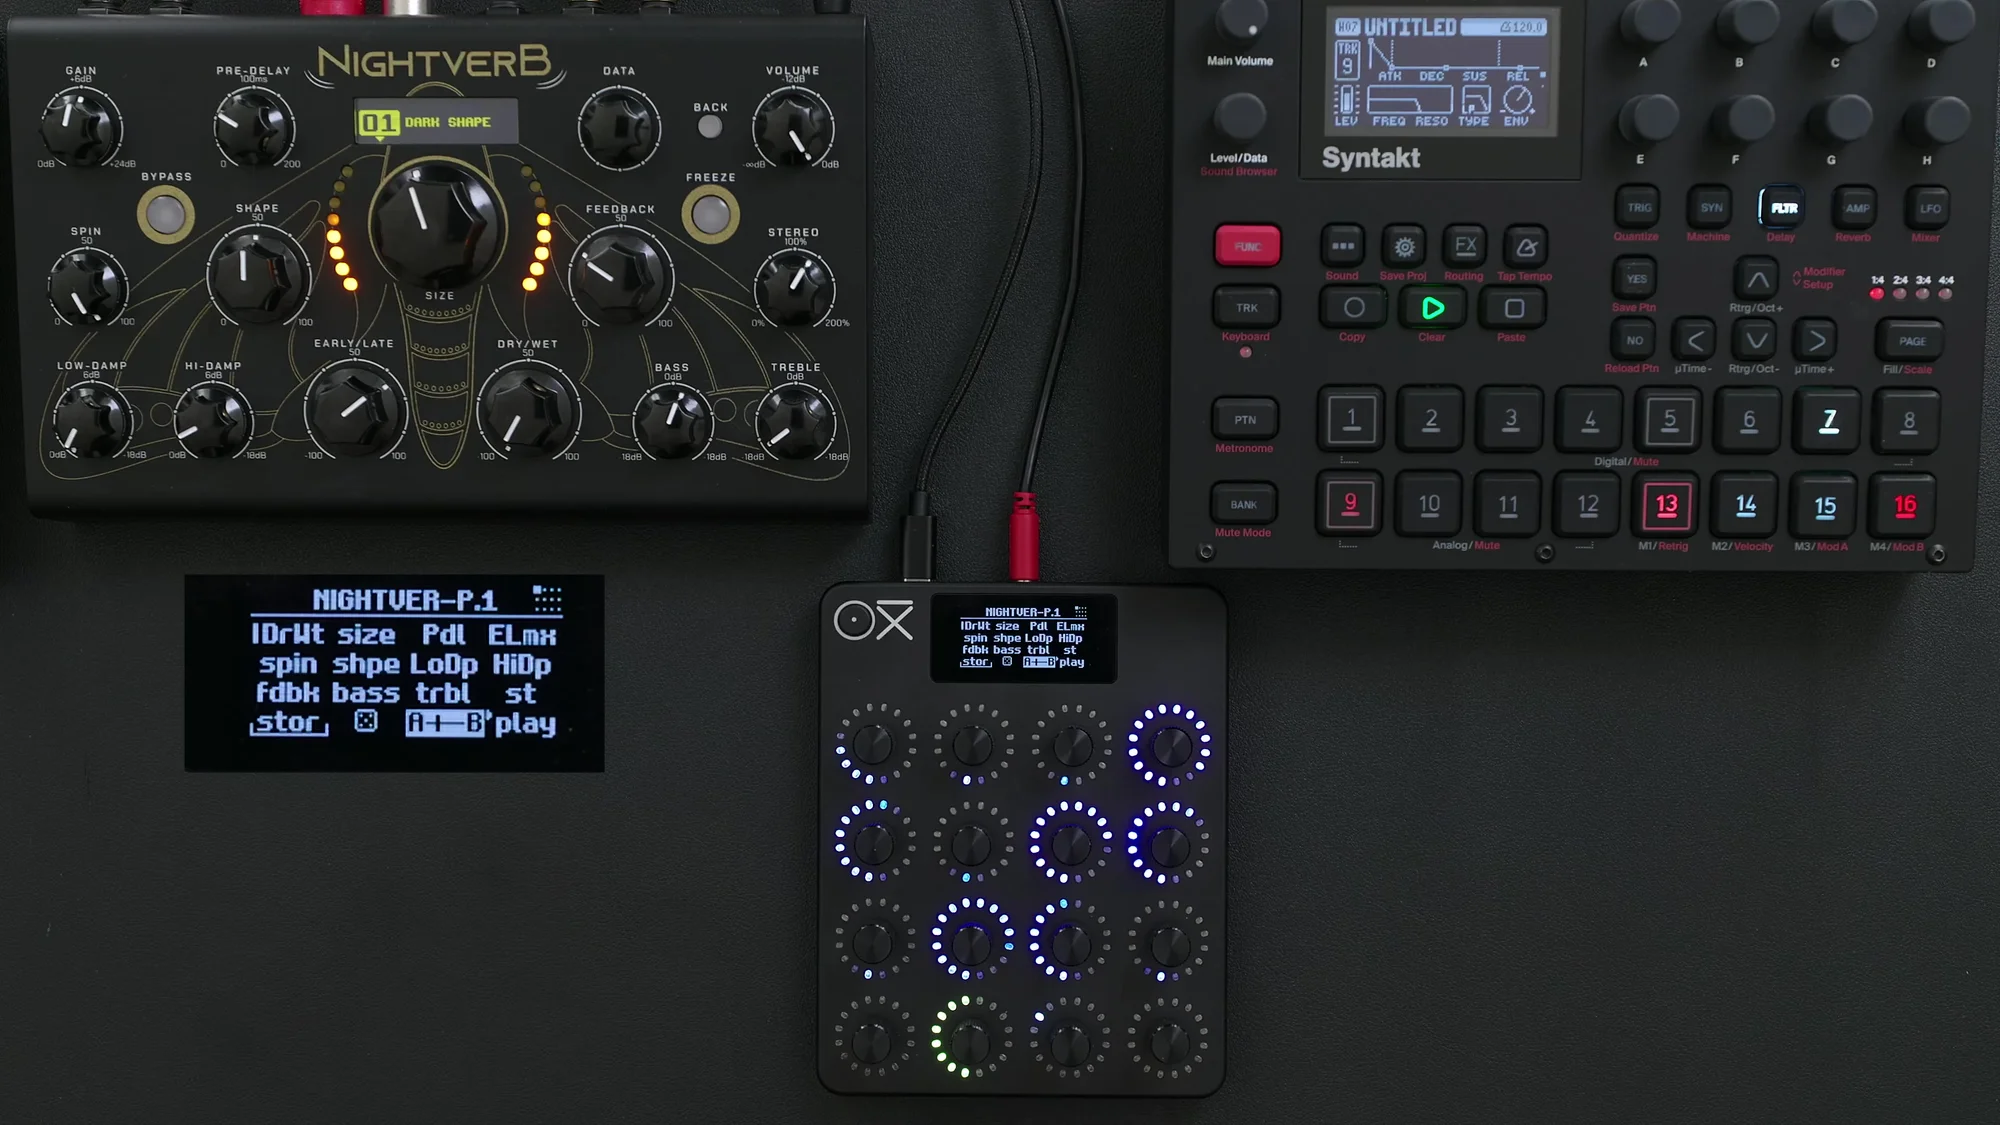
Snapshot
Snapshot is a feature that stores two states of an entire page (A and B) and lets you morph between them. It's perfect for transitions, or for exploring the "middle ground" between settings.
Setup
Pick one encoder to use for the snapshot
Press the encoder → Shift → Special → select Snapshot
A and B sliders appear on the display
Capturing States
Dial in a sound you like → press and turn the snapshot encoder counterclockwise → captures State A
Change to a different setting → press and turn the snapshot encoder clockwise → captures State B
Once captured, you can smoothly move back and forth between A and B just by turning the snapshot encoder. It's a great feature for finding those "happy accidents" that live in between two sounds.
You can also choose which parameters to include in the snapshot individually by selecting the target encoders while holding down the snapshot encoder. This is handy when you only want to morph specific parameters.
Randomization
Randomization is a feature that randomly changes encoder values. It's a ton of fun, especially in combination with effects.
Setup and Usage
Press the encoder → Shift → Special → select Random
A dice icon and the randomization amount (a percentage) appear on the display
Each time you press the encoder, randomization runs
The randomization amount determines how much things change relative to the current encoder value. Setting it to around 40% gives you a nice, moderate amount of variation.
Choosing What Gets Randomized
There may be times when you don't want to randomize every encoder — for example, when you want to control the dry/wet balance yourself.
Pressing in the Randomize encoder shows the encoders that are currently set to be randomized. Tap the ones you want to exclude, and they'll no longer be affected by randomization.
Morph Timer
Randomization also has a timer feature. When you set a timer (e.g., 3 seconds), the randomization isn't applied instantly — instead, it gradually transitions from the current state to the randomized state over the time you set.
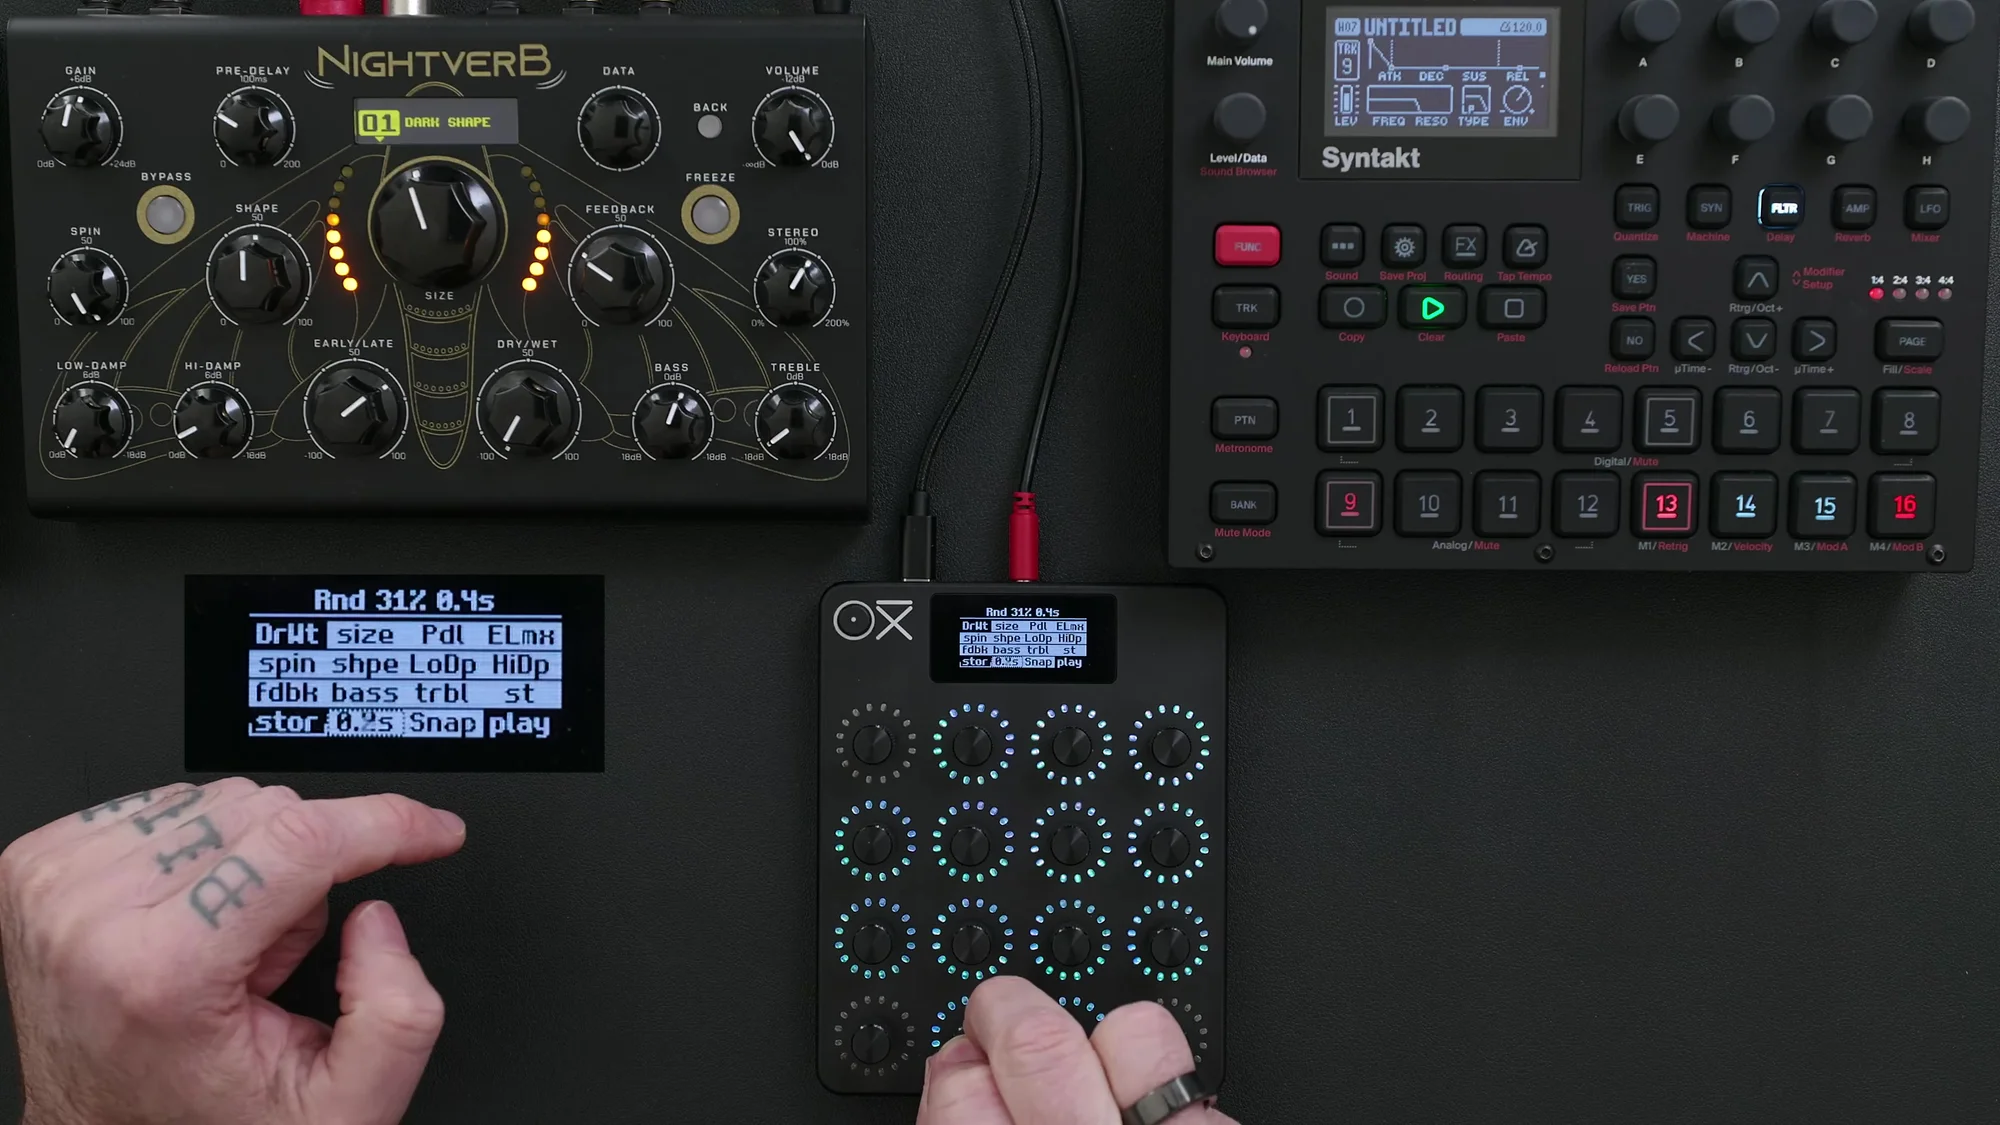
This is perfect when you want more fluid, smooth variation. Even in a live performance, it lets you create a natural transition rather than an abrupt change.
Store
Store is a feature that lets you temporarily save and recall a "good state" you found through randomization.
Usage
Assign Store to an encoder (Special → Store)
When you find a setting you like, press and hold the Store encoder → it's saved
Try another randomization
Press the Store encoder → you're back to the saved state
The workflow of repeatedly randomizing and using Store to save each time you find something you like is very practical. You can also combine it with Snapshot, using a Store-saved state as a safe "way back" while you freely explore with randomization.
Recording
Recording is a feature that records encoder movements and plays them back as a loop. It's intentionally designed to run asynchronously, with each encoder having its own independent loop buffer and loop length. This produces organic, human-feeling movement.
Recording Steps
Press Shift → the recording encoder lights up red (you can also assign a dedicated encoder: Special → Rec)
Press the recording encoder → it arms for recording
Start moving an encoder → recording begins
Shift + the recording encoder → recording stops → loop playback begins
Recorded encoders show a dot next to their number on the display. Record again to overwrite or add to it.
When you want to stop playback, it's handy to assign Play/Pause to the press action of any encoder (Special → Play Pause).
If you record the movements of multiple encoders at different times, each loop plays back independently, producing complex, ever-evolving modulation patterns.
Mute
You can also assign Mute to an encoder's press action. In the video example, mute buttons were combined with the volume controls on the mixer page to toggle tracks on and off.
You can check which tracks are muted by the bar next to the track number on the display. When the bar is showing, the track is on; when it's not, the track is off.
Making the Most of the OXI App
The E16 works completely standalone, but using the OXI app makes building scenes far more efficient.

What you can do in the app:
Check for firmware updates
Load and create instrument definitions: download per-instrument MIDI CC maps or build and save your own
Create and edit scenes: build your mappings efficiently on a large PC screen
Save and import scenes: save them on your PC and load them into the E16
You can map on the E16 itself, but when you're setting up a large number of controls, the app is overwhelmingly faster.
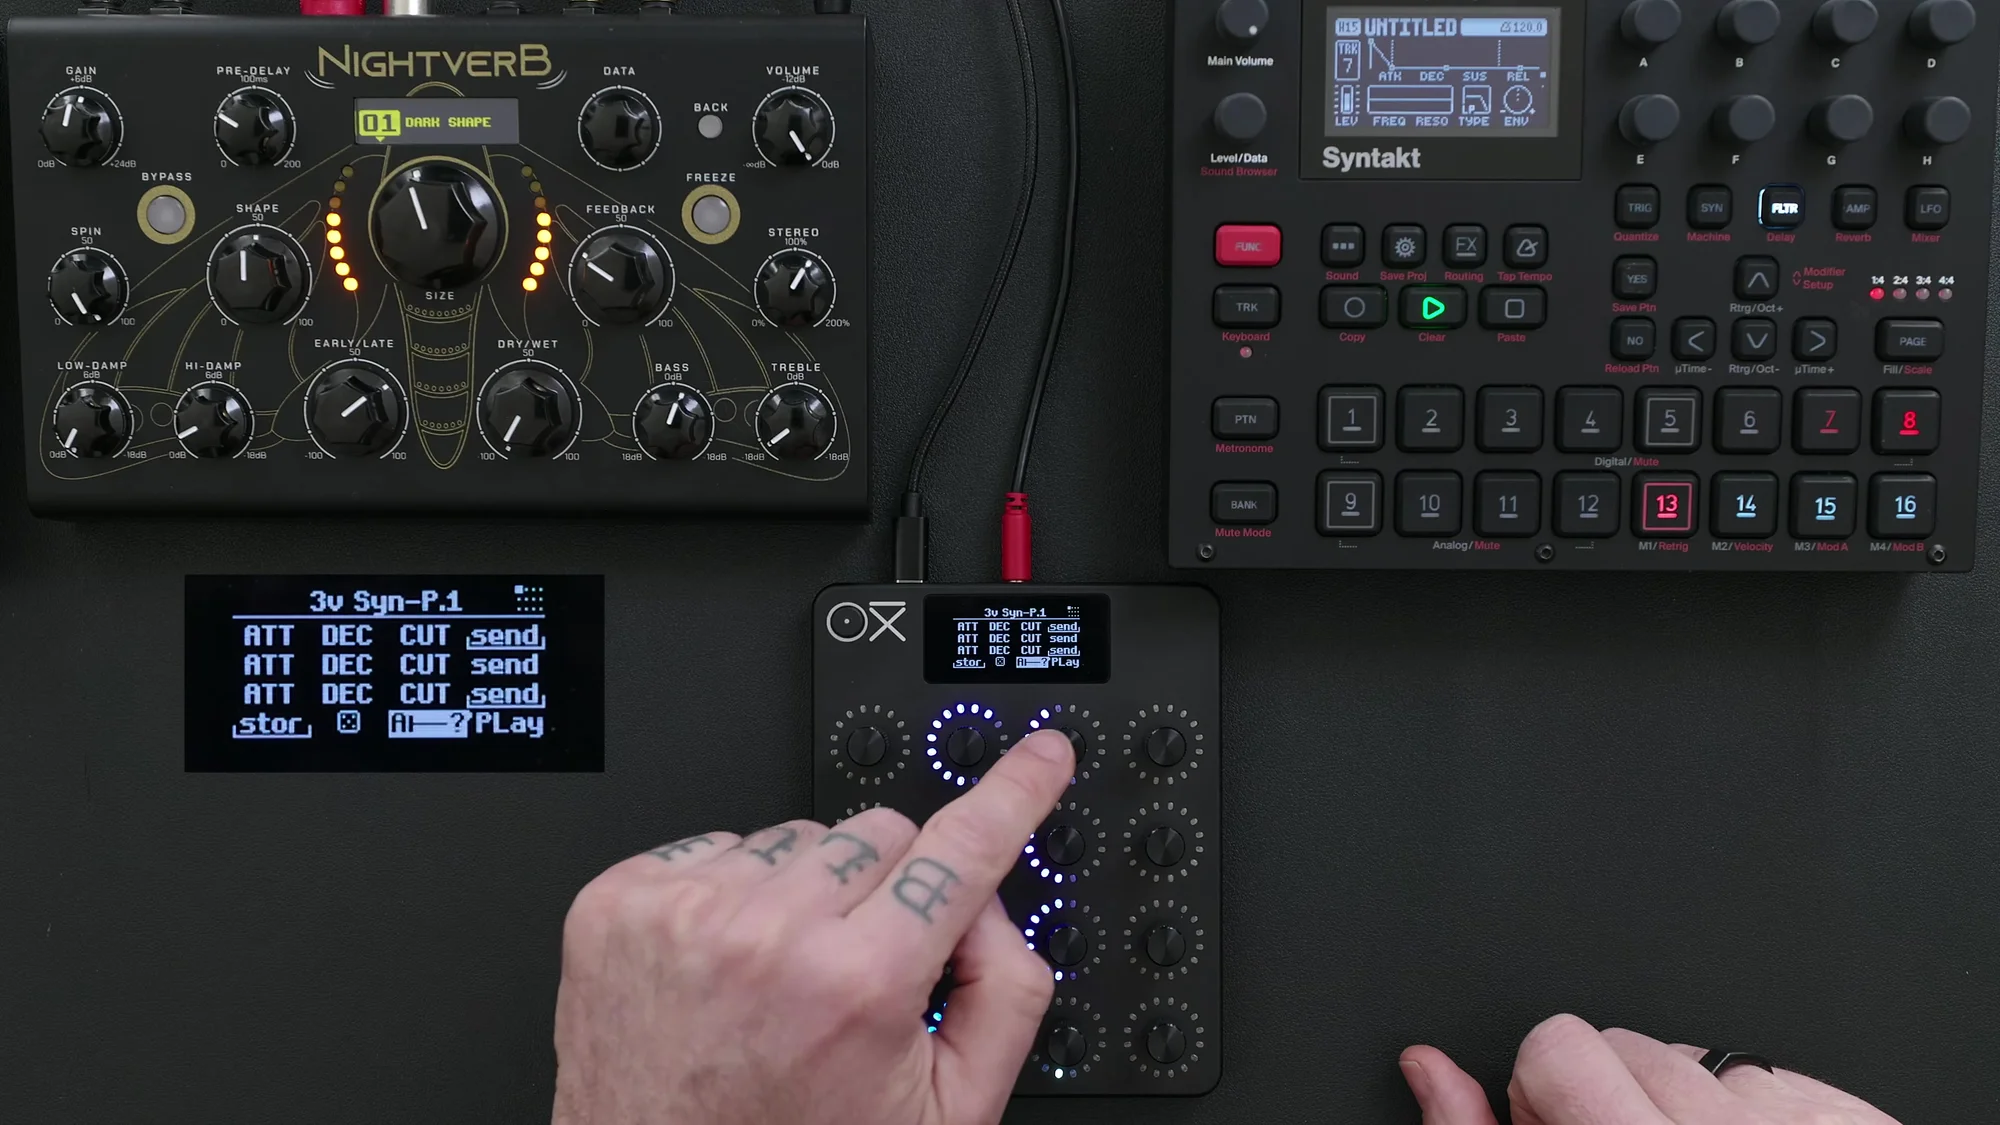
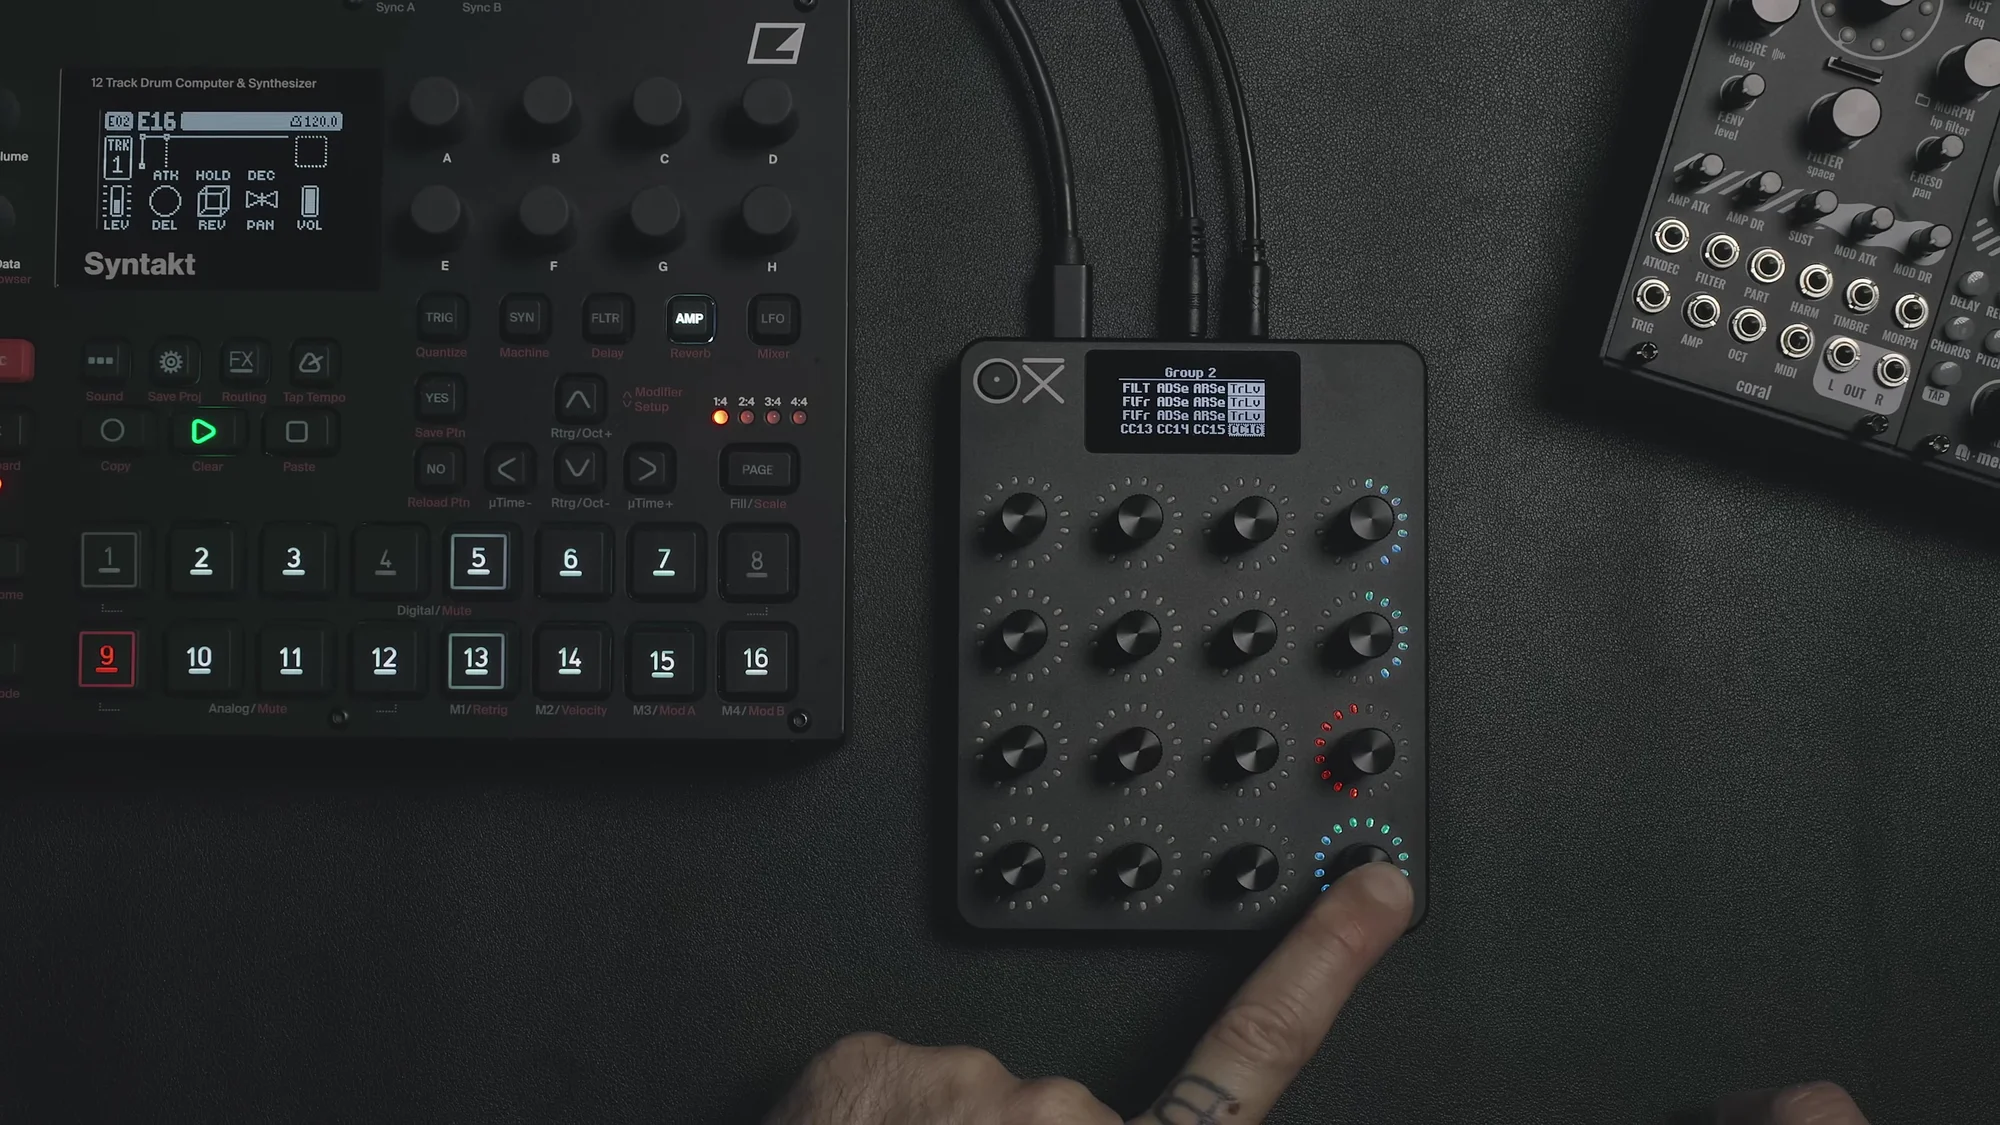
Practical Setup Examples
Here's a summary of the setup examples shown in the videos.
Basic Setup (Paired with the Syntakt)
An example with the parameters for three tracks grouped onto one page.
Each row is one track (e.g., Track 9, 10, 11)
Encoder layout per track: Attack → Decay → Filter (Swap: Cutoff/Resonance) → Send (Swap: Delay/Reverb)
Swap Destination doubles the number of controls within a single page
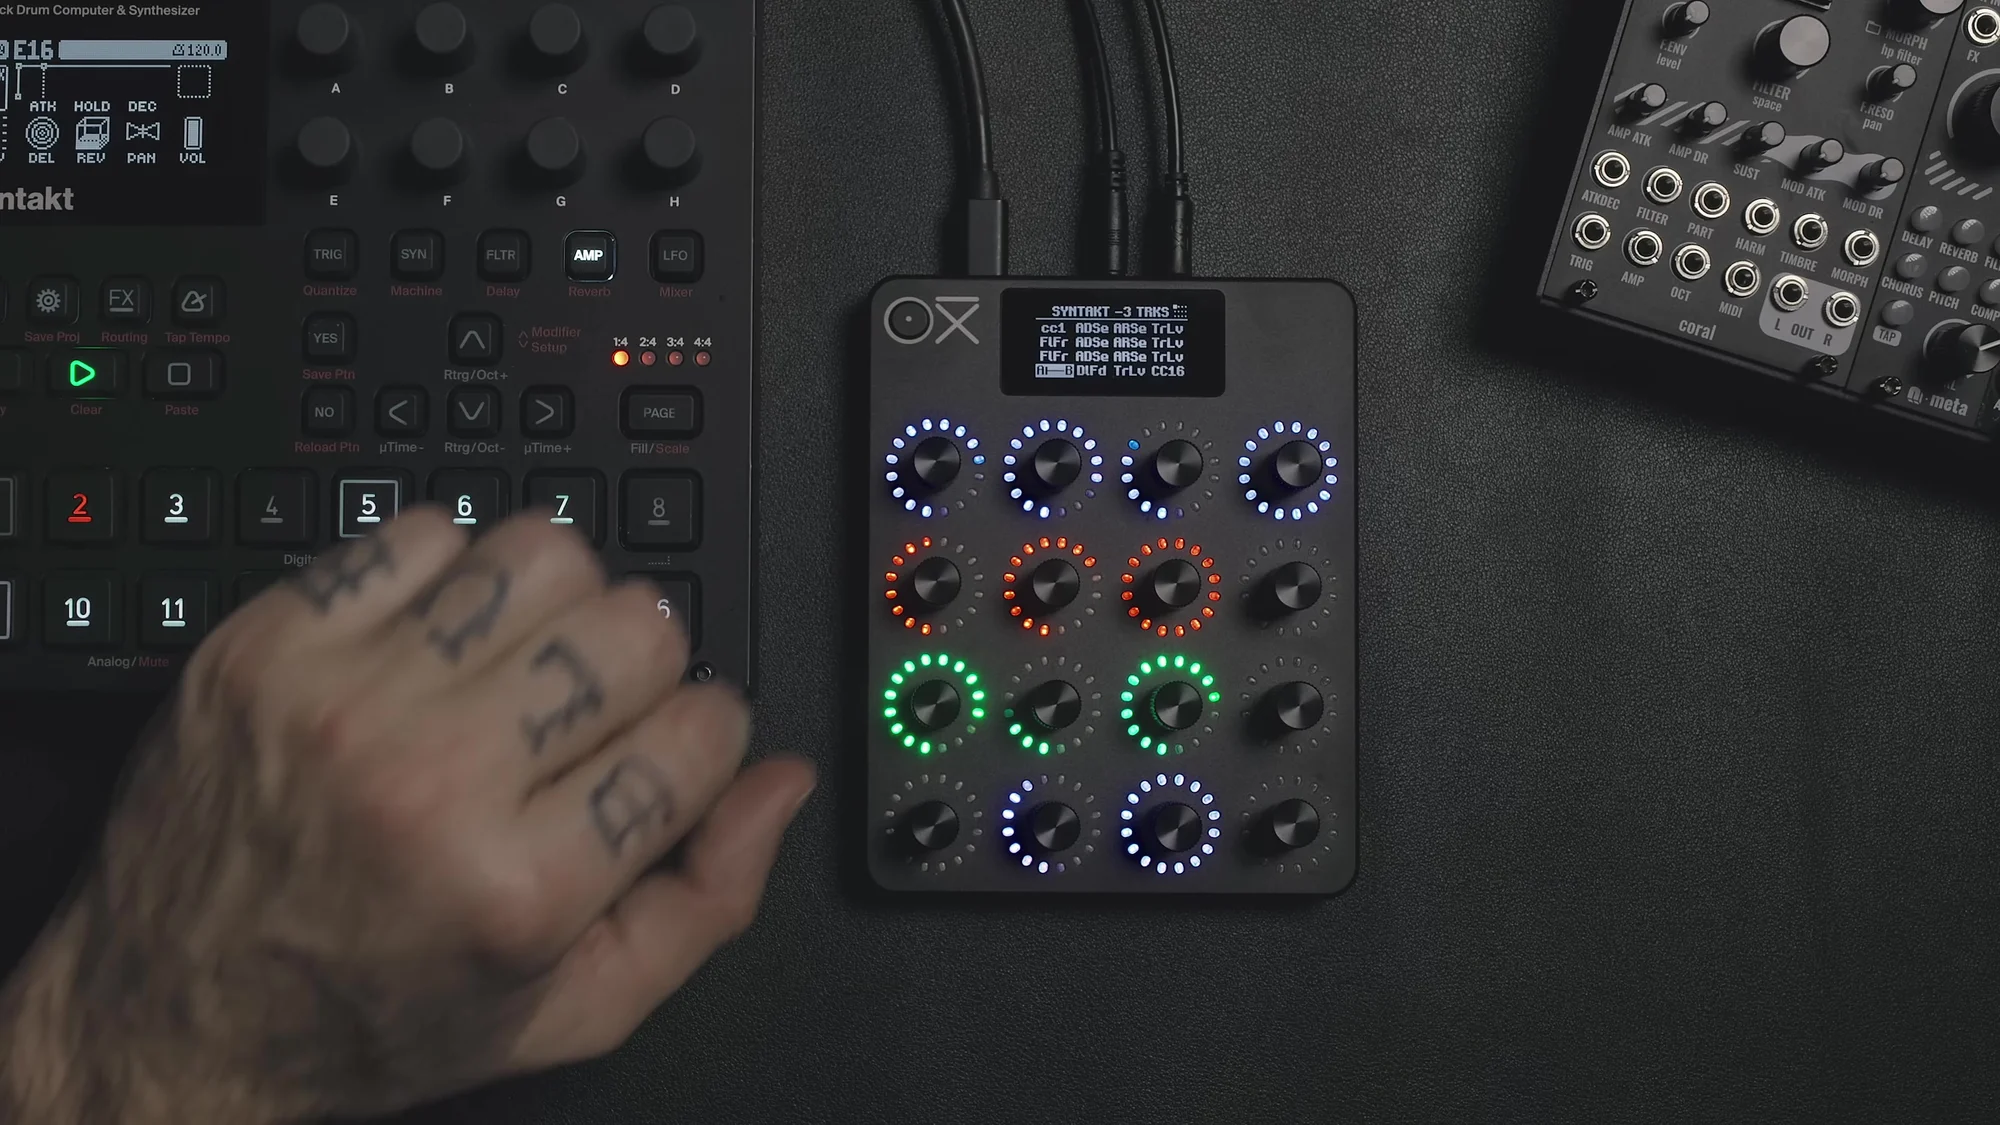
Full Setup (Syntakt + Night Verb)
A complex setup integrating 12 tracks plus effects.
Page 1: send amounts for 12 tracks + Night Verb dry/wet + randomizer + snapshot + recording
Page 2: filters for 12 tracks (Swap: Cutoff/Resonance)
Page 3: mixer (volumes for 12 tracks + mute buttons)
By organizing pages by parameter type like this and making use of Swap Destination and Grouping, you can build an environment where even complex setups are intuitive to operate.
Practical Tips
Here are a few tips.
Making the Most of Swap Destination
Assign pairs of frequently used parameters (Cutoff/Resonance, Delay Send/Reverb Send, etc.) to a single encoder with Swap
Color-code the LEDs so you can see at a glance which destination is currently active
Using Snapshot Effectively
Save a "safe state" to State A before a performance
Freely change the sound during the performance, knowing you can always return to A
There are good sounds hidden in the morph positions between A and B too
Randomization Workflow
Randomizing effects parameters is especially effective
I recommend starting the randomization amount at around 40%
Exclude parameters you want to control yourself, like dry/wet
Save settings you like with Store → explore freely → recall whenever you want
Use the morph timer to create smooth transitions rather than abrupt changes
Making the Most of Recording
Asynchronous loop playback creates natural modulation
Recording multiple encoders at different times gives you a polyrhythmic effect
It's especially effective on filters and send amounts
Making the Most of Autosave
Turning on Autosave in the system settings automatically saves your progress
This is especially useful when setting up before a live show
That's it for EP.1. The OXI E16 has the potential to be a performance tool that goes beyond the boundaries of a mere MIDI controller. By combining features like Swap Destination, Snapshot, Grouping, Randomization, and Recording, you can achieve expression that goes beyond the usual limits of MIDI.
OXI E16 Product Details
You can find the product details for the OXI E16 below.
